DIY PVC Shoe Rack Storage Idea
Large PVC pipe can be used to help organize your family’s shoes with this simple PVC shoe rack design. Gain more floor space and help declutter your home with this simple DIY project.

Freestanding Shoe Holder Design
Build a freestanding shoe holder near your front door as a creative way to store your shoe collection. If you are like us, then you are in a constant battle with shoe clutter. We have a closet-turned mudroom cubby near our garage and a simple wood shoe organizer in our garage.
But we still needed more places to store our family’s shoes. In our laundry room, we don’t have much space but we have a dead corner that is too small for any other DIY project. We decided it would be a great place to build a PVC pipe shoe rack.
*Disclosure: I only recommend products I would use myself and all opinions expressed here are our own. This post may contain affiliate links that at no additional cost to you, I may earn a small commission. Read our full privacy policy.
Best Cement Or Glue

We used Gorilla Glue maximum adhesive and it worked really well. You can also use Loctite pl 400 to act as a PVC cement.
How deep should the shoe rack be?
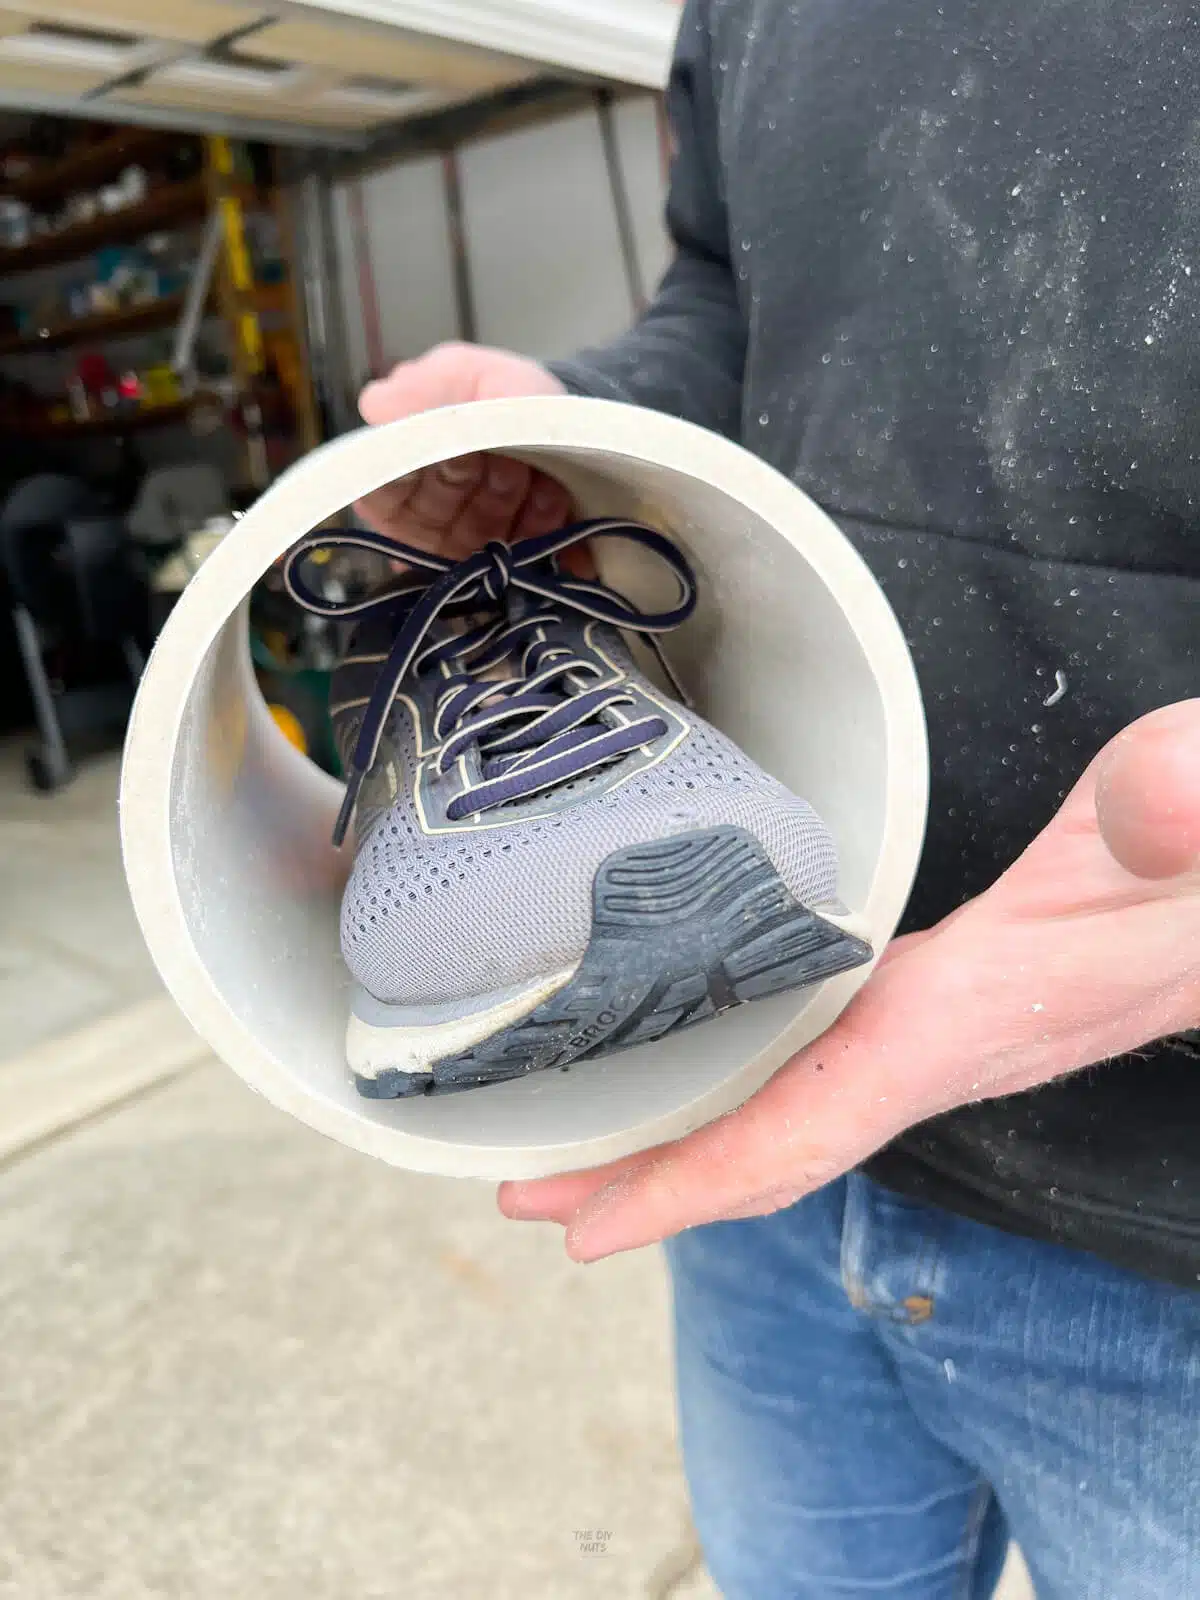
Shoe racks normally range in depth from 11” to 14”. For cost-efficiency we made ours 11” and my husband’s shoes fit perfectly in there and he is a size 10.5.
How many pairs of shoes does our rack hold?
Our triangular freestanding shoe holder can hold up to 8-11 pairs of different types of shoes. We have 9 slots where some spots can hold a pair, while other slots are better with just one shoe. We also have two dead spaces against the wall where we can put a pair of flip-flops.
It depends on how smooshed you want your shoes to be. A pair of flip-flops can have both shoes in there and tennis shoes. You might just want one pair in each PVC pipe.
What size PVC to use for a shoe rack?
We went to Home Depot with a pair of our biggest shoes to help us determine the size. We felt a 6-inch PVC pipe was a good size and a great way to store all of our shoes.

Where can you buy PVC pipe?
We ended up getting our 6” PVC pipe at Menard’s after seeing that our local Home Depot did not have the 6” in stock that day.
How much did it cost to build a shoe organizer?
Don’t be shocked at the price of the large PVC pipe. It ended up costing us around $75 to build the complete shoe rack, but we now have a custom storage solution that finally gives us more floor space.
Honestly, I thought this DIY project would have been cheaper, but we are still happy with our new shoe rack. Concrete forming tubes may also be a good idea and a little cheaper with the same type of feel.
Recommended Supplies
- 10’ PVC Pipe (width 6” Schedule 40 PVC pipe that is foam filled)
- Pencil
- Gorilla Glue Construction Adhesive or Loctite pl 400
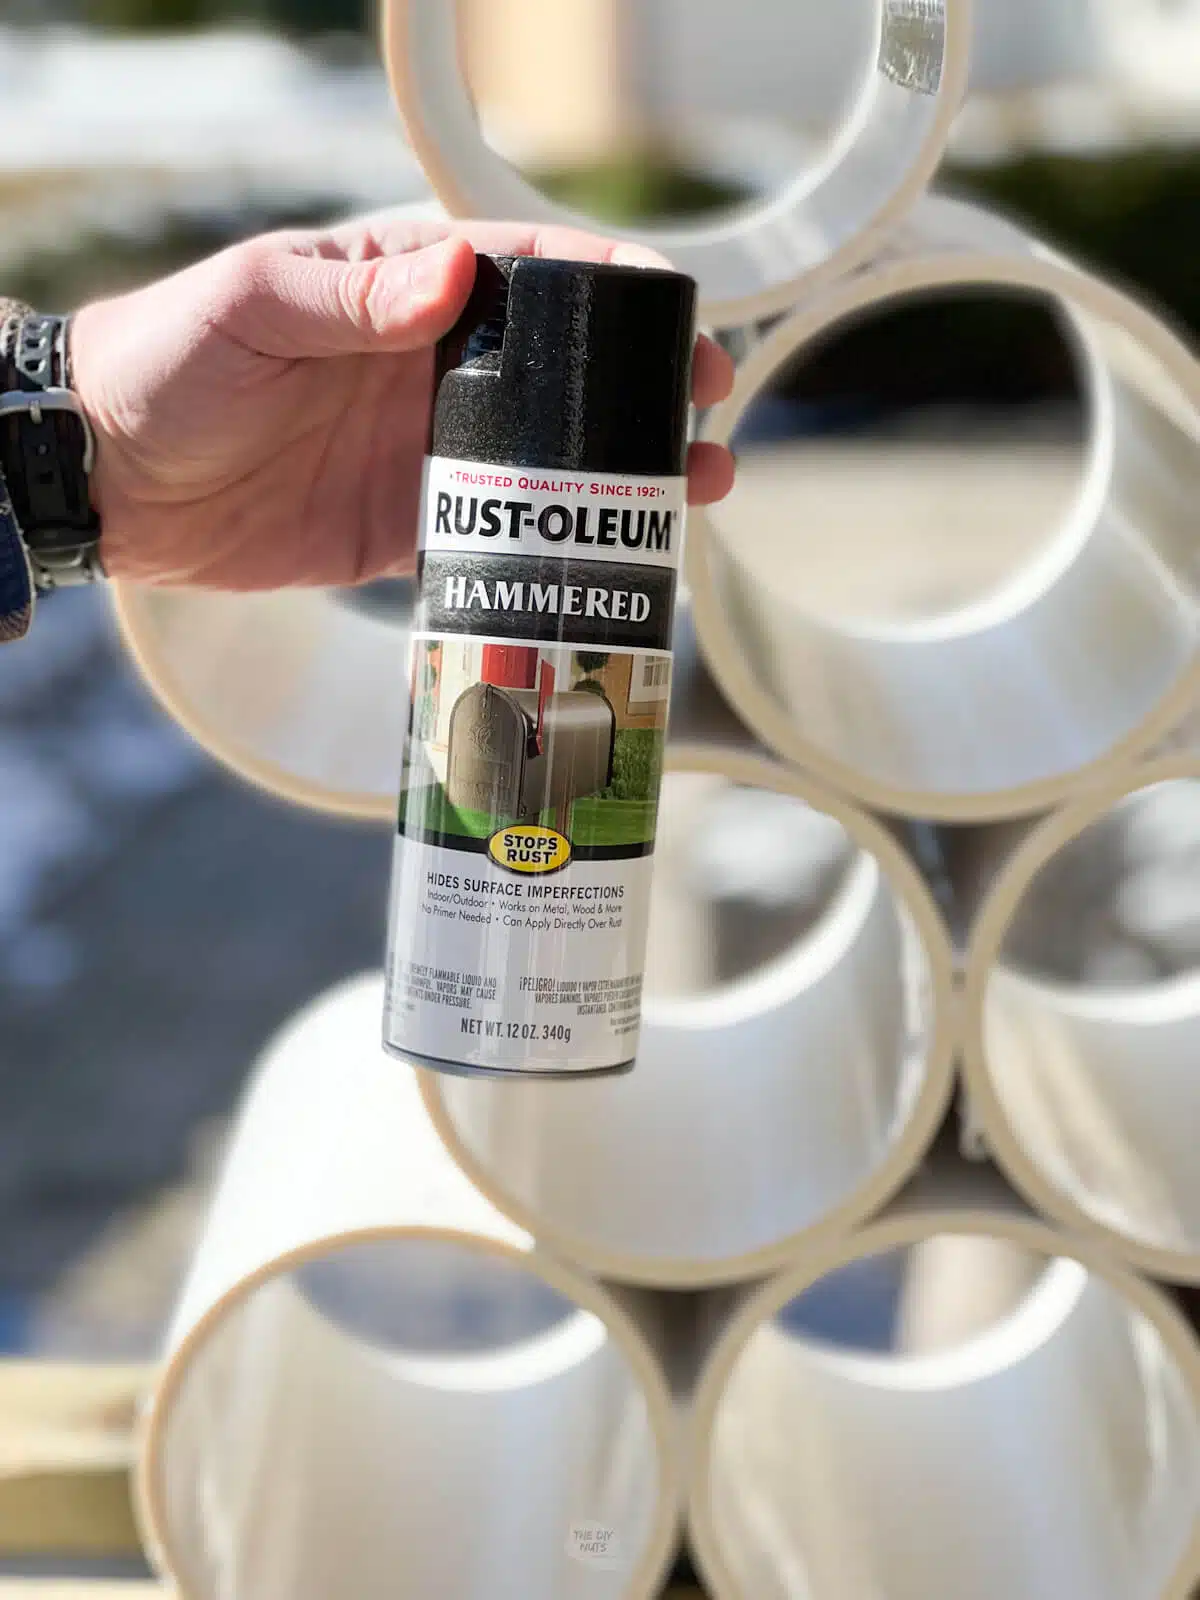
- Spray Paint (we used a Hammered finish with primer built-in to help hide any imperfections)
- Miter Saw or hand saw
- Clamps or 2 x 4 with weight to help put pressure on when drying
Do you have to cut your own PVC pipe?
Some stores may cut the PVC pipe for you. Since we have the tools we were just going to do it ourselves. It doesn’t hurt to ask as it would make this DIY project a little easier and easier to transport the number of pieces in your car.
Decide On Your Shoe Rack Design
- Where are you putting your PVC shoe rack?
- Is it completely freestanding?
- Will it go up against a wall like ours?
- How many pairs of shoes do you want it to hold?
- What depth do you want each pipe to be based on shoe size?
- Determine the shape, size, the geometric pattern you want your shoe rack to be

How to build a PVC shoe rack
Step 1: Use a tape measure and a permeant marker to mark length.

Step 2: Cut the pipe to length. Each section was cut to 11” for ours. We used a miter saw but you can also use a regular hack saw. When cutting the 6” diameter with a miter saw you have to cut and rotate to get all the way through.

Step 3: Use 80 grit sandpaper to clean up the pipe and edges at cuts.
Step 4: Clean PVC pipe with sponge and Dawn dish soap. We did this in our bathtub and let them completely dry. The adhesive and paint will stick better to

Step 5: “Dry fit” pieces together to make sure you are happy with the shape and size of your shoe rack. Mark where pipes touch with a pencil.

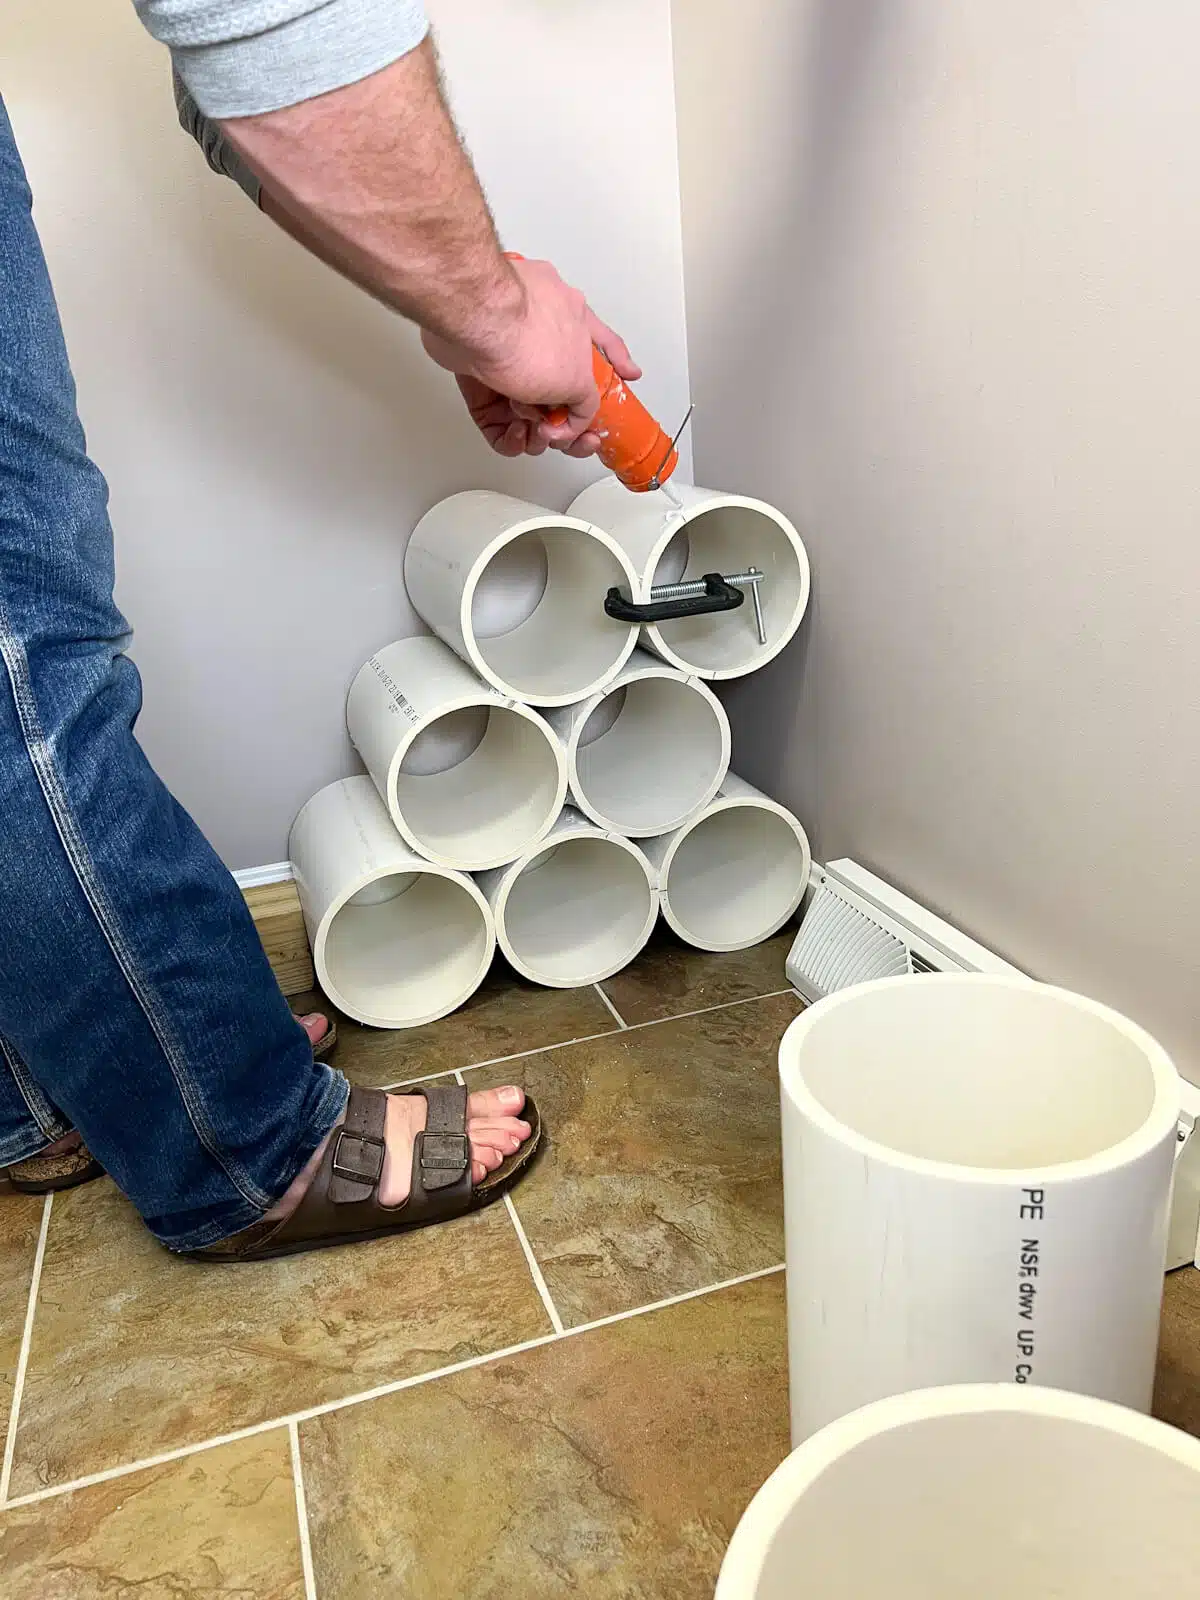
Step 6: Using construction adhesive (we used this Gorilla Glue) to put the pipe together. Put a line bead line in between each place the pipes would touch.

Step 7: You will need to prop or use clamps to keep it together while the adhesive is drying. We had a piece of wood against our dryer to hold the bottom against the wall and clamps on the other pieces.
Tip: use your finger to create clean lines on the parts where you may see the adhesive.

Step 8: Let the construction adhesive dry overnight. Use a small razor blade to clean up any extra glue.

Step 9: The next day spray paint the new shoe shelf with the spray paint and the color of your choosing. Don’t be scared to showcase your personality with different colors.

Follow us on Pinterest, Youtube or Facebook for more DIY inspiration!

DIY PVC Shoe Rack

Equipment
- Miter saw
- Sharpie
- Tape Measurer
- Pencil
- 80 Grit Sandpaper
Supplies
- Construction Adhesive
- PVC Pipe 6″
- Spray Paint finish and color of your choice
Instructions
- Use a tape measure and a permeant marker to mark length.
- Cut the pipe to length.
- Use 80 grit sandpaper to clean up pipe and edges at cuts.
- Clean PVC pipe. We did this in our bathtub and let them completely dry. The adhesive and paint will stick better to
- “Dry fit” pieces together to make sure you are happy with the shape and size your shoe rack.
- Use construction adhesive to put the pipe together. We used one bead line in between each place the pipes would touch.
- You will need to prop or use clamps to keep it together while the adhesive is drying. We had a piece of wood against our dryer to hold the bottom against the wall and clamps on the other pieces.
- The next day spray paint the new shoe shelf with the spray paint and the color of your choosing. Don’t be scared to showcase your personality with different colors.
Notes
- Each section of pipe was cut to 11” for ours.
- We used a miter saw but you can also use a regular hack saw. When cutting the 6” diameter with a miter saw you have to cut and rotate to get all the way through.
- Hammered spray paint will give a textured look and may hide imperfections.