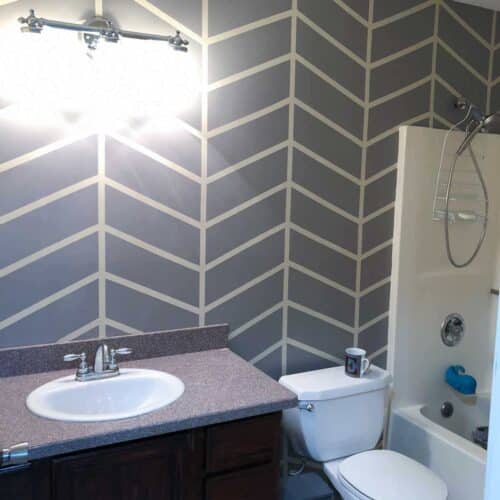
DIY Painted Herringbone Accent Wall
Learn how to paint a herringbone pattern for a cheap small bathroom makeover.
Print Tutorial
Equipment
- Pencil
- Ruler or Tape Measurer
Supplies
- 1″ Painter’s tape this is the best brand to use for these designs.
- Wall Paint In The Color Of Your Choice
Instructions
- Decide on your design and the dimensions between the lines.
- Tape vertical lines 12" apart. Use a level or measure in 3 spots to make sure you are taping a straight line.
- Measure 7" down from the ceiling on every other line and mark with a pencil.
- Continue to measure 7" down from the mark or ceiling.
- Create a diagonal line from each 7" mark. Repeat until design is complete.
- Press the tape on with fingernails, old credit cards or clean foam roller.
- Use a color of your choice and a small foam roller to paint at least 2 coats of paint. Use a paint brush to trim out the edges of the wall.
- Once the paint is dry, pull the tape off the wall starting with the diagonal lines.
- Continue untill all the tape is off. Touch up the paint as needed.
Notes
- Make sure you use high-quality painter's tape for clean and crisp lines.
- To help with bleeding paint, there are a few different ways you can try to "seal" your tape on the wall. One of the most common ways is to paint a thin layer of the base color over the paint. You can also try to use an old plastic card, clean foam roller or your fingernail to make sure the painter's tape is on well.
- You can modify this design to fit your space and personal preference. Practice tape on a floor or tagboard first to get the spacing you like.
Cost: under $40