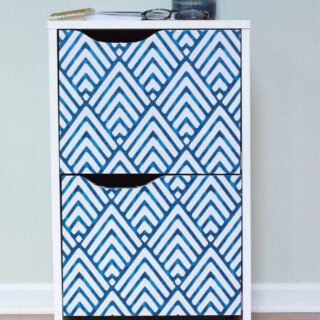
How To Makeover A File Cabinet With Contact Paper
This inexpensive file cabinet makeover uses spray paint and contact paper.
Print Tutorial
Equipment
- 220 Sandpaper optional
- Deglosser
- Rag
Supplies
- Painter’s Tape
- White Spray Paint with Primer Built-in
- Contact Paper
Instructions
- Make sure drawers are clean and dust-free.
- Cut small strips of contact paper to cover drawer edge.
- Carefully stick one part on the drawer edge. As you pull the backing off you need to make sure you are using your fingers to push out any air bubbles.
- You may need to cut small slits in the back of the paper to get contact paper to lay nicely.
- Cut a piece of contact paper larger than the drawer front.
- Starting on one side, stick the contact paper on the edge and cover the drawer. Push the contact paper on as you go from one side to the other.
- Wrap edges around the back of the drawer edges.
- Trim extra contact paper with exacto knife.
- Repeat for the second drawer.
- Remove drawers and take file cabinet box outside.
- Prep areas you do not want painted by covering wiht painter's tape.
- Lightly sand any rough spots.
- Wipe surface with a deglosser. Make sure your file cabinet is clean and dust-free.
- Use a spray paint with a primer built in and spray first coat of paint. Let fully dry.
- Continue to paint 2 more coats with drying time in between. Let paint dry overnight.
- Put your file cabinet back together.
Notes
- If your file cabinet does not come apart, you will want to spray paint before covering the drawers with contact paper.
- Use large sweeping motions when spray painting.
- When applying contact paper, rub your nail or piece of cardboard or old credit card on all edges to make sure that you made the contact paper stick.
Cost: Under $20