Pouring DIY Concrete Counters In Place (+ Learn From Our Mistakes)


If you our considering DIY countertop options then this article is exactly for you. We documented our whole experience to help you learn how to pour a DIY concrete countertop in place (and a few mistakes to learn from along the way).

There are two ways you can choose to do your DIY concrete counters. We chose to build the form in place and pour right on our basement bar. We will show exactly everything we did (the good and bad) so you can be as successful as possible in your DIY.
Considerations
When deciding whether or not you should pour your concrete counters, there are a few things to consider.
- Level of comfort working with concrete. While this project seems easy, there is some nuance to working with concrete.
- Ability to lift and pour concrete. Even just a 5-gallon bucket of concrete can weigh a decent amount. You want to consider if you can do this without hurting yourself.
- Location of counters. Getting perfect concrete counters can be difficult. For our basement wet bar, we were completely fine with imperfections so it was a good route for us.
Pros and Cons Of Pouring In Place
Another thing you need to ask: Do you want to pour the concrete in place or build molds in another location and then install them?
Pros: This specific project was for a small wet bar in our basement. If we had made the bar top in our garage and then carried it down our basement steps we would have had to carry a slab that weighs approximately 800 pounds
Cons: It is best to buy premade molds. If pouring upside down and then bringing in, you can make your own molds with cheaper materials.
Recommended Materials
*Disclosure: This post may contain affiliate links that at no additional cost to you, I may earn a small commission. Read our full privacy policy.
Notes About Supplies
- Silicone caulk is used to seal the corners of the form.
- Instead of chicken wire, you can get fiberglass mesh or ‘hair’ as well.
- You need to use sand and top mix only because you do not want larger stones in the countertop mix.
- Burlap and plastic drop cloths are used to wet-cure the concrete. You can also use damp towels instead.
Tools Needed
- Measuring buckets (can be found in a hardware store paint section)
- Clean 5-gallon buckets
- Hand float (concrete float)
- Steel trowel
- Marginal trowel
- Jigsaw & Blade
- Tape measure
- Straightedge or Level
- Pencil/pen/permanent marker
- Drill
- Hole saw
- Drill motor and mixing bit
- Tin snips
- Palm sander
- Extension cord
- Gloves and safety glasses
- Miter saw
- Spray bottle
Safety Tip: Concrete is very basic (acidic vs. basic) and will burn you if left on your skin and will not burned off.
Other Design Factors To Consider
- Determine the type of edge you want for your concrete countertop (bullnose, square, angled, etc.)
- Determine if you can make the edge form yourself or buy your edge forms pre-made as we did.
- Determine the color and finish you want your countertop to have.
- Our color is white base mix with a dark gray powder added in.
- Figure out the size (length x width x height/depth) and convert it to cubic feet.
- You can use this concrete calculator here to help determine the number of concrete bags needed.
How To Make DIY Concrete Counters
Before You Begin
Build your cabinets or form. We started with the bar or cabinets already framed. This how-to is only for building a countertop on a sturdy structure.

Building Forms
Step 1: Cut Cement Board To Size
Use a jigsaw to cut cement board to size.
- Our countertop area has a sink so we flipped the sink over and marked it out.
- Triple-check your measurements for the hole in the sink.
- Our sink instructions told us to have the hole 0.75” smaller than the size of the topside of the sink.

Step 2: Place Cement Board Over Framing
The cement board will not carry a lot of weight. Make sure it is properly supported or framed out. You do not want the cement board or your concrete countertop to sag or flex.

Step 3: Make Joints Watertight
Put the tape at the joints or seams of the cement board to try to make them as watertight as possible. This will help make your clean-up easier.
Step 4: Cut Edge Forms To Size
Once the cement board is installed, measure and cut the forms with a miter saw.

Step 5: Attach Edges To The Board

Use pan head screws to attach the edge form to the cement board. Tape the seams. After doing this, I don’t think it was necessary.

Step 6: Add Mesh

Mixing & Pouring Concrete
Step 7: Set-Up Mixing Station
We mixed ours in our driveway so we could hose down the area after we were done.
Step 8: Mix Concrete
- Pour the instructed amount of water into a 5-gallon bucket from the measuring container
- Add ½ of the bag of cement
- Mix with a drill motor
- Add water per instructions
- Add color pack (if used)
- Mix
- Add water
- Add the rest of the concrete bag
- Mix with a drill motor

You want the consistency to be “flowable” but not soupy, just a little more wet than packable.
Step 9: Wet Cement Board
Using a spray bottle spray the cement board with water.
Step 10: Pour Concrete
Carry the 5-gallon bucket to countertop site and pour it out of the bucket.

Step 11: Spread Concrete
Using trowels and straightedge work concrete into place.

Step 12: Vibrate Concrete
As you are pouring the bucket out you need to tap the edge form with a hammer. Running a palm sander or sawzall along the outside face will vibrate and consolidate the edge.

Step 13: Repeat Mixing and Pouring
Continue this process until concrete is at the top of the forms.

Step 14: Finish The Concrete

- Start with a straightedge
- Use the gray concrete float
- Then use the steel trowel
- Use the steel trowel once all bleedwater is gone and the concrete is as firm as your palm is when you touch your pinky to your thumb.
- Getting to this point could take 4+ hours.
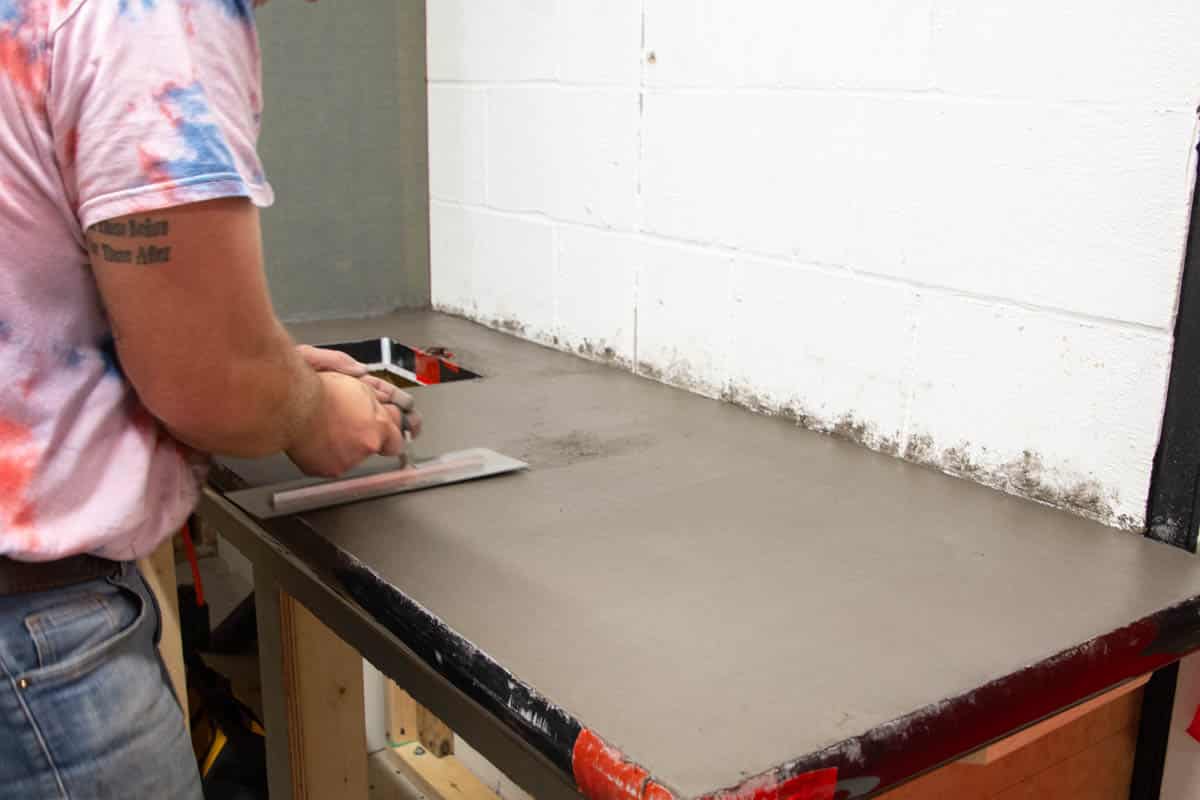
Continue using the steel trowel until you are happy with the surface.

Step 14: Wet Cure The Concrete
Place burlap or old towels over the concrete. Spray them until they are damp and cover the whole thing with plastic for a solid week.

Step 15: Wait A Week
Step 16: Remove Forms
Remove the plastic and snap loose the edge form.

Step 17: Finish The Concrete Countertops
Dry everything off. Use 220-grit sandpaper first to smooth the surface. Finish with 320-grit sandpaper.

Step 18: Seal Countertops
We used a beeswax sealer due to ease and a more natural way to seal our DIY concrete counters. But have ended up with a few watermarks.

Tips
- From bag to bag or mix to mix you want to try to have the amount of water you put in the mix to be as consistent as possible.
- Save some concrete in the bottom of the bucket, spray lightly with water, and cover the top. You might need this as you finish the concrete after you are done pouring.
- Wet curing reduces the chances of anything cracking. You will want to look at what you did or how it is going…don’t. Wait the full week.
- The textured look we have is from the wet curing with burlap. If you don’t like this look you don’t have to use burlap.

Learn From Our Mistakes
Even though this was not our first time working with concrete, we still had some air bubbles.
- Our theory is that the mix was not wet enough and unable to fully get into the corners of the molds. Vibrating your edges should help with this.
- We plan to make a concrete table soon following a similar method and we will keep you posted if we can fix our mistakes.
- We used beeswax sealer, but an epoxy or different resin would probably have been better. There are a few watermarks on the counter.

Check back soon to see how we will finish this area.
Concrete Counter FAQs
Yes, you should seal your concrete counters if you want them to last.
If pouring in place, the biggest con is that you might mess up or have air bubbles. You have to decide if you are willing to take that chance as demoing them to remove is a pain.
Yes, 100%. Even with the imperfections, this was a great way to get a smooth counter in our basement. If it were our main kitchen, I would probably just stick to stone and not take the risk.
Related DIYs
- How To Install An Inground Basketball Hoop
- Our DIY & Budget-Friendly Kitchen Remodel Ideas
- How To Paint Laminate Countertops
We can’t wait to finish this space and share it with you. We are happy with our DIY concrete counters and the industrial, unique look they added to our basement wet bar.