How To Paint A Glass Tile Backsplash With These Simple DIY Steps


Do you want to get an updated kitchen backsplash without tearing out your old one? This budget-friendly, beginner-friendly DIY tutorial is for you. Use our step-by-step tutorial to learn how to paint your glass backsplash tiles in just one afternoon.
This DIY tutorial has been a reader-favorite since it was published in July 2021. I recently updated it with a clearer format in March 2026. And if you were wondering our painted glass tiles still look great after 5+ years!
I honestly cannot believe how easy and quick it was to paint glass tiles. Proper cleaning, prep, and using the right materials will make your painted tiles last. I wish I had done this DIY years ago.

What You Need To Know
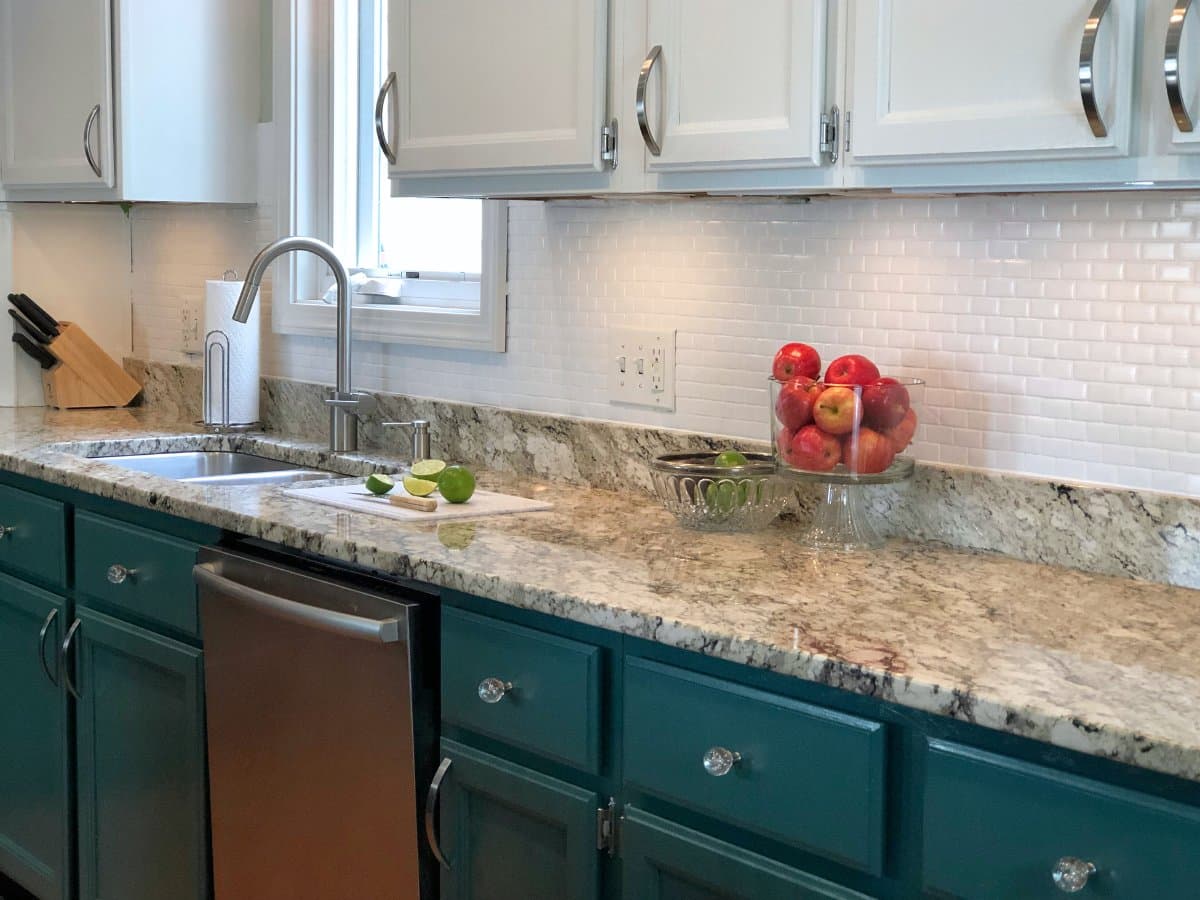
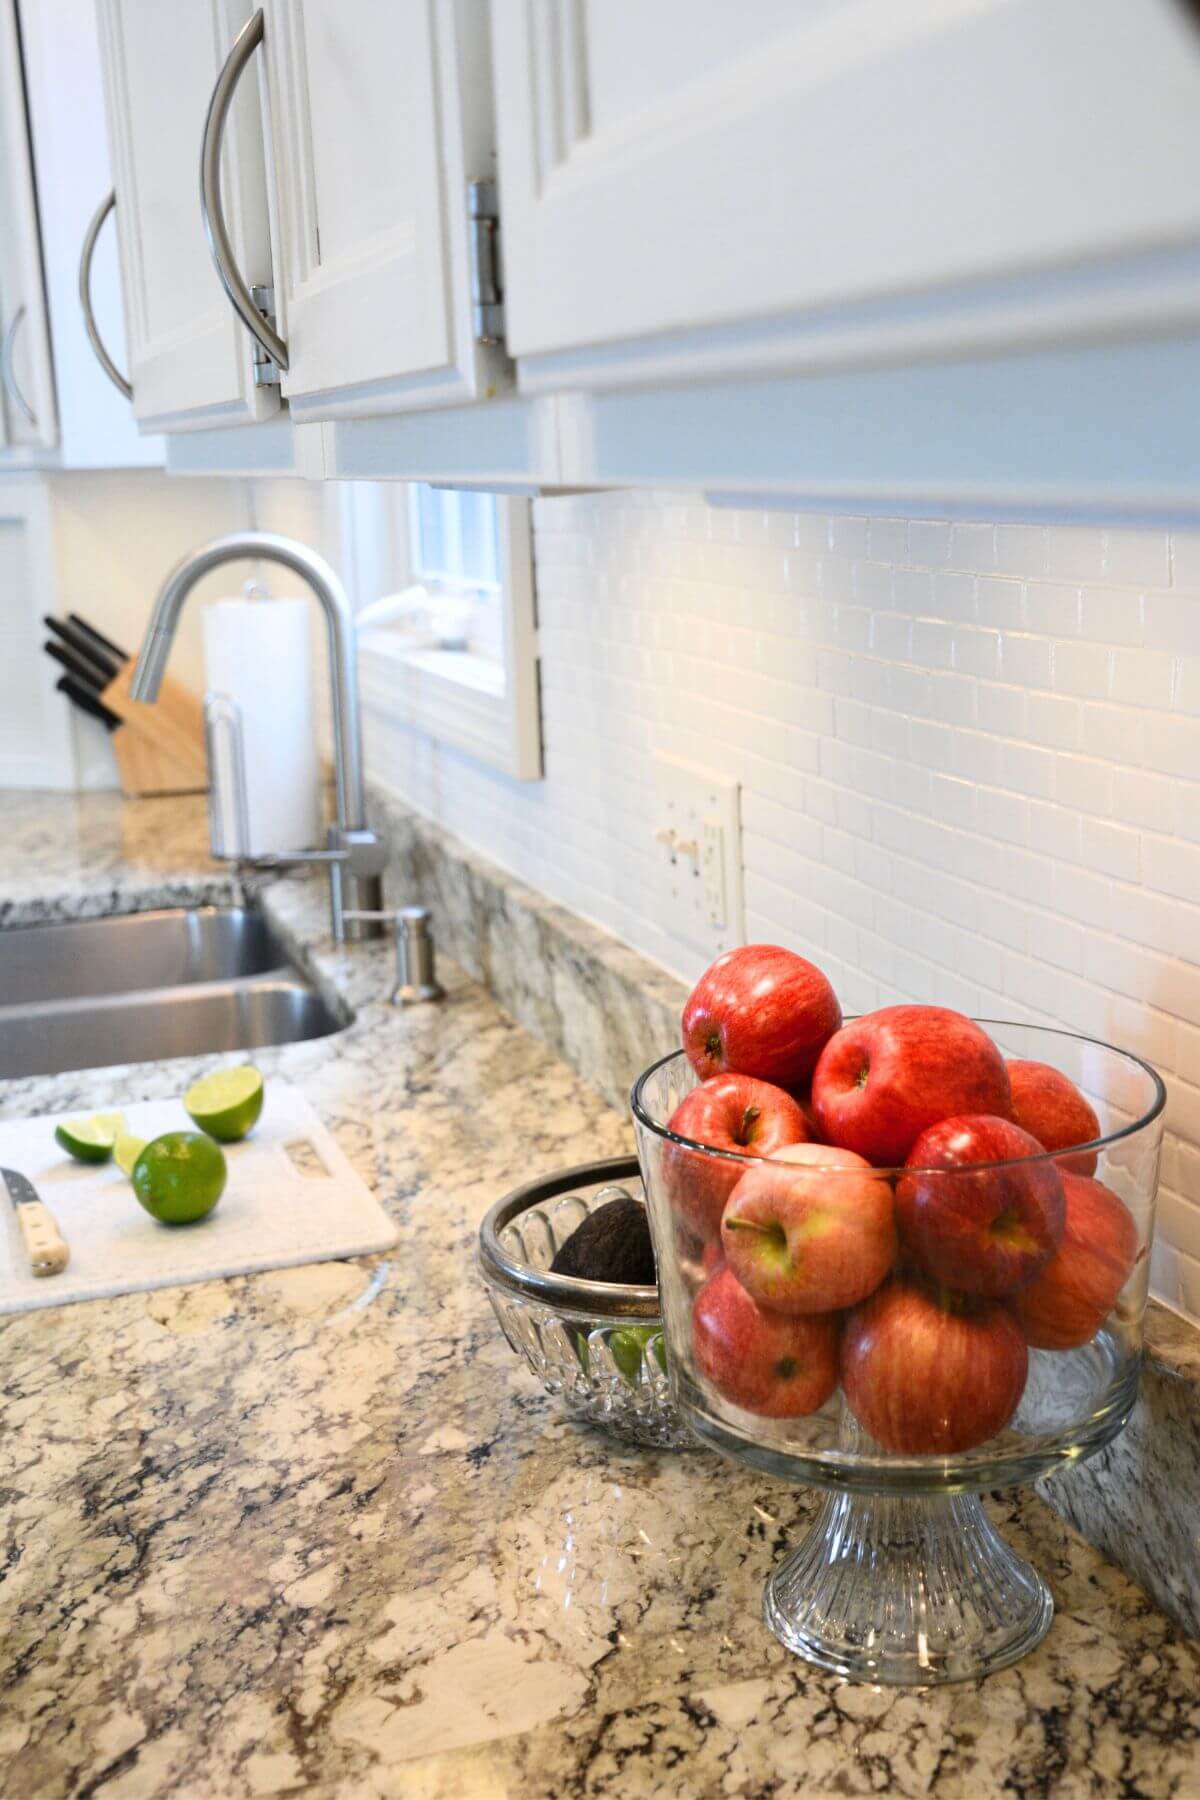
Our “Before” Tile
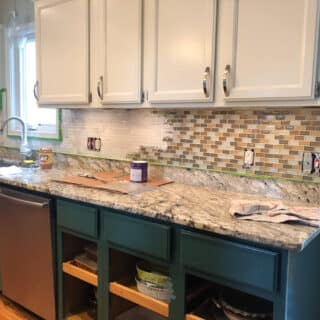
When we first moved into our house, we knew that the kitchen needed some updating (you can see what our kitchen cabinets looked like before painting). Over time, we painted and repainted the oak cabinets white, added a glass kitchen tile backsplash, and installed new counters.
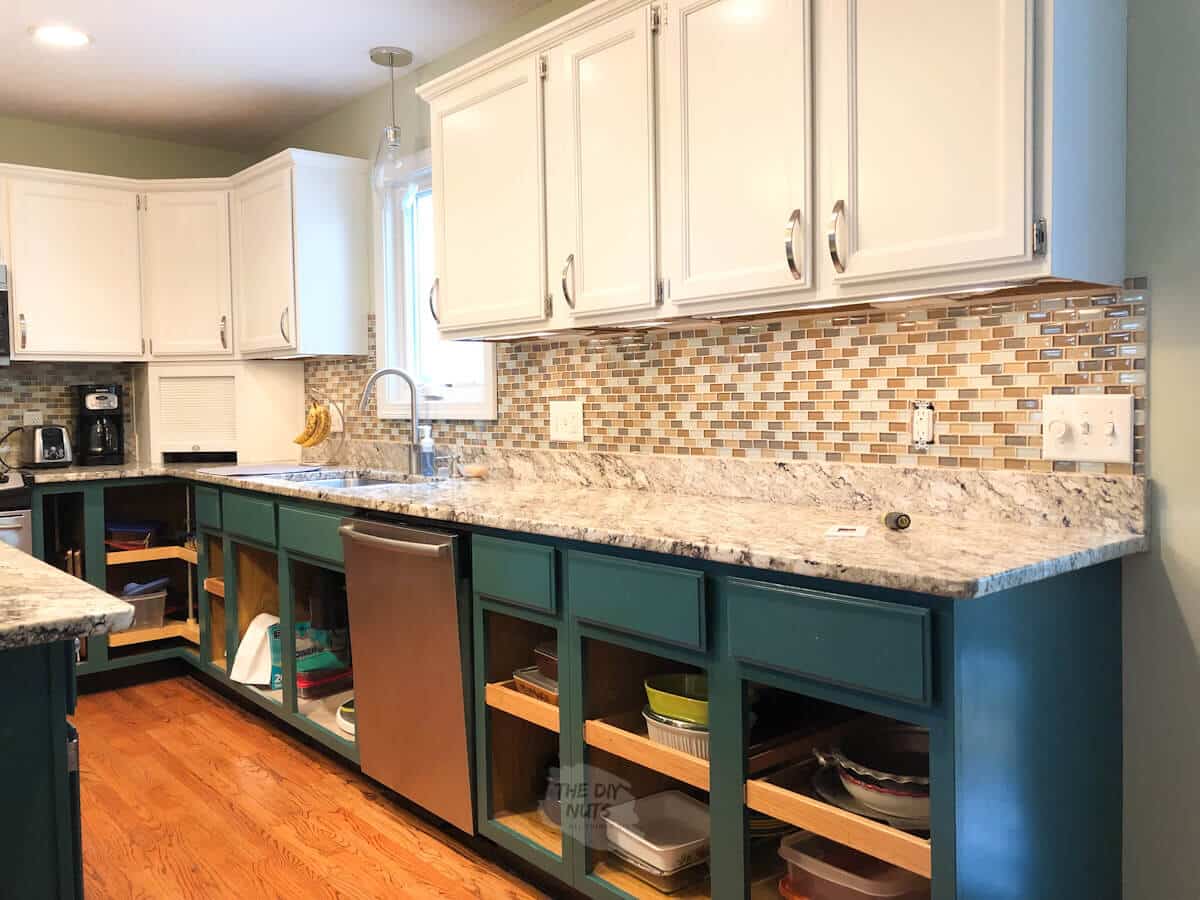
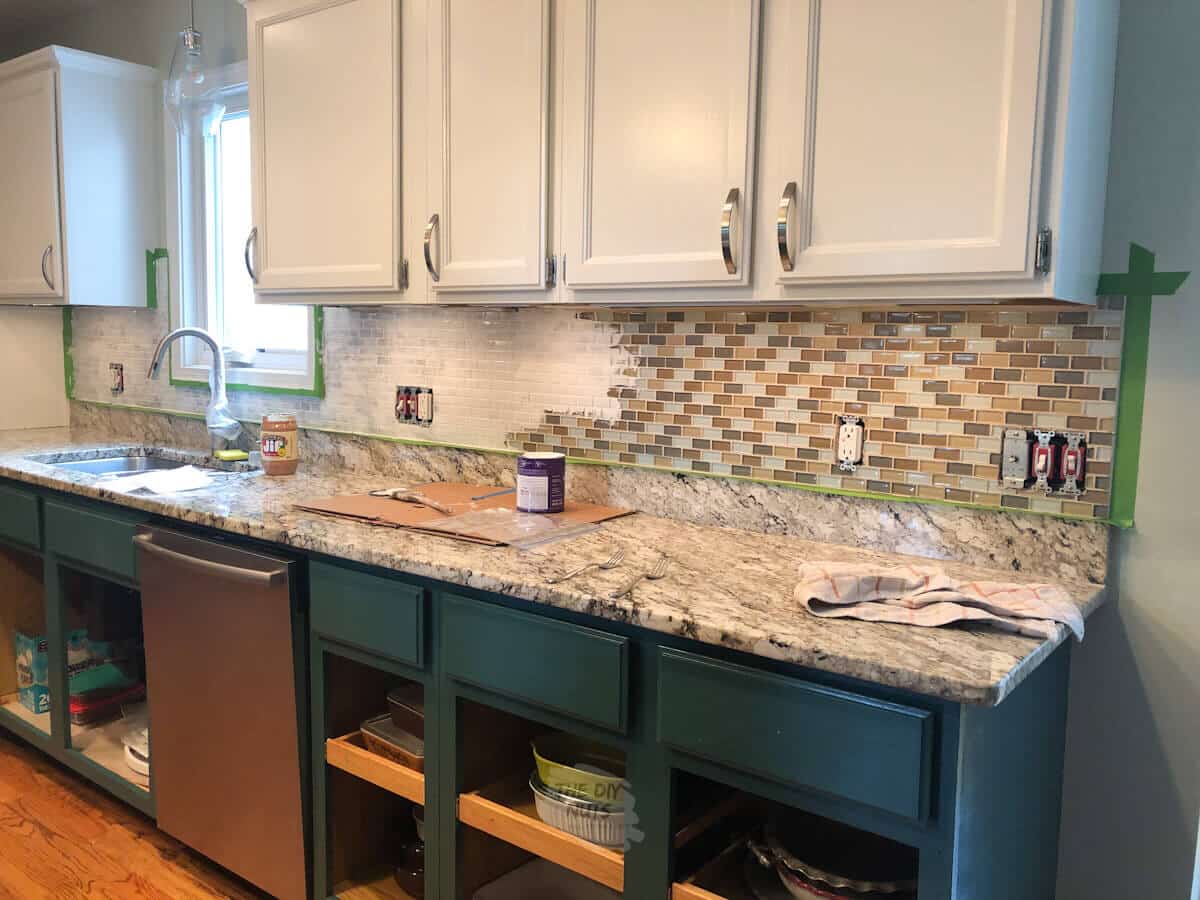
However, 8 years later, the glass mosaic backsplash was totally dating our kitchen. Our kitchen has around 20 square feet of tile. This DIY painting makeover was done in a few 20-30 minute sessions. Waiting for the paint to dry took the project the longest.

Supplies You’ll Need
*Disclosure: This post may contain affiliate links that at no additional cost to you, I may earn a small commission. Read our full privacy policy.
*We used High Reflective White paint for a bright, crisp color.
Simplified printable instructions are at the bottom of this post.
Before You Begin: Decide On Your Paint Finish
- Semi-gloss was the perfect choice for us because it gives the tile a slightly glossy look. We also like using semi-gloss for the trim and cabinets.
- You may want to note that a few readers have told us they wish they had used high-gloss paint for a bit more contrast on their cabinets. It is a matter of personal preference which look you prefer. The only con to using gloss paint is that it will show imperfections a little more than semi-gloss paint.
Other Considerations
- Some people may suggest using epoxy paint. However, this kind of tile paint can be smelly, and who touches a kitchen backsplash compared to other areas in your home? We felt there was no need to use this type of paint.
- If you use a kit, you must also compare the different shades of white. Remember that not all white paints are equal. By buying a gallon of the High Reflective White (not tinted) from Sherwin Williams, I knew I could use that paint to make everything match in the future.
- You can use Stix primer instead of the one we used. Our local paint store recommended this to stick to the tile’s slick surface, but we could not get it in time.
Painting Our Backsplash Tile
See the video in this post as well.

Step 1: Clean The Glass Tiles
Clean the tiles with Dawn dish soap and a sponge. You want to make sure you cut the grease and grim.
Put extra elbow grease into areas prone to grime, such as around your stove. This is where it tends to be a little dirty and greasier (hello, bacon at our house). Proper prep and cleaning will allow the primer to adhere better. Let the tiles fully dry.
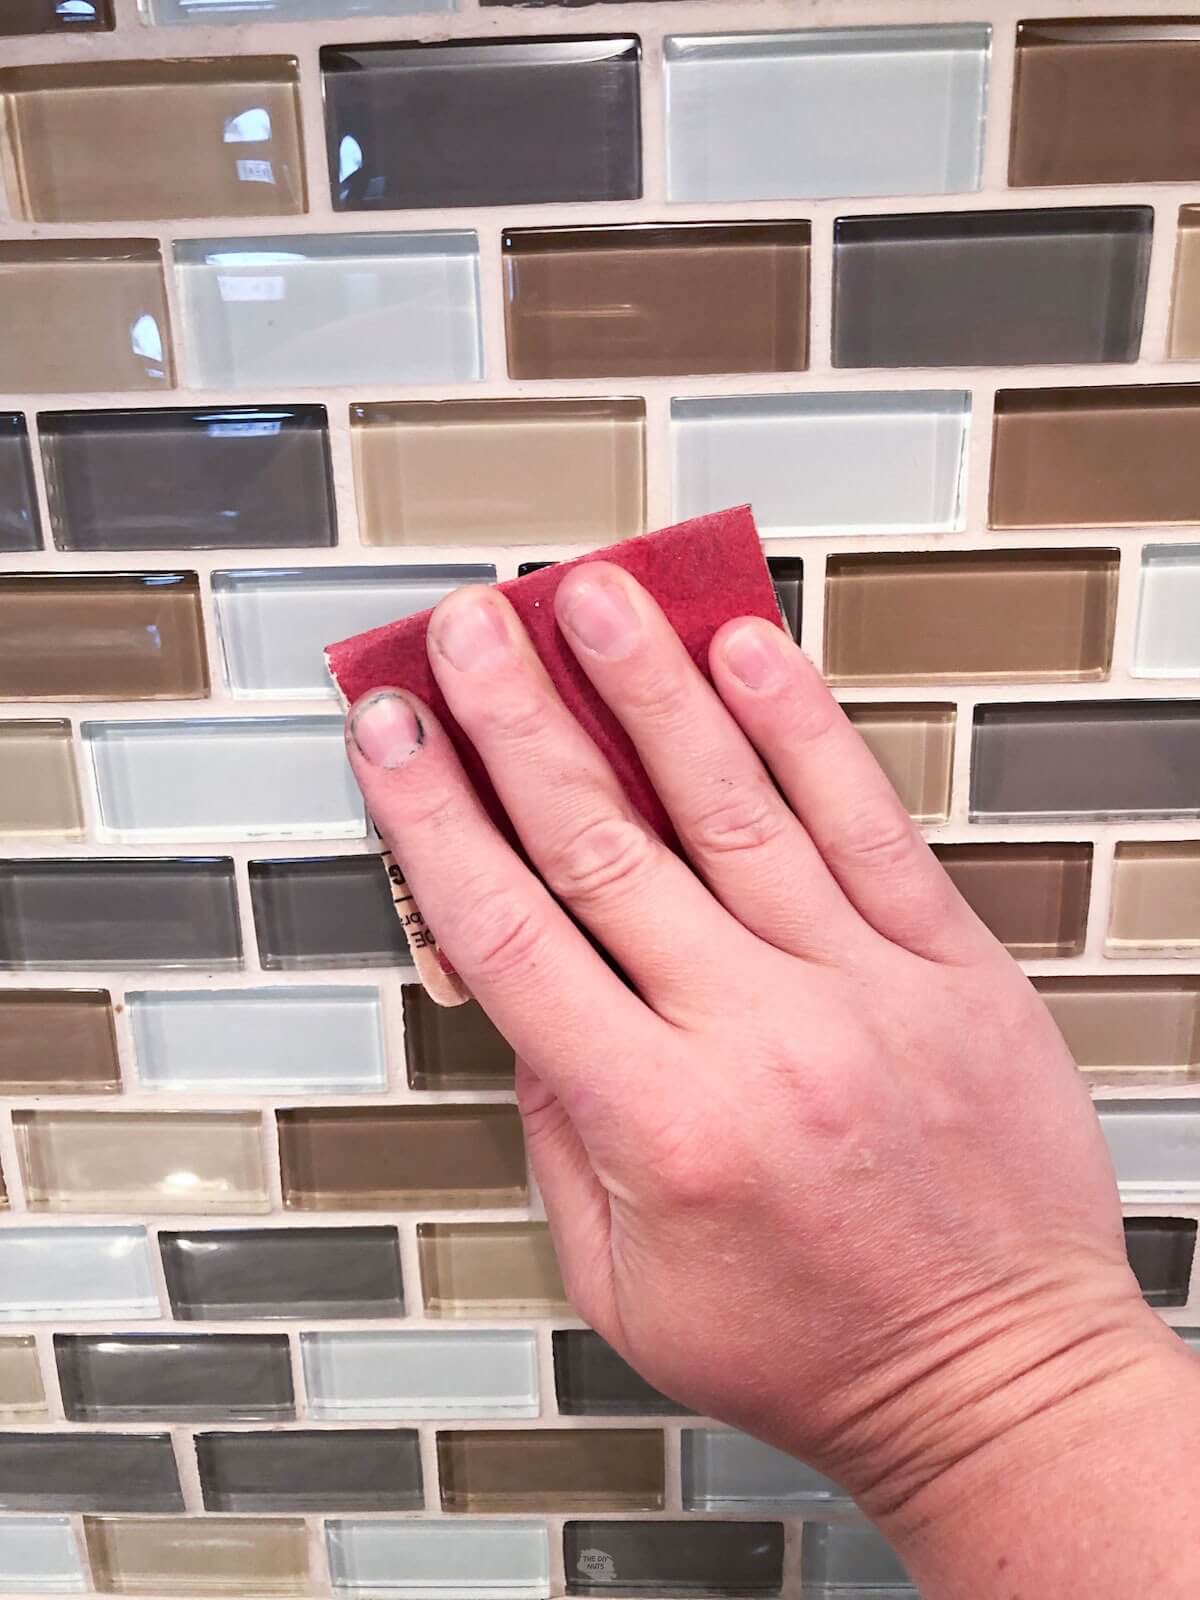
Step 2: Lightly Scuff Surface
Use extra-fine sandpaper to scuff up the tile. I did not do a ton of this, just enough to give the primer something to stick to.
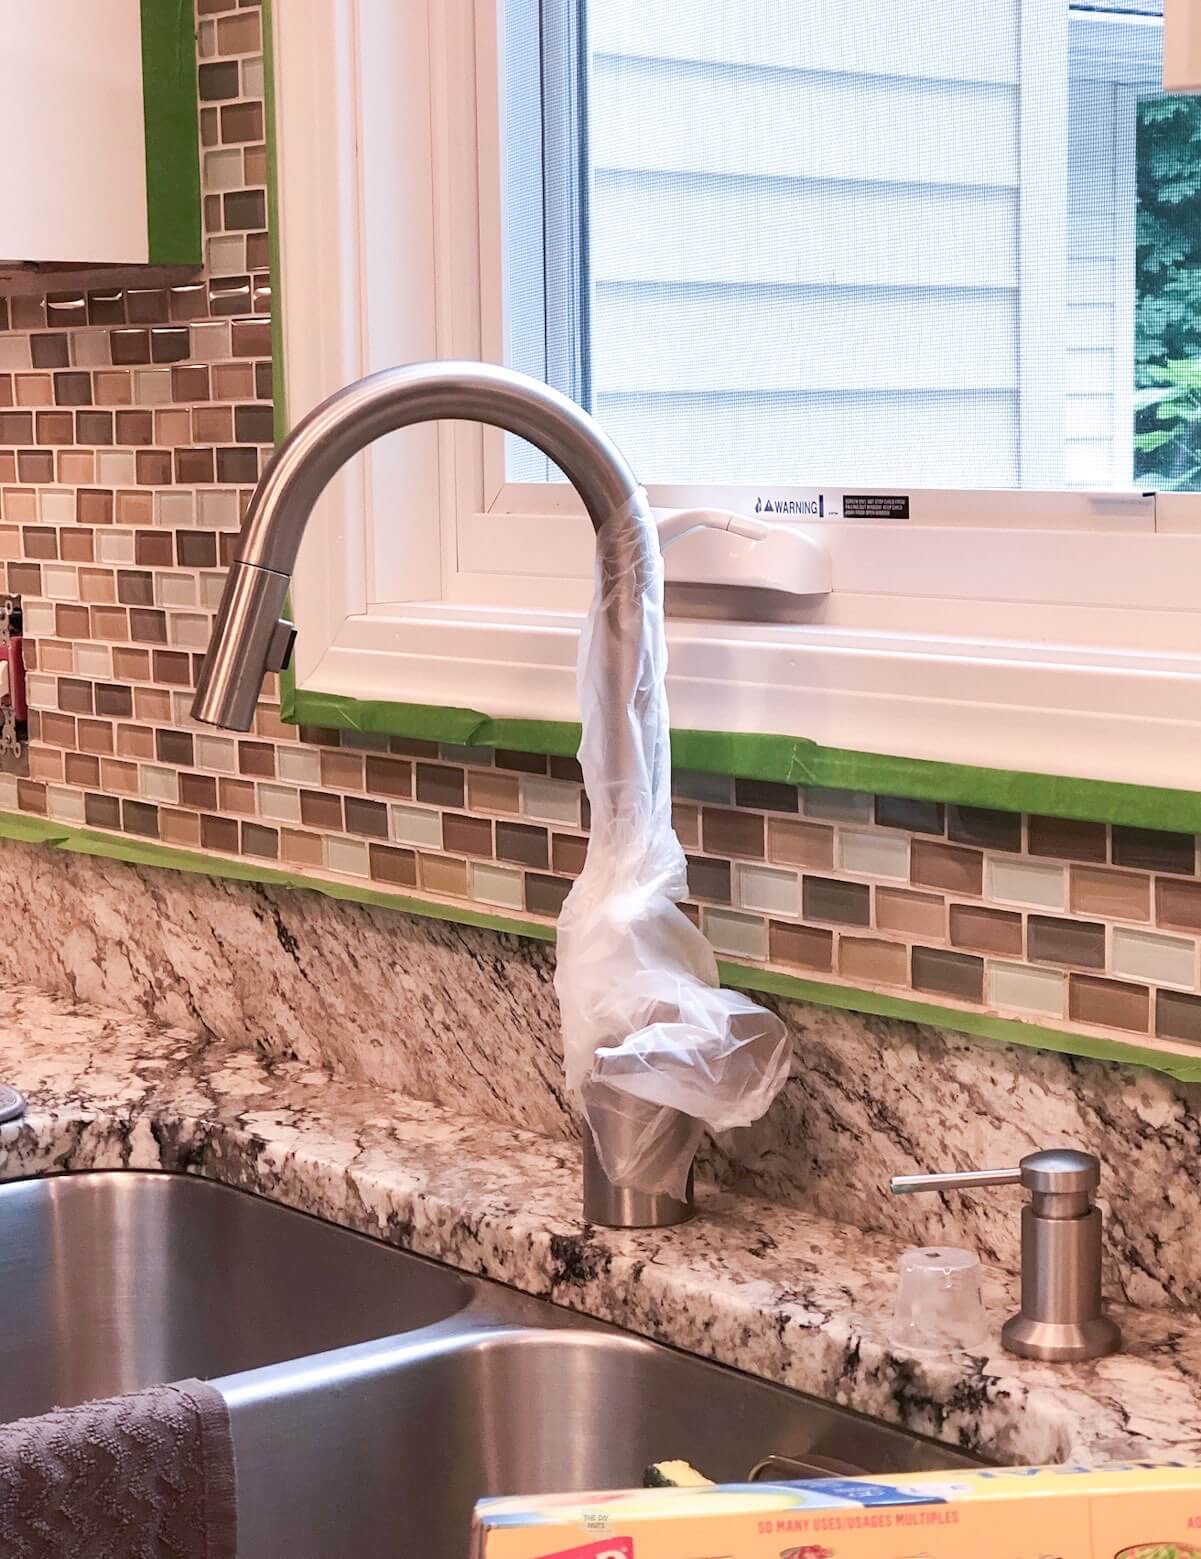
Step 3: Prep Areas With Painter’s Tape
Wipe areas you don’t want to be painted, like the counters and window frames. Add painter’s tape to the areas and cover any areas you don’t want painted. Press your fingernail in the seam between the counters and the tile.
Depending on the condition and type of backsplash, you may need to caulk it before or after painting.
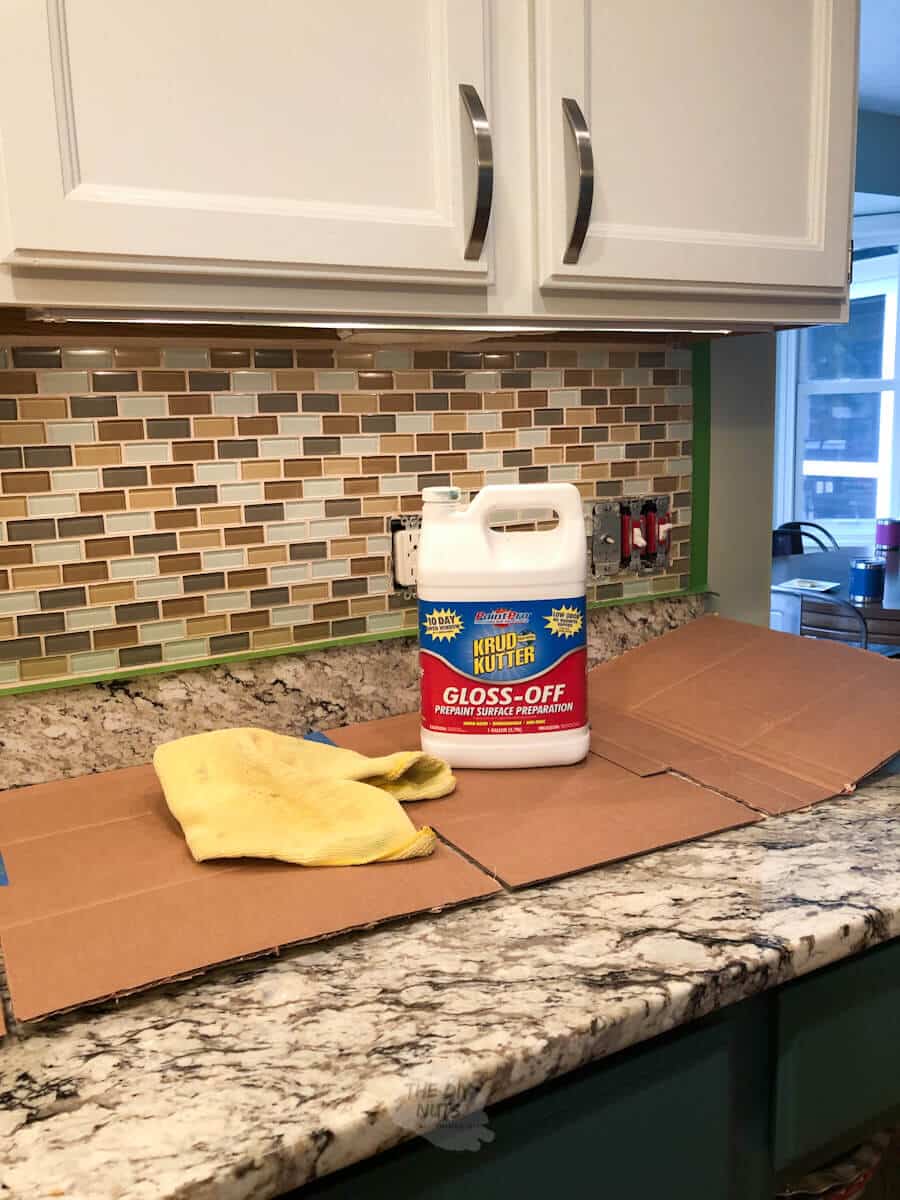
Step 4: Use A Deglosser
Wipe down tiles with Krud Kutter on a rag. Wear gloves to protect your hands from the chemicals.

Step 5: Apply Primer
Use a quality paint brush to prime grout lines and areas a roller cannot reach. Work in small areas.
If your tile pieces are larger, you may use a roller after the brush in the grout lines. Since our glass tile is so tiny, I only used a brush for the primer. This might leave a slight texture, so be careful as you work.
Step 6: Check For Drips
Make sure to brush away any drips lightly. This is probably the trickiest part of a good paint job. If you do end up with a few bumps, you can always sand them before the next coat.

Step 7: Start Painting
Once the primer is dry, you can repeat the brush painting or try only using a small foam roller to apply paint.

Step 8: Continue Painting 2-3 Layers With Proper Dry Time In Between
After the first coat of paint with the brush, the next two used the small foam roller. This allows for more even coverage. Make sure your grout is completely painted to your liking as you work.
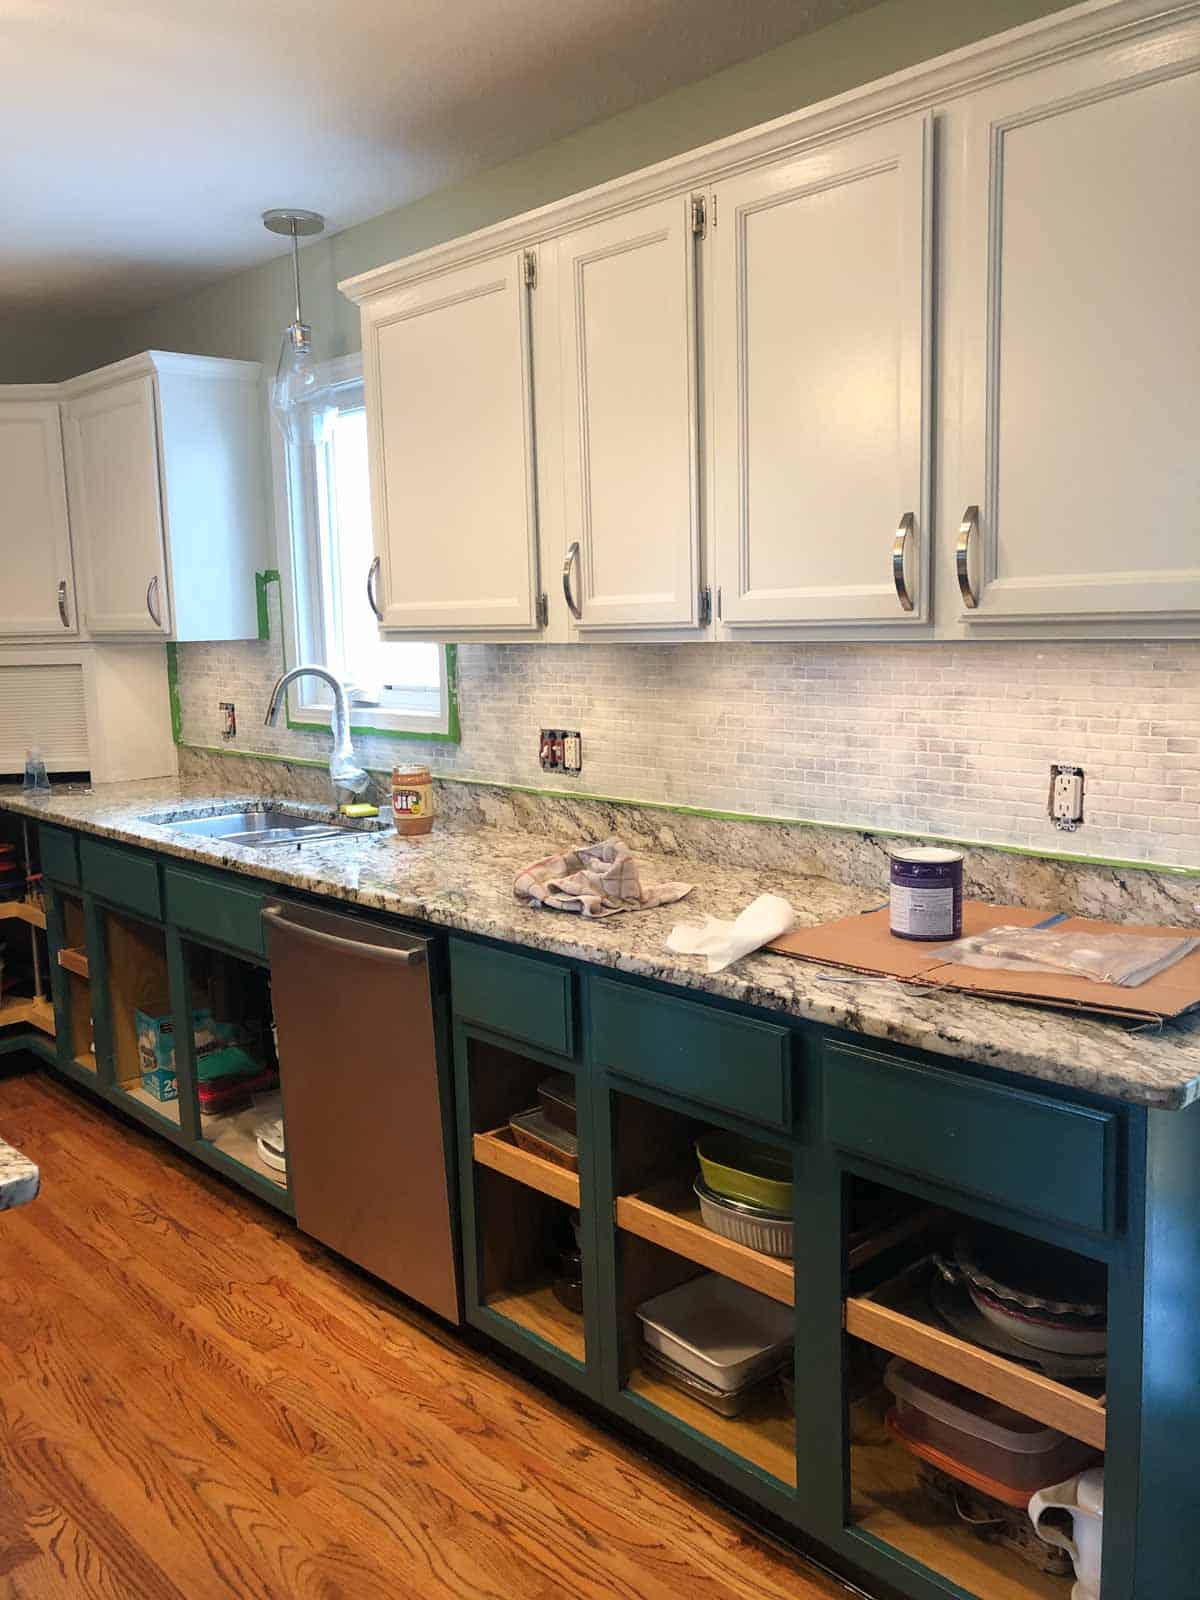
Don’t let the splotchy priming job worry you. Just make sure you cover the tile surface. You can see how the white color is much more solid once you start using paint.
Tips
- PAINT TILE AND GROUT THE SAME COLOR – Using one color on both creates a cleaner, more seamless look.
- USE 2-3 COATS OF PAINT – We used 3 coats of paint with light sanding in between.
- USE A SELF-LEVELING PAINT – I chose Sherwin-Williams Urethane Trim Enamel because I had already used it on our kitchen island and liked the smooth finish.
- OTHER OPTION FOR CLEANING – Some DIY painters recommended using an electric sander and TSP cleaner. Since my tiles were not greasy, Dawn dish soap, deglosser, and light sanding worked fine.
Tutorial FAQs
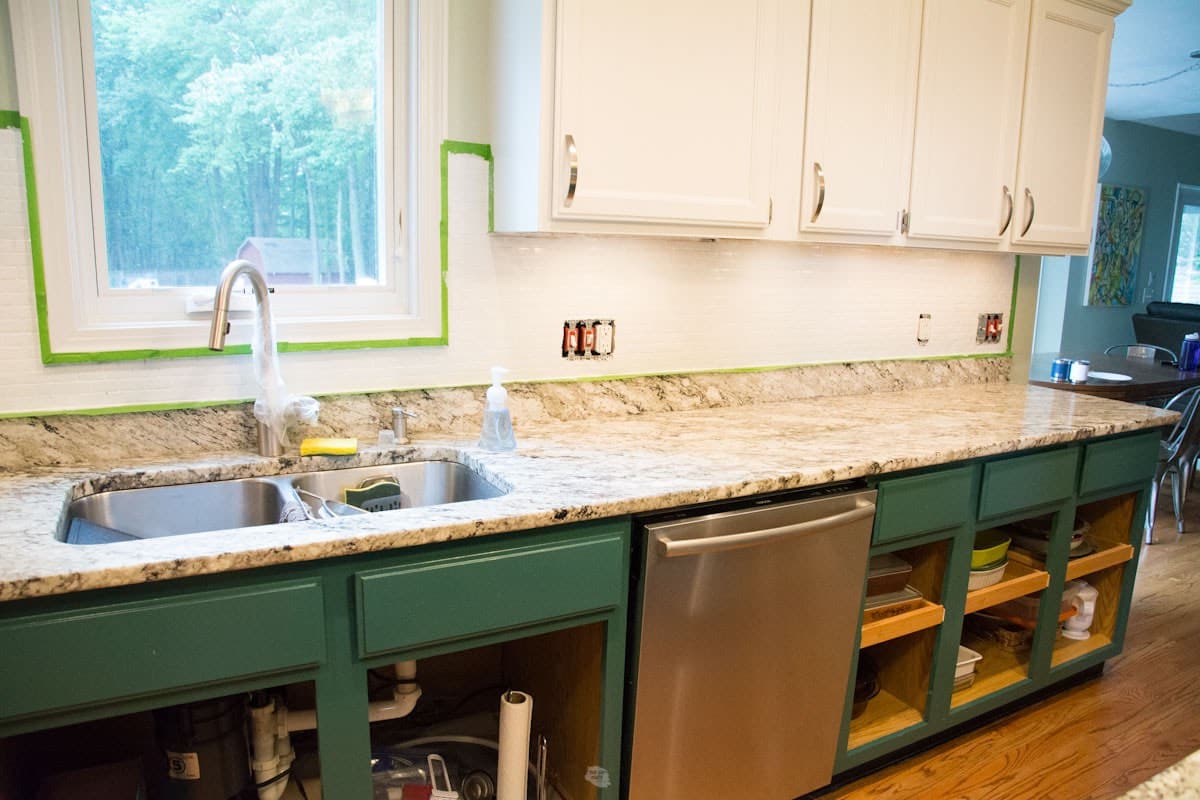
Our Before and After Kitchen Backsplash
At first, we thought this would be just a great temporary fix. However, it has been three years since we completed this project. We still haven’t torn it out just yet.

We absolutely can’t believe the huge impact our painted backsplash has had on modernizing our kitchen. If you hate the look of your backsplash and don’t want the hassle of tearing out the old tile, go for it! We are still happy we did.
Follow us on Pinterest, YouTube or Facebook for more DIY inspiration!
More Painting DIY Projects
- How To Easily Paint Bathroom Cabinets
- 7 Mistakes To Avoid When Painting Cabinets
- How to Whitewash Brick: Get the scoop on all the supplies we used to upgrade a brick wall fireplace.
How To Paint A Kitchen Backsplash
Equipment
- 2.5″ Angled Brush
Supplies
Instructions
- Clean tile with dawn dish soap.
- Wipe dry.
- Use extra-fine sandpaper to scuff up the tile.
- Wipe away dust.
- Tape out areas you don’t want painted and cover counters with cardboard, drop cloth, or butcher paper.
- Optional: Use Press and Seal to protect the faucet handle.
- Wipe down tiles with deglosser.
- Use a paintbrush to paint grout lines and a small foam roller with primer. Make sure to wipe away any drips that are occurring when painting before it dries.
- Let dry (read instructions on paint cans for your dry time).
- Repeat with Urethane Trim Enamel paint in the color of your choice.
- Paint at least 2 coats with proper dry time in between.
- Remove painter's tape and clean up any areas.
Video
Notes
- Test that your primer adhered to your tile by painting a small area and letting it dry. Use your fingernail to make sure you cannot scratch away the primer.
- Semi-gloss or high gloss paints will mimic the look of real tiles.
- Continue to check for drips as you are working. You can always sand with extra fine sandpaper in between layers if needed.
A very thorough article. It was just the encouragement I needed to do the same task, that is, to eliminate the busy glass tiles that were popular a few years ago. Your new backsplash looks so much better. I previously knew how important the prep is. You can not paint over dirt and grease. And I also guessed that now-a-days great primers are made for glossy surfaces in order for the topcoat to adhere. I think the topcoat is equally important. It seems to require something that is somewhat scrubbable to clean up any greasy splatters. The contracted price to paint porcelain tubs and sinks is quite expensive, and I was thinking that this might be the process needed for the glass tiles. Apparently not! Thanks!
Hi Tom. You will love when you paint your glass tile. Yes, make sure you prep it properly and use high-quality paint after priming. So far our painted tiles are holding up well and I have had to wipe them and clean your normal kitchen splatters. Good luck with painting your tile.
It’s funny how you put down the big box stores but then ended up going there for a product choice that was in stock. You have to remember Sherwin Williams is a corporation but just smaller chain stores. Fortunately the big box stores do better remaining one stock for their customers. Thank for sharing your experience
Hi. Thanks for visiting our site. We like big box stores just as much as the next DIYer. However, for paint advice, we normally get better information from local paint stores (even Corporations like SW). Just like with anywhere, it is probably because of the people that work at our local store. On the other hand, we have been lucky before and have found some really helpful advice at those big box stores. We were very happy that we were able to find that primer at Home Depot and it really did the trick. I am happy that I was able to find a product that would work and was able to share it with our readers. Good luck with your future DIY projects (no matter where you chose to get your supplies).
I book marked this page at least a year ago and finally got off my duff to try it. I have the same exact backsplash and so was glad to see how you were able to cover it. I followed your instructions to a T and it looks great! I was torn between semi-gloss and high gloss – I went with semi and it looks good. Perhaps could be a little more reflective but I’m very happy. Thanks for the great how-to instructions! Cheers.
Hi Susan! We also went with semi-gloss and really like how ours turned out. I am so glad that your backsplash painting project worked out! Thanks for coming back and sharing your DIY project success with us!
Can some of you who’ve done yours post pictures?
I’m dying to try this in my kitchen but I can’t decide on the color. My cabinets are white and the walls are a greige color (tan/beige). My countertop is a solid surface that blends well with the wall color and has some tiny specs of colors.
Hi Cindy. Yes, it is so hard to pick the color to paint your tile backsplash. Like I said in my post, I probably should have done a little warmer white with my counters, but didn’t really want to deal with all the white molding I had in the kitchen and other areas. Using large peel and stick paint samples may help you decide your tile color. We talk all about those in this post: https://thediynuts.com/samplize-review/. Good luck with your tile painting project.
How are they holding up? Going to paint my glass backsplash this weekend and curious if you would do anything differently? Also any thoughts on a water based poly acrylic top coat to seal?
Hi Katie. My painted tiles still look awesome and we have had a few kitchen splatters that we were easily able to clean. If you use high-quality paint I wouldn’t think you would need a topcoat. However, I do think it wouldn’t hurt anything, so adding it is probably fine. Let me know if you end up using a topcoat and any tips for my readers.
Although this a very informative and I know what to use I have a question about the ceramic tile….do I need to paint it with the primer then I will be able to paint sunflowers on it?? I read somewhere tho that u can’t go over the paint cuz it will streak. Am I able to use the Sherwin Williams paint and paint sunflowers?? Thanks u so much
-Renea
Hi Renea. This is a really great craft question. Since I have not tried painting decorative tiles on a white ceramic tile I do not have examples. However, this might be a good DIY crafty tile project for me to try. I would think you could prime the tiles using a small foam roller or even spray primer and they use quality acrylic paint to make your sunflowers. If the paint is streaky and you want a solid-looking color then you would paint sunflowers with another coat once the first layer dries. However, you could also use the streaking to your advantage and create a more textured look. I would then consider sealing your painted tiles with a clear spray or even mod podge.
You now have my wheels spinning and may try this tile craft project in the future. Let me know how it works out.
Thanks so much for sharing! I love how your backsplash turned out!!
Universal Stone
Thanks. If painting our backsplash didn’t work out, we were totally going to have to replace it. Glad it did because it saved us a lot of money and time.
I just updated my tiny house kitchen with new laminate and painted the backsplash using this method and paint. I used Stix because I’ve used it before. I used Whitetail from Sherwin Williams for the paint for a warmer tone. Turned out great!
Hi Stefane. I am so glad that your kitchen backsplash project turned out so well. Thank you so much for taking the time to share with our readers about your awesome painted tile project.
Nice Blog. Thanks, You for Sharing Such Information.
This stenciled backsplash turned out so good! I might have to try this technique out! Thanks so much for sharing!
Hi, thanks for providing all the steps and instructions. I wanted to ask how much “chemical” smell you had with the primer and the paint? How long did it take it to clear? I regretted DIY projects i did in the past because the smell was just too much for me. Thanks in advance for any tips regarding this.
Hey Simona. Great question. Since both of the paints and primer used are water-based they are not nearly as smelly as other products. The SW Emerald Urethane Trim Enamel does have a little bit of smell, but it didn’t really bother me when painting. I am also sensitive to smells, so I am always careful. The good news is you can open your windows if you are doing a kitchen backsplash and that should help. If you do end up doing this DIY project, I would love to know what you thought about the smell and process. Good luck.
Great post! I’m thinking about painting my backsplash, however, I have a unique problem. My backsplash is small stacked stones. Some of the stones are a coarse surface and some glass. They all very in size and depth. Trying to figure out the best way to tackle it. Maybe a toilet with an roller with an thick nap?
Hi Katie. If the backsplash already has a lot of texture, I would think you could just use a brush when painting it. You could always test it out in small area first to see if the brushstrokes bother you or are just part of the texture that is already there. Good luck with your tile painting!
A life saver find! Complete, easy to follow directions. Thanks!
Hi Deb! Thanks so much for the kind words about our backsplash painting tutorial. We are so glad it helped you complete your own DIY!
Is this safe behind an oven? I’m worried about heat with the paint.
Hi Shannon. I would go to your local paint store and ask this question. As with any DIY project, it is up to you to decide what could work for your space. We have enough space and a granite partial backsplash behind the stovetop. People paint that wall area all the time so it works for us, but your area may be different.
Hi Erin,
Thanks for all this info! You have given me hope!
How has the paint held up behind your stove/oven over time?
Hi Karissa. The paint behind the stove still looks great. And we have had to wipe clean a lot. I would just make sure you don’t use harsh chemicals when cleaning any painted surface. Good luck with your backsplash painting project!
This turned out so good! I love it so much. We are doing some home projects this summer and I might just have to add this to our list. We are starting with some kitchen cabinet painting, but maybe this will have to be next! Thanks for sharing!!!
Thanks, Jackie. We are still happy with out painted backsplash. Good luck with your painting projects.
Hello! I love how this turned out for you. We are going to start this endeavor ourselves. What color and type of paint did you use on your white cabinets? We want to do white backsplash with white cabinets and like how yours looks!
Hi Lauren. Our cabinets and backsplash are Sherwin Williams High Reflective White. They are very true white so you may want to just test it out for your space and lighting first. Good luck with your backsplash and cabinet painting projects!
Thanks for this article, it was well written, easy to understand, provided tips and tricks and supplies! I can’t wit to get started!
Hi Lori. Thank you so much for the kind words! I hope your tile painting project turns out well! It is still one of those DIYs that gave us the most bang for our buck!
Thank you for easy to follow along with instructions. This detailed information will be used soon on my outdated backsplash.
I’ll send before and after pictures.
Hi Charlie. We would love to see your painted backsplash when you finish. Good luck!
Hi thanks so much for the tutorial. I did it this weekend and it looks great! However, any tiny little touch to the tile and it chips instantly. any solutions to this? it already chipped in a few noticeable areas and it is heart breaking!
Hi Mary. Bummer about a few spots. It is hard to say why that would be the case. I wonder if there was grease or something still present that isn’t allow the primer to fully adhere. Did you fully cover all areas with primer and allow proper dry time? Did the primer pass the scratch test (meaning it didn’t scrape off after it dried). I would let the paint fully dry and then try to touch up (which may include lightly sanding, primer and painting those spots). It can take paint up to 30 days to fully cure.
I am sorry I can’t be more help as I did not have this issue at all as the primer fully adhered to my tiles. Good luck, I hope you are able to fix those areas.
@Erin, Thank you!! I am still extrememly pleased with the results. thank you a million!
Hi Mary. I am so happy you love your fresh looking space!!!
I have question will the paint sustain the heat of the stove and oven?
Hi Edith. I can only talk about personal experience and our painted cabinets and tile have held up well. When in doubt, we always recommend heading to your local paint store with specific product recommendations for your specific project.
I just painted my glass backsplash with Benjamin Moore Regal Select semi-gloss in white. It turned out great but I’d like it to be really glossy. Can I apply the same paint but in a gloss over what I’ve just painted or use a clear high gloss top coat? I’m new to the DIY game and loved your tutorial. I’ll definitely be checking out more since I plan to paint my staircase soon.
Hi Jamie. My guess is that you could add a top coat of some sort. Just be careful that you don’t apply something that would yellow over time. I would go into your Benjamin Moore store and ask what they suggest since you used their products. I am glad your tile painting went so well!
I’m wondering how this DIY held up with time? I really want to upgrade our glass tile backsplash (hello bacon grease) but worried it stains easily with a « normal » paint. Any feedback ? Thank you
Hi Julie. We did this project over 3 years ago and it hasn’t stained at all and we have splattered tomato sauce and bacon grease. Using a really durable paint (like SW Emerald) in semi-gloss makes it that we can easily wipe the painted tiles clean. Also, make sure to use 2-3 coats of paint so that cleaning can work. I will see that I normally just wipe it with a wet paper towel and avoid harsh chemicals. Good luck with your project!
Can’t get over the improvement in the backsplash. Before, it was slightly dated and very busy. Now, it looks as if it was installed as cute white tiles. Good job on tutorial and photos.
Thanks Elizabeth! Painting our backsplash really did create a more modern look we were going for.
Thank you! I wanted to paint my backsplash but couldn’t find anyone doing it with glass tiles but you. And painters and paint store workers looked at me like I was crazy. Mine are very similar to yours but with textured tiles mixed in. I finally painted them following your instructions and I’m sooo happy. Makes such a huge difference.
Hi Noelle. Thanks for taking the time to let us you liked our tile painting tutorial. I also have gotten a few funny looks when I was researching the best way to do this project. I am glad you love your painted backsplash. We still haven’t replaced ours and probably won’t until we do a full kitchen gut remodel.
They make it look easy and walk through enough steps to ensure it is easy for others, too.
Hi Martha! Thanks for the kind words about our painting tutorial. Good luck with your kitchen DIYs!
This is nice motivation. I have an aged backsplash and need to decide what to do with it.
Good luck, Lyn. We still have torn ours out as the painted glass tiles still are in great shape.
Very helpful and needed, very, very easy to understand. Need more
Hi Sally! Thanks for the feedback about our DIY tutorial. We hope your backsplash project goes well!
Hi! I am so excited and inspired by your post. I have almost identically the same tiles you had and just needed a quick (maybe temporary) fix. I got the supplies and started a 5 foot test area with the directions/supplies you detailed. After allowing the primer to completely dry, while brushing on the first coat of paint, I noticed it started to peal/clump off the tiles. I am going to let this coat dry and sand it down tomorrow and apply coat #two. Just wondering if this was an issue you had? If so, any suggestions? Thanks!
~also Erin
Hi Erin. I am sorry you are having issues. Did you degrease and lightly sand? My primer stuck to the tiles and even passed the fingernail test when dry. Is there a chance your primer wasn’t completely dry? or you applied it too thickly? There are so many factors why a primer might not stick. I hope you were able to figure out a DIY solution.
I have the same granite and white cabinets. My current kitchen backsplash is not terrible, as the color of the tile is beige/sand. The tile is 7×7, laid on a diamond/diagonal pattern, has a travertine/matte look (but is either ceramic or porcelain). I’ve wanted to paint it, almost more of a whitewash, with the goal of keeping it non-glossy, to maintain the stone/travertine-like appearance. I would think that my tile would take paint even better than yours because they aren’t glossy or glass.
Do you have any pointers with respect to the paint I should investigate? I’ve played around on part of it that isn’t visible, and the grout lines take the white well, and I seem to need only one coat to make it appear whitewashed. My goal ultimately is to create a more cohesive, almost monochromatic look between my white cabinets and the busy movement of the granite, ultimately to make the beige/sand tiles appear more white, or whitewashed. Any brainstorming you’d recommend? Chalk paint? Enamel? I’ll follow your steps, which sound logical. Thanks!
Do you have any pointers with respect to the paint I should investigate? I’ve played around on part of it that isn’t visible, and the grout lines take the white well, and I seem to need only one coat to make it appear whitewashed. My goal ultimately is to create a more cohesive, almost monochromatic look between my white cabinets and the busy movement of the granite, ultimately to make the beige/sand tiles appear more white, or whitewashed. Any brainstorming you’d recommend? Chalk paint? Enamel? I’ll follow your steps, which sound logical. Thanks!
Hi Heather. I think you are on the right steps in regards to testing a small area and you are correct that your tiles should take the paint better than glass tiles. You may be interested in the how we whitewashed our friend’s brick fireplace. We used a masonry paint for that project and no primer. I am not sure how porous your actual backsplash is. I would think you could use similar materials we used on the glass, but would get your paint in the finish of your choice (matte or satin).
This is the exact ugly kitchen tile that’s in my kitchen. We just purchased the house a few weeks ago and I can’t wait to paint over it. Thanks for the info!
Hi Tina. Good luck with your project!
These directions were wonderful! Clear and concise and made me confident and excited to get going on this project! They left nothing to chance and covered every detail of the project. No second guessing here and no second guessing what they said.
Hi Peggy! Thanks for the kind words! Just a reminder to always test your specific supplies in your space before tackling any DIY project!