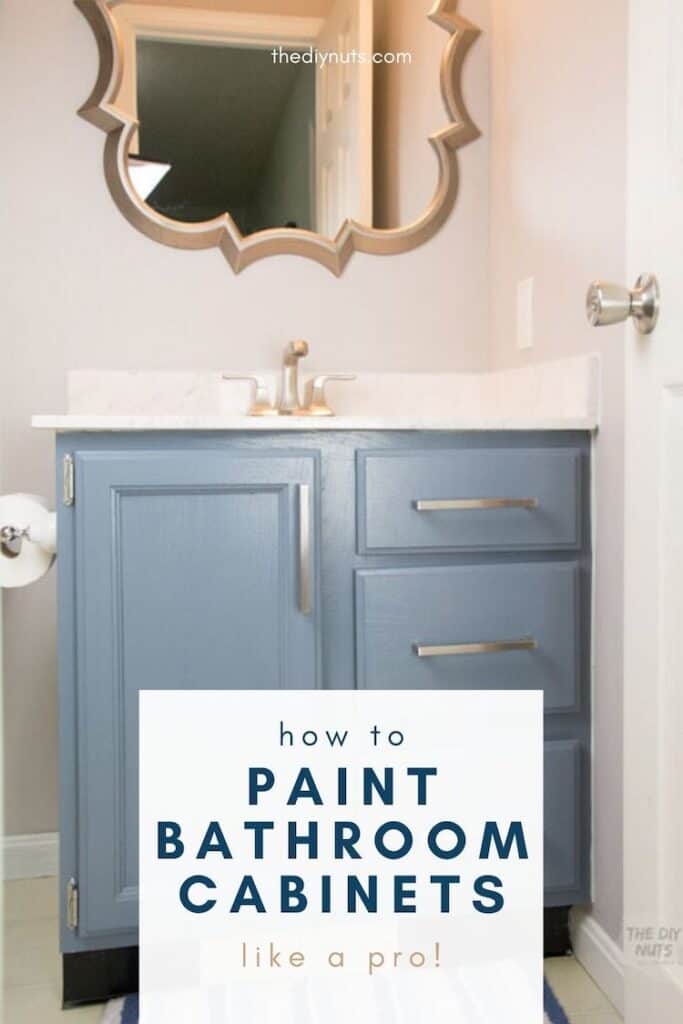
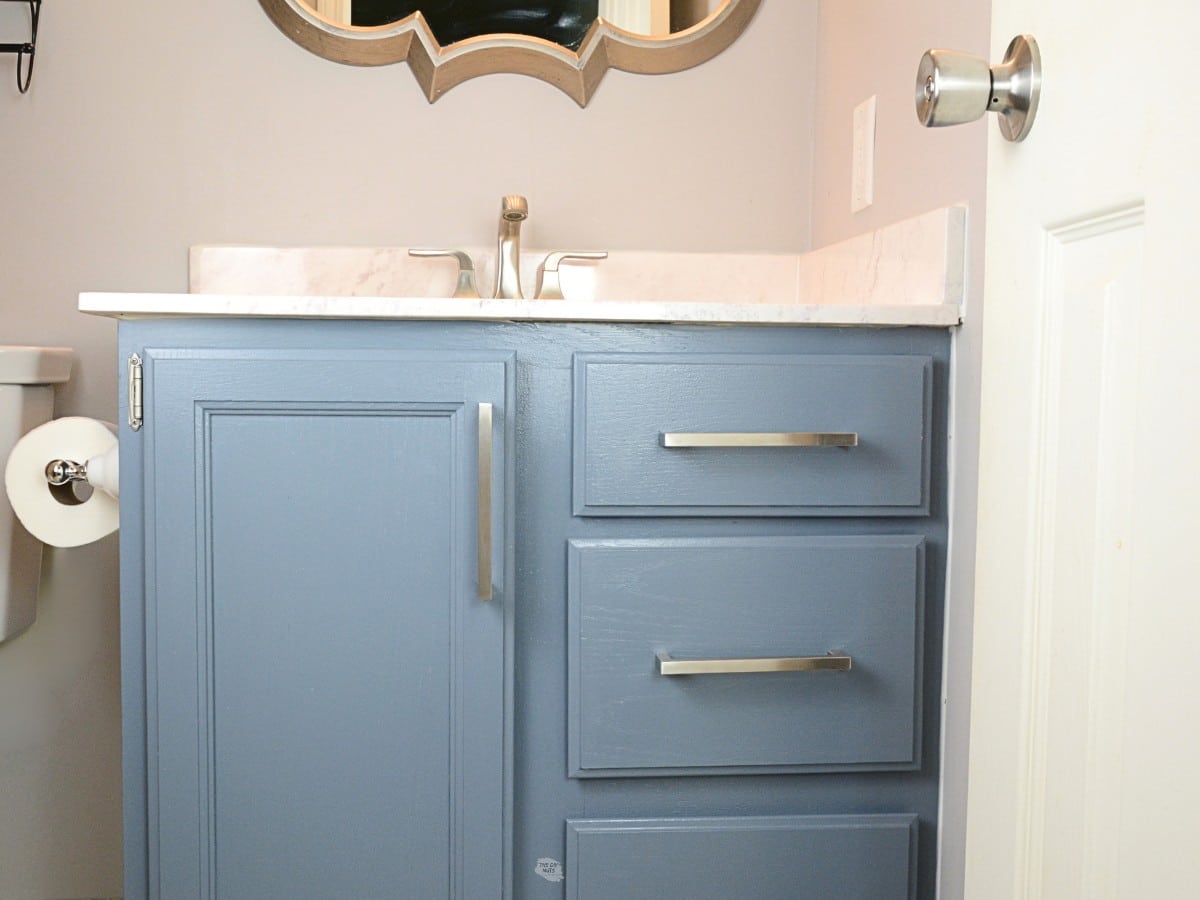
Easily Paint Bathroom Vanity Cabinets To Last

Does your house have a lot of old, construction-grade oak in it? You can get an instant upgrade by learning how to paint your bathroom cabinets for a fresh look. Our easy, step-by-step method will help you makeover your vanity cheaply.
From painting our kitchen cabinets white to repainting a different bathroom vanity, we love a good cabinet painting project.
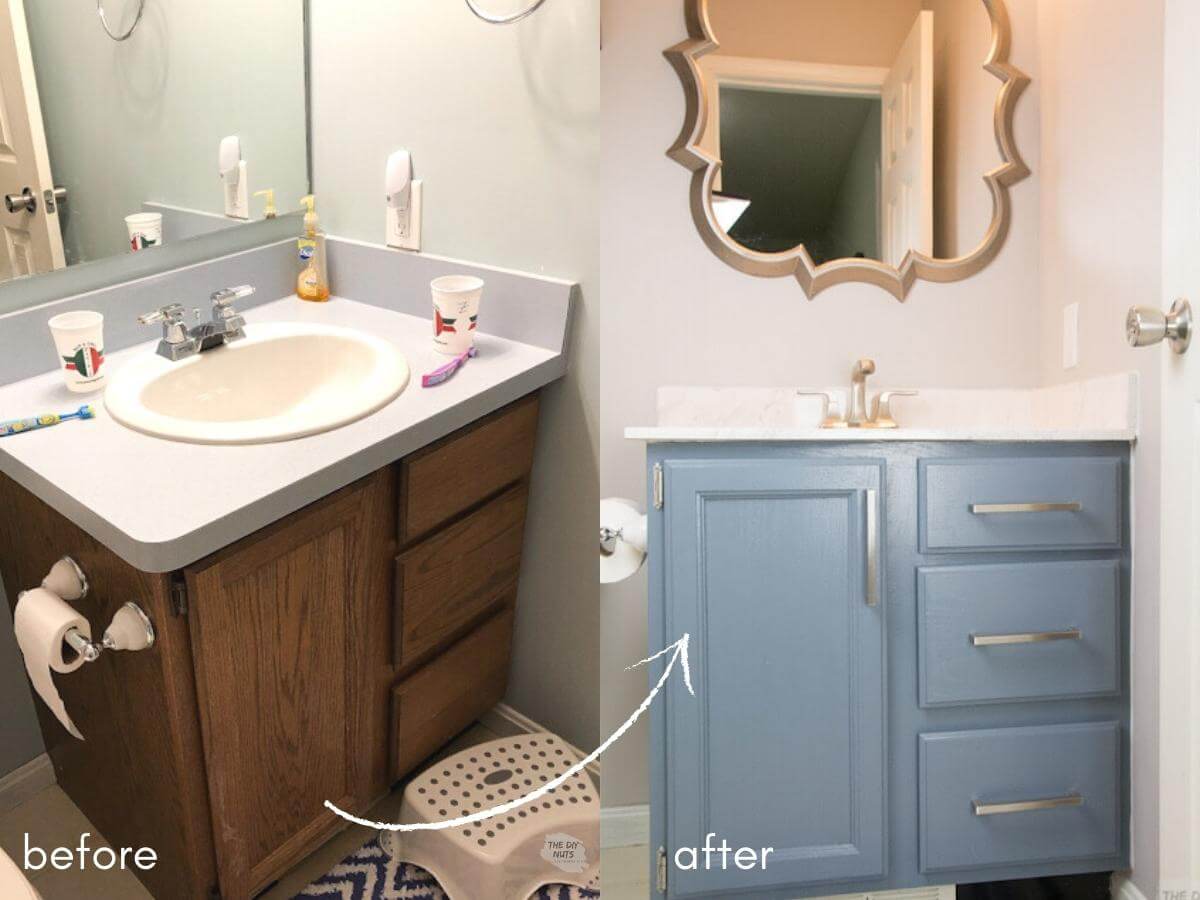
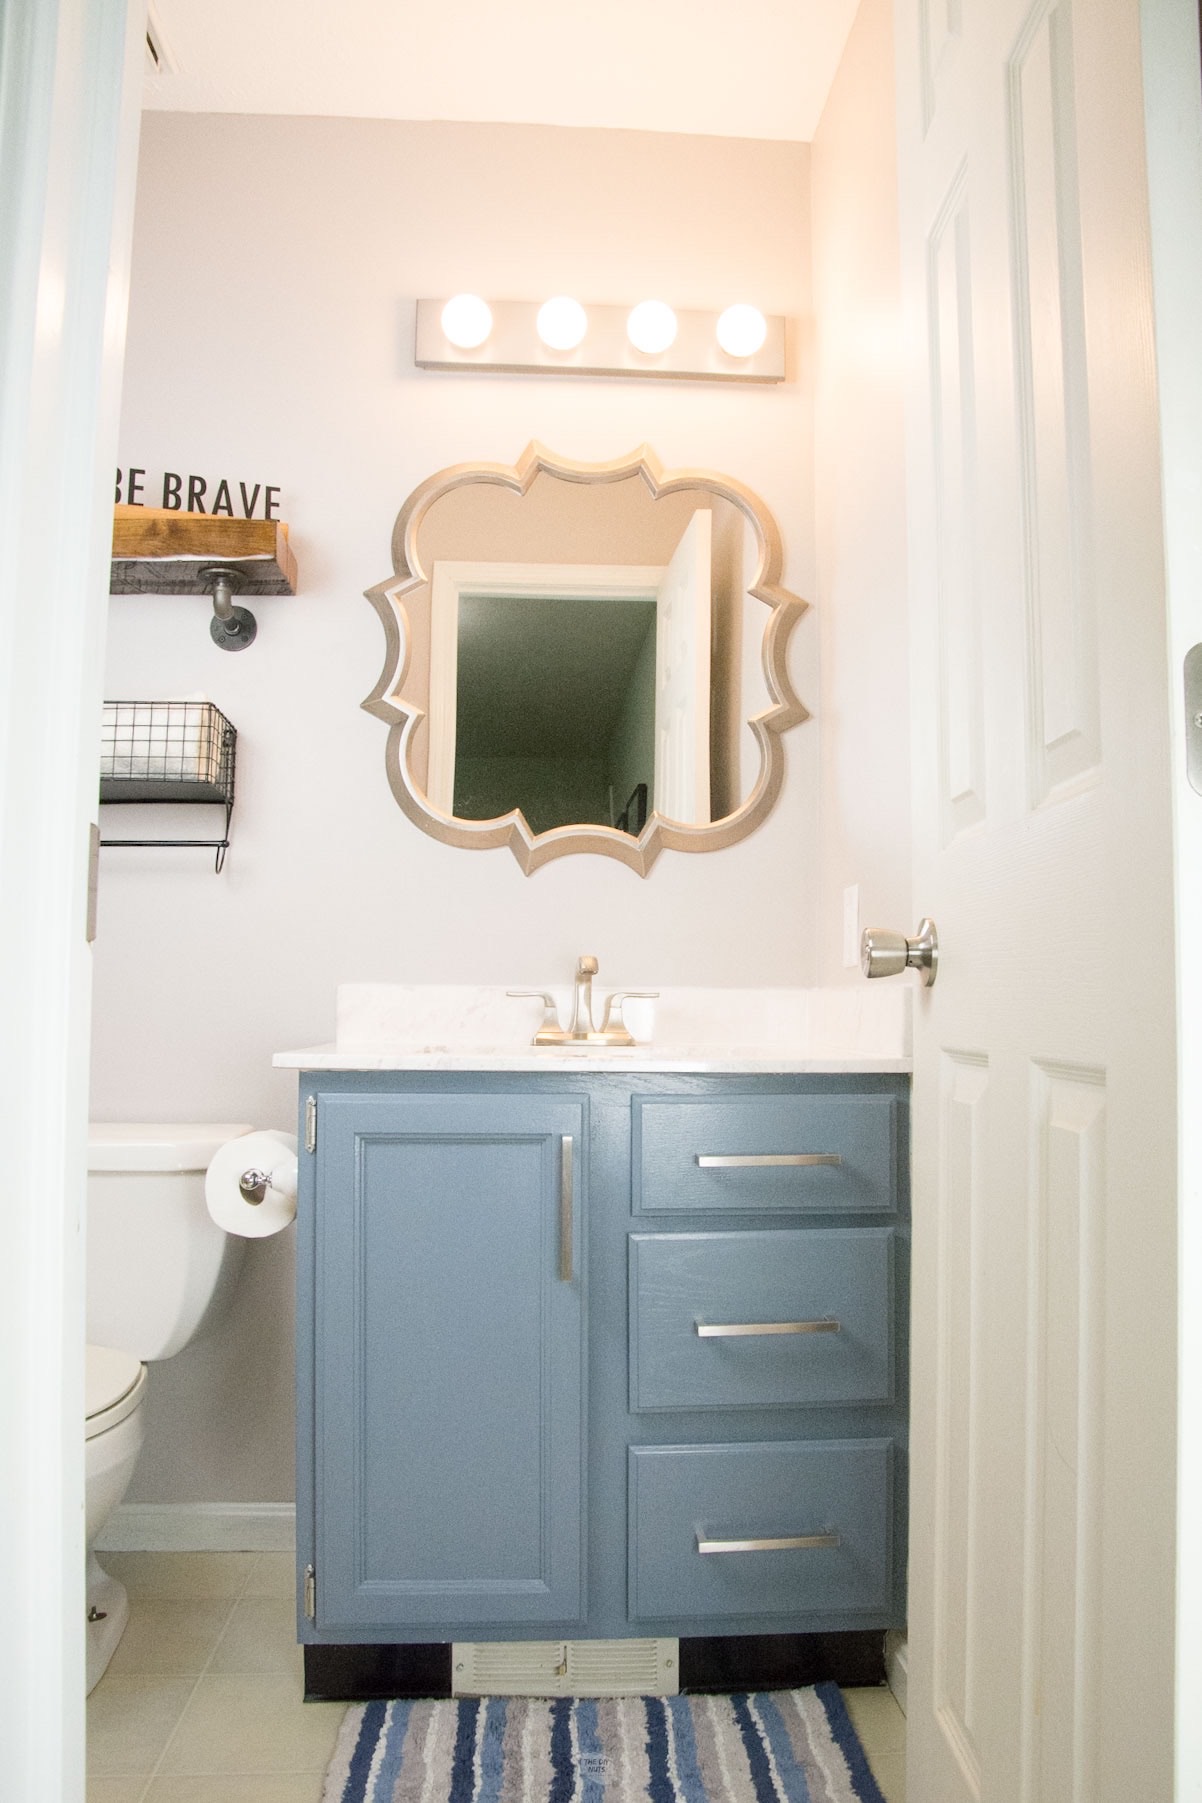
This time, we wanted to create a nice blue-gray cabinet for our bathroom vanity. This matches the two-toned look of the painted oak stair railing that is outside the bathroom door.
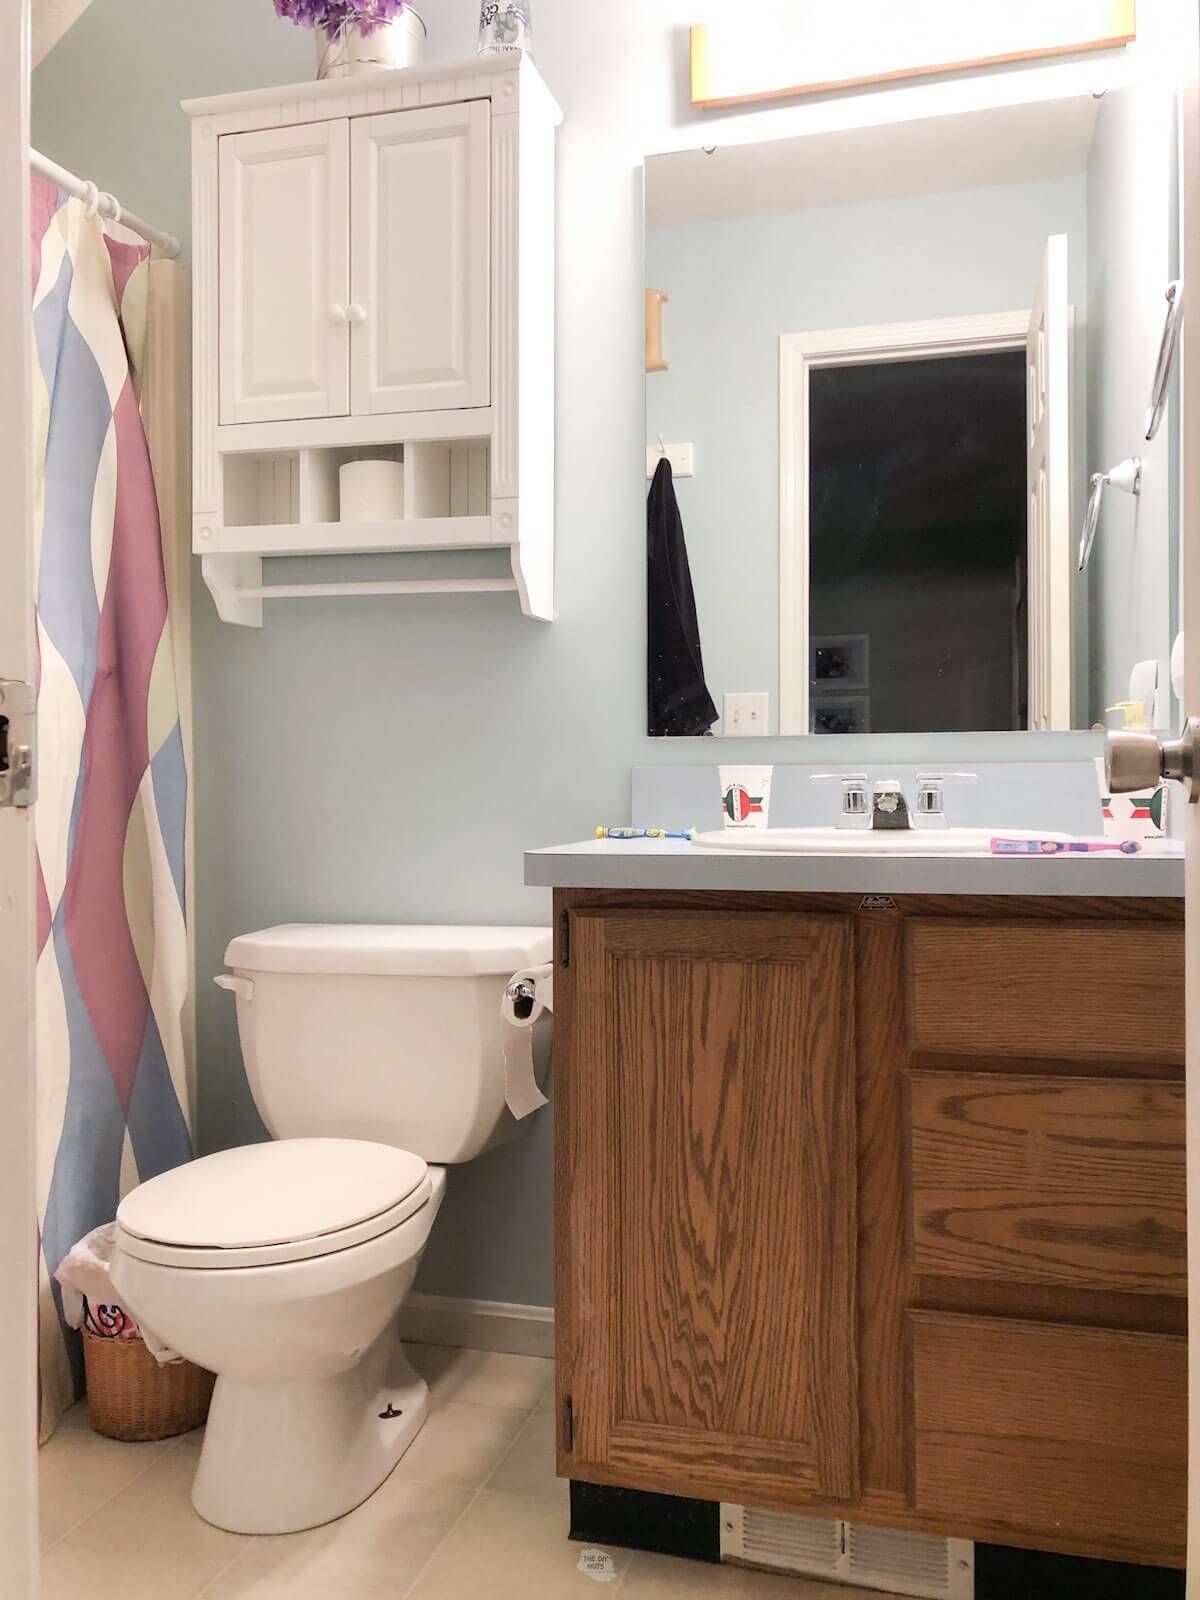
The “Before” Bathroom
Our house was built in 1992, and oak Merillat cabinets and molding really seemed to be the standard. We know that getting rid of the golden oak color in your home can help update your space.
What Readers Say:
We followed your directions to a T and my bathroom vanity turned out great! Thank you so much for the tutorial. I was very intimidated by the thought of messing up and having to spend $1,000 on a new vanity, but this gave me the confidence to try it and I’m so glad I did.
Julie
Do bathroom cabinets need to be sanded before painting?
Yes, you need to scuff the surface of your cabinet so the primer will adhere. Use a sanding block or 220-grit sandpaper to lightly sand your cabinets. Your goal should be to dull the current surface.
Don’t worry. The sanding part is not bad and will take only a few seconds, which we will explain in the step-by-step tutorial.

Supplies You’ll Need
*Disclosure: This post may contain affiliate links that at no additional cost to you, may earn a small commission. Read our full privacy policy.
Notes About Supplies
- A good-quality brush, like the Purdy 2 ½” Angular Trim Brush or an equivalent from Wooster, will help you achieve a smooth finish.
- Foam rollers help you apply paint in thin coats and will give you the best finish.
- Plastic Door and Drawer Protectors will stop your painted doors from rubbing on the cabinet frames.
- Using the right primer is one of the most important things when painting bathroom cabinets. We used Sherwin Williams Multi-Purpose Latex Primer, but Zinsser or Kilz would also work.
- Our current paint recommendation for all cabinet painting projects is Sherwin Williams Emerald Urethane Trim Enamel. Before we discovered the SW paint, we used this paint in Charcoal Blue due to the price.

Read More>>> Find The Best Paint For Your Bathroom Cabinets
Note: No matter what paint you choose, make sure you use paint meant for cabinets and trim.
How To Paint Oak Bathroom Cabinets

Before You Begin
- You may need to fill old hardware holes with wood filler using a putty knife. We did not have to do this because our old cabinet drawers and doors did not have any hardware.
- Set up your work area for doors and drawers. We like to paint doors and cabinets in our garage or basement. Having a separate area is nice, since it takes time for each coat of paint to dry fully on both sides of the doors.
- Add a drop cloth around the cabinet boxes.
- Decide whether to paint your old countertops, replace them, or keep them as is.
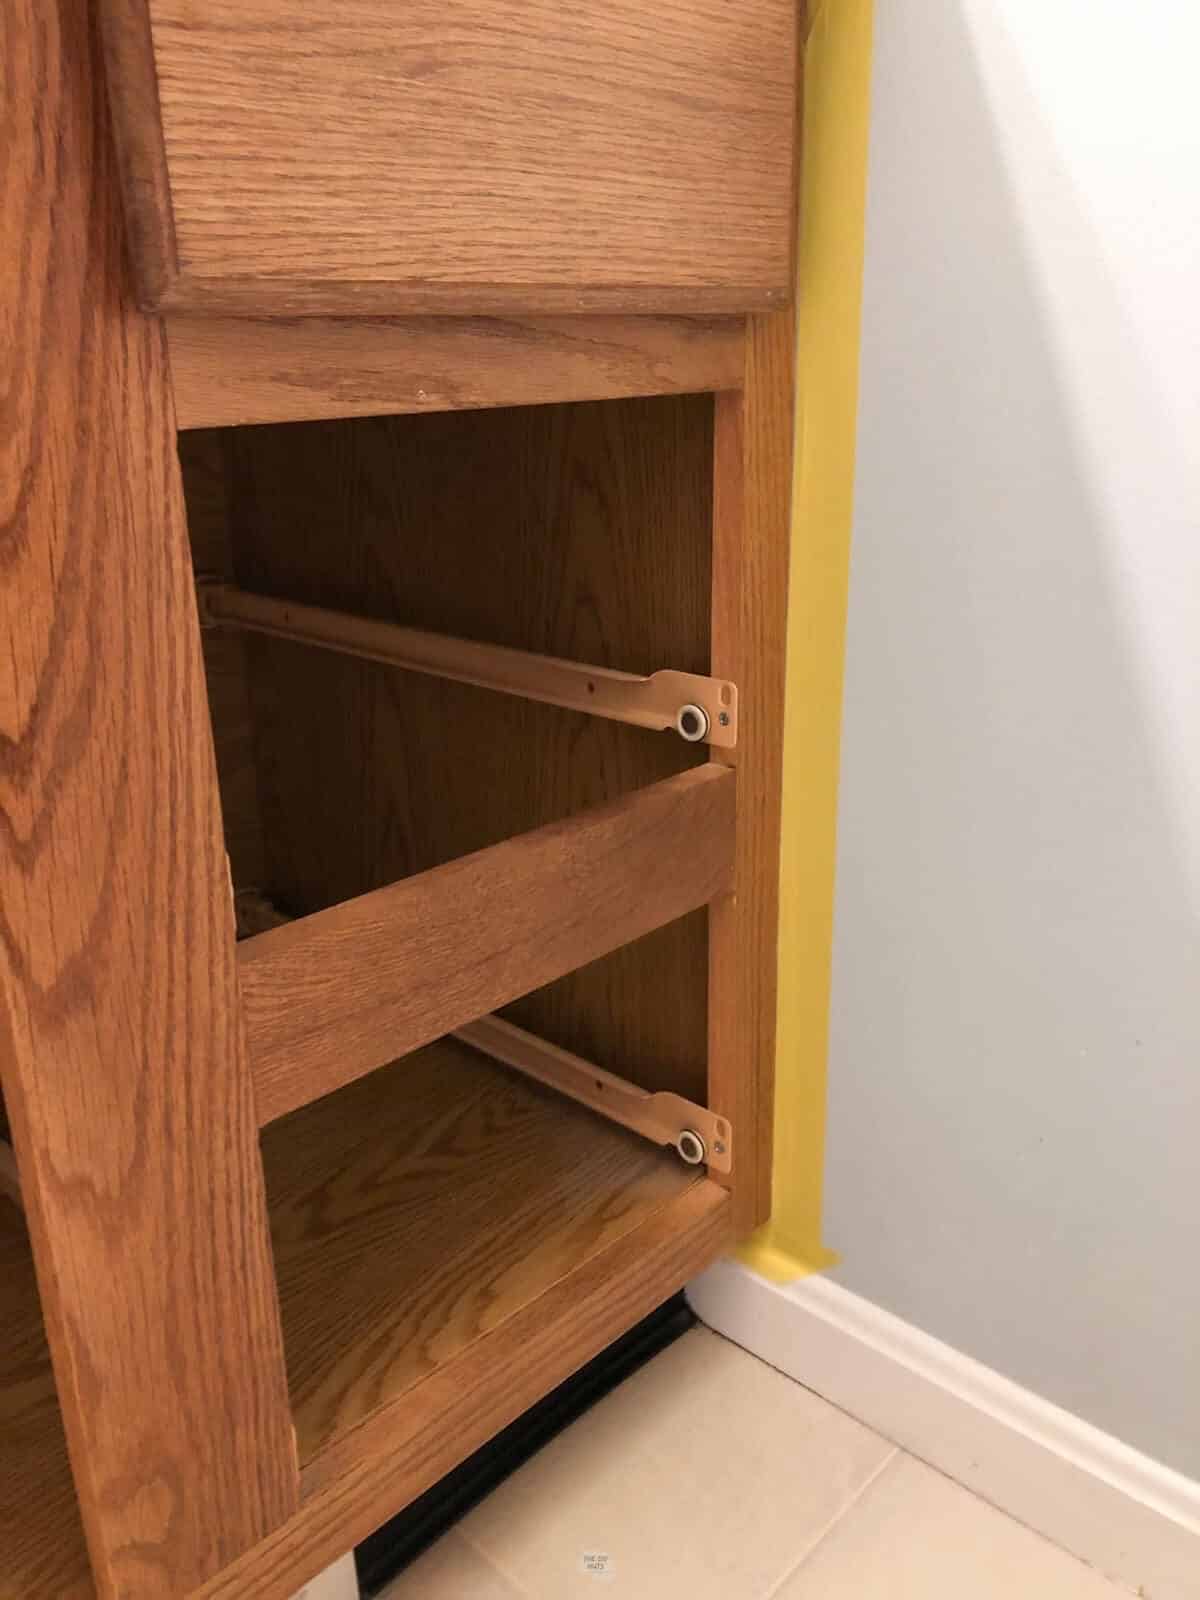
Step 1: Remove All Drawers and Hardware
- Take all doors and drawers out. You will notice that we have a fake drawer on the top, and we did not remove or unscrew it. It was fine to paint it as part of the cabinet box.
- Remove hardware (hinges included).
- Place in a bag and label clearly. You also want to put a piece of painter’s tape inside the drawers ,labeling where they came from.

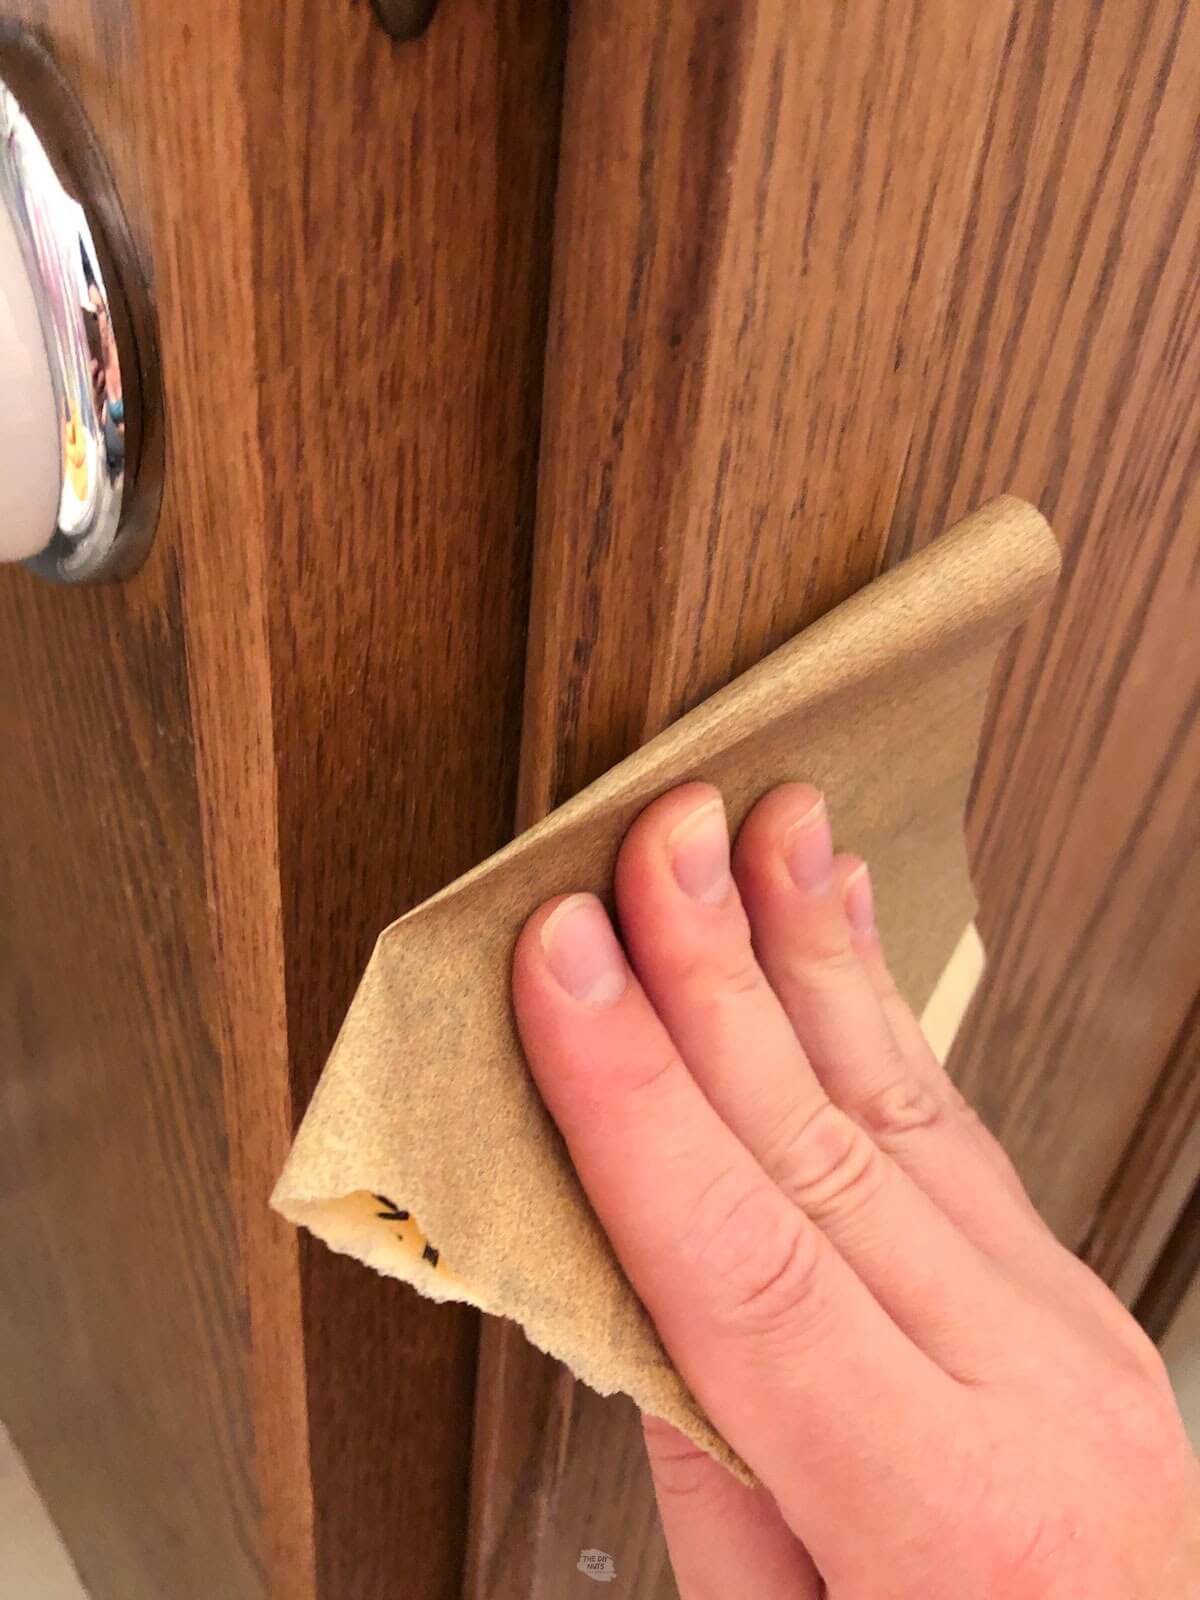
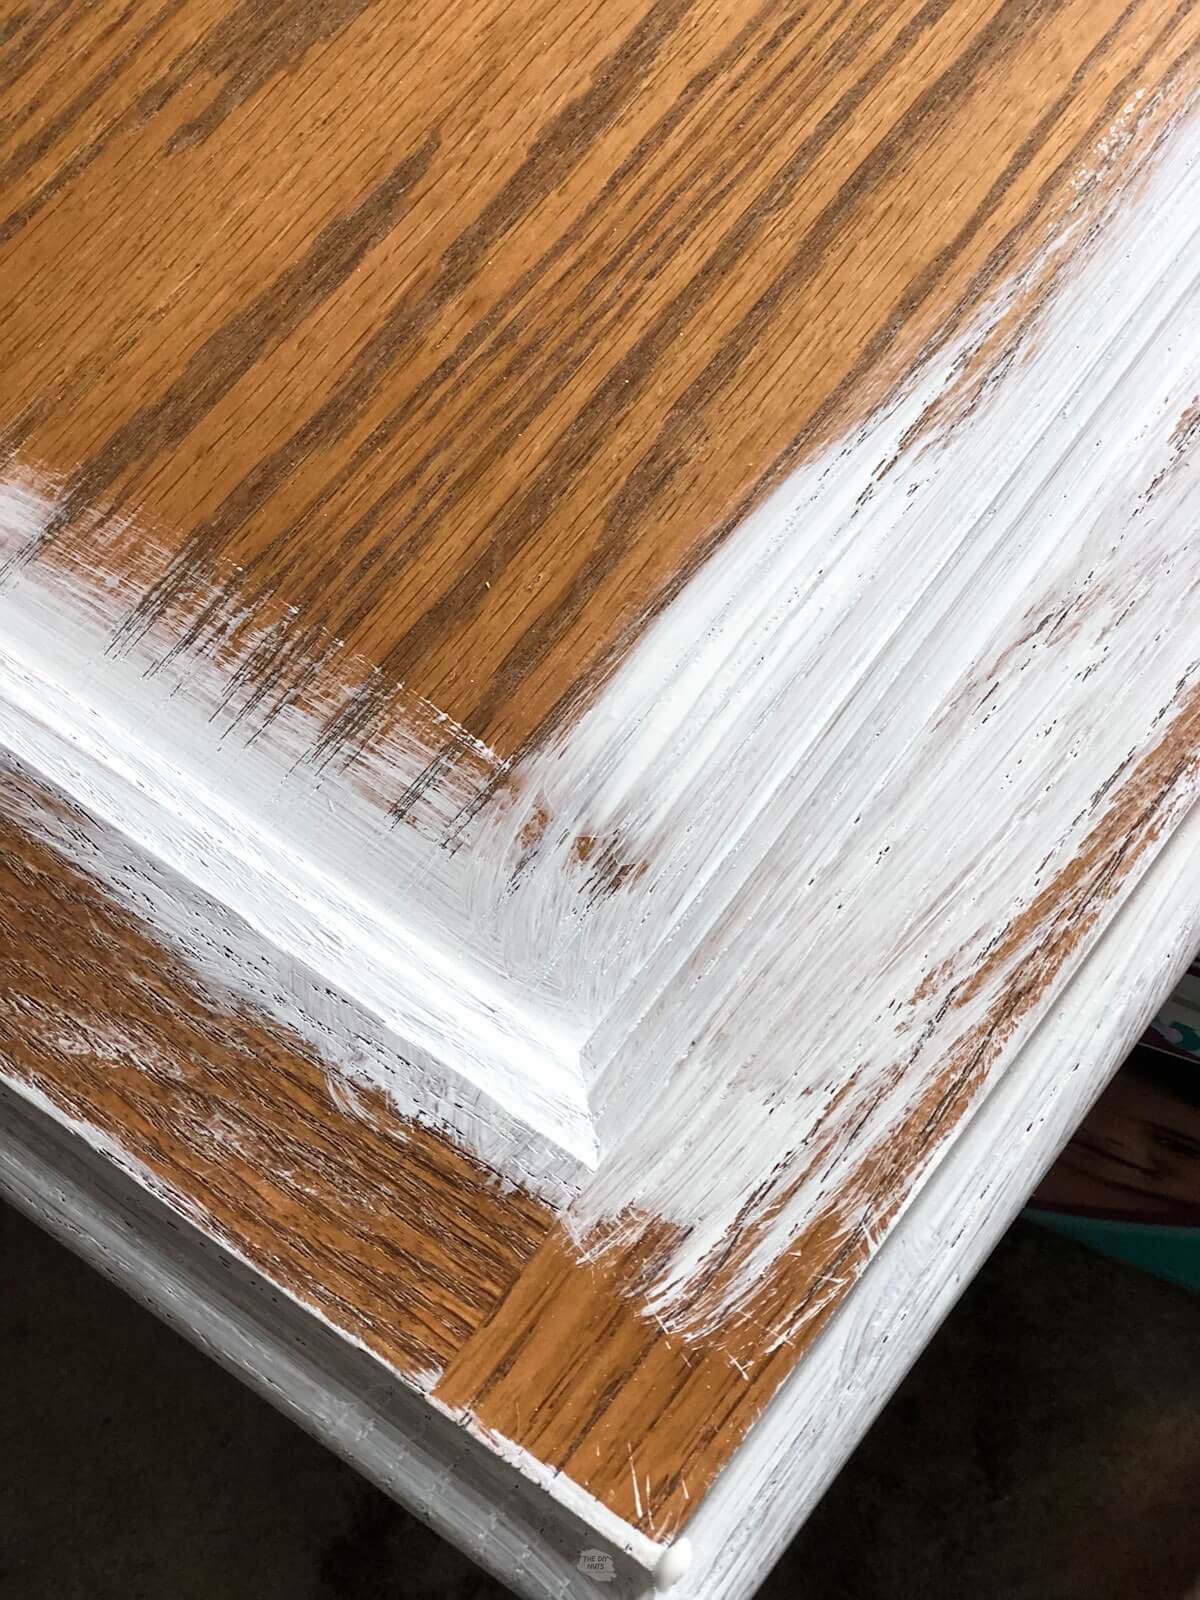
Step 2: Scuff Up The Surface With 220 Sandpaper
Lightly sand with fine sandpaper to roughen up the gloss on our current surface. This always allows the primer to stick a little better. Make sure you go with the grain.
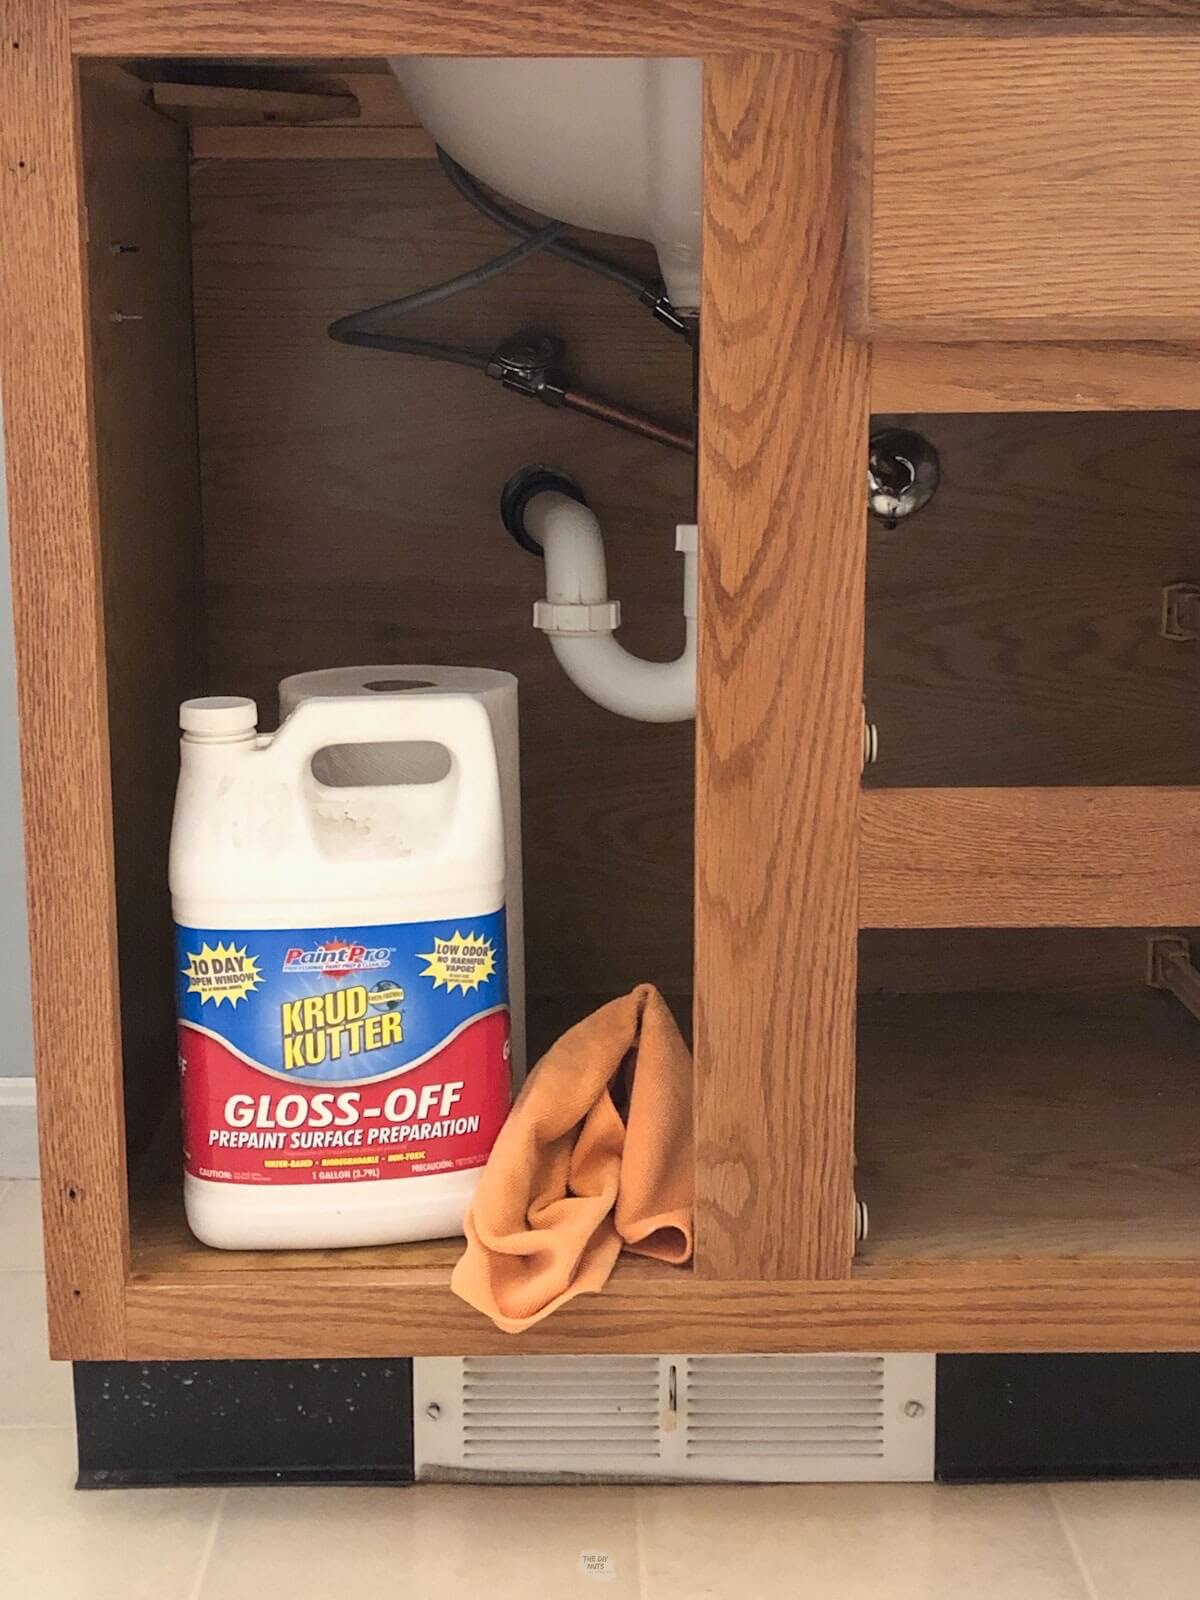
Step 3: Wipe Down With Deglosser
Use a deglossing agent or trisodium phosphate to clean cabinets. Wear rubber gloves when using a damp cloth to wipe down cabinets, drawers, and doors.
Also, double-check that you cleaned and deglossed all parts. You do not want anything greasy left over.
Step 4: Tape Out The Back Of The Drawers & The Side Of The Cabinet
Tape any spots that you feel you will not be able to trim well with a brush. I only taped along the wall where the cabinet and the wall meet. Use your fingernail or an old credit card to really push the tape on.
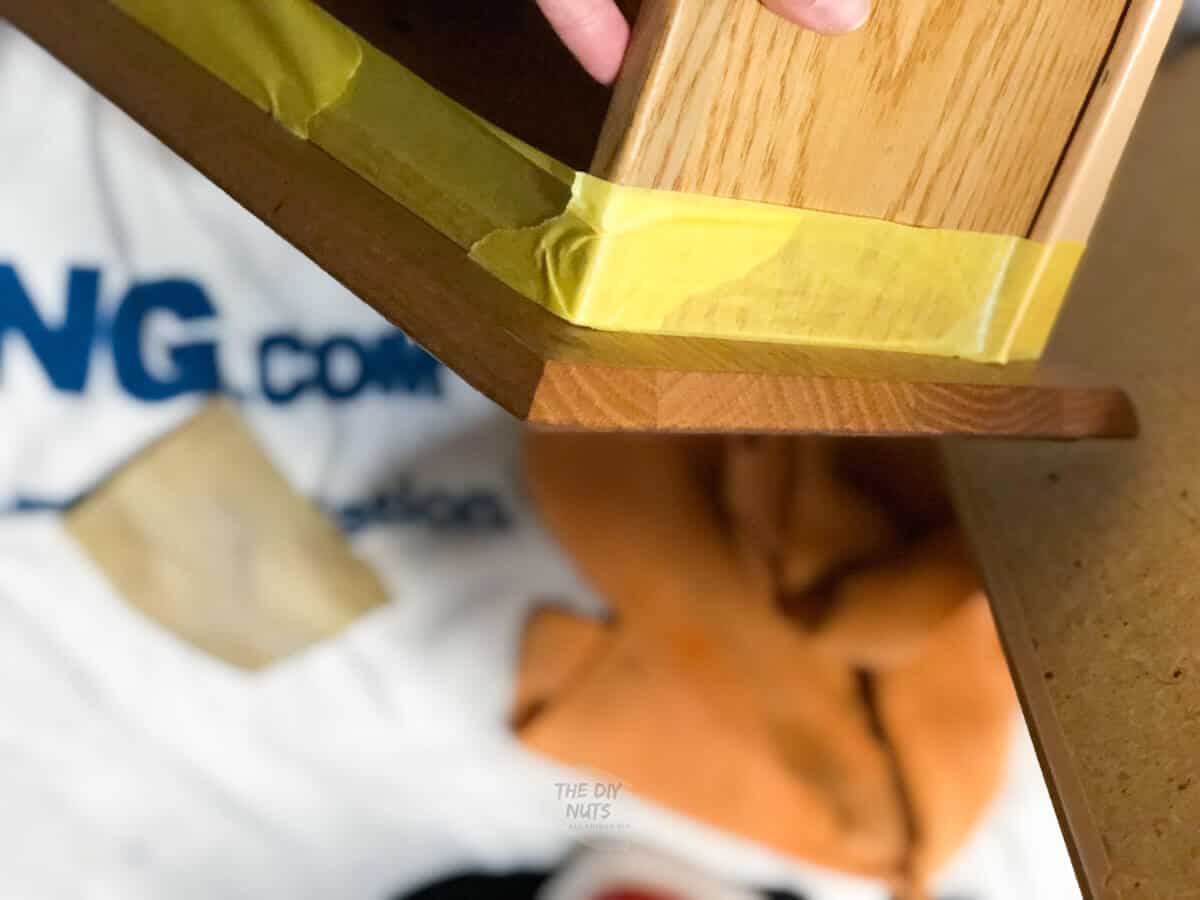
Tape drawer fronts on the back so that you can add a coat of primer and paint to the backs of the drawers easily.
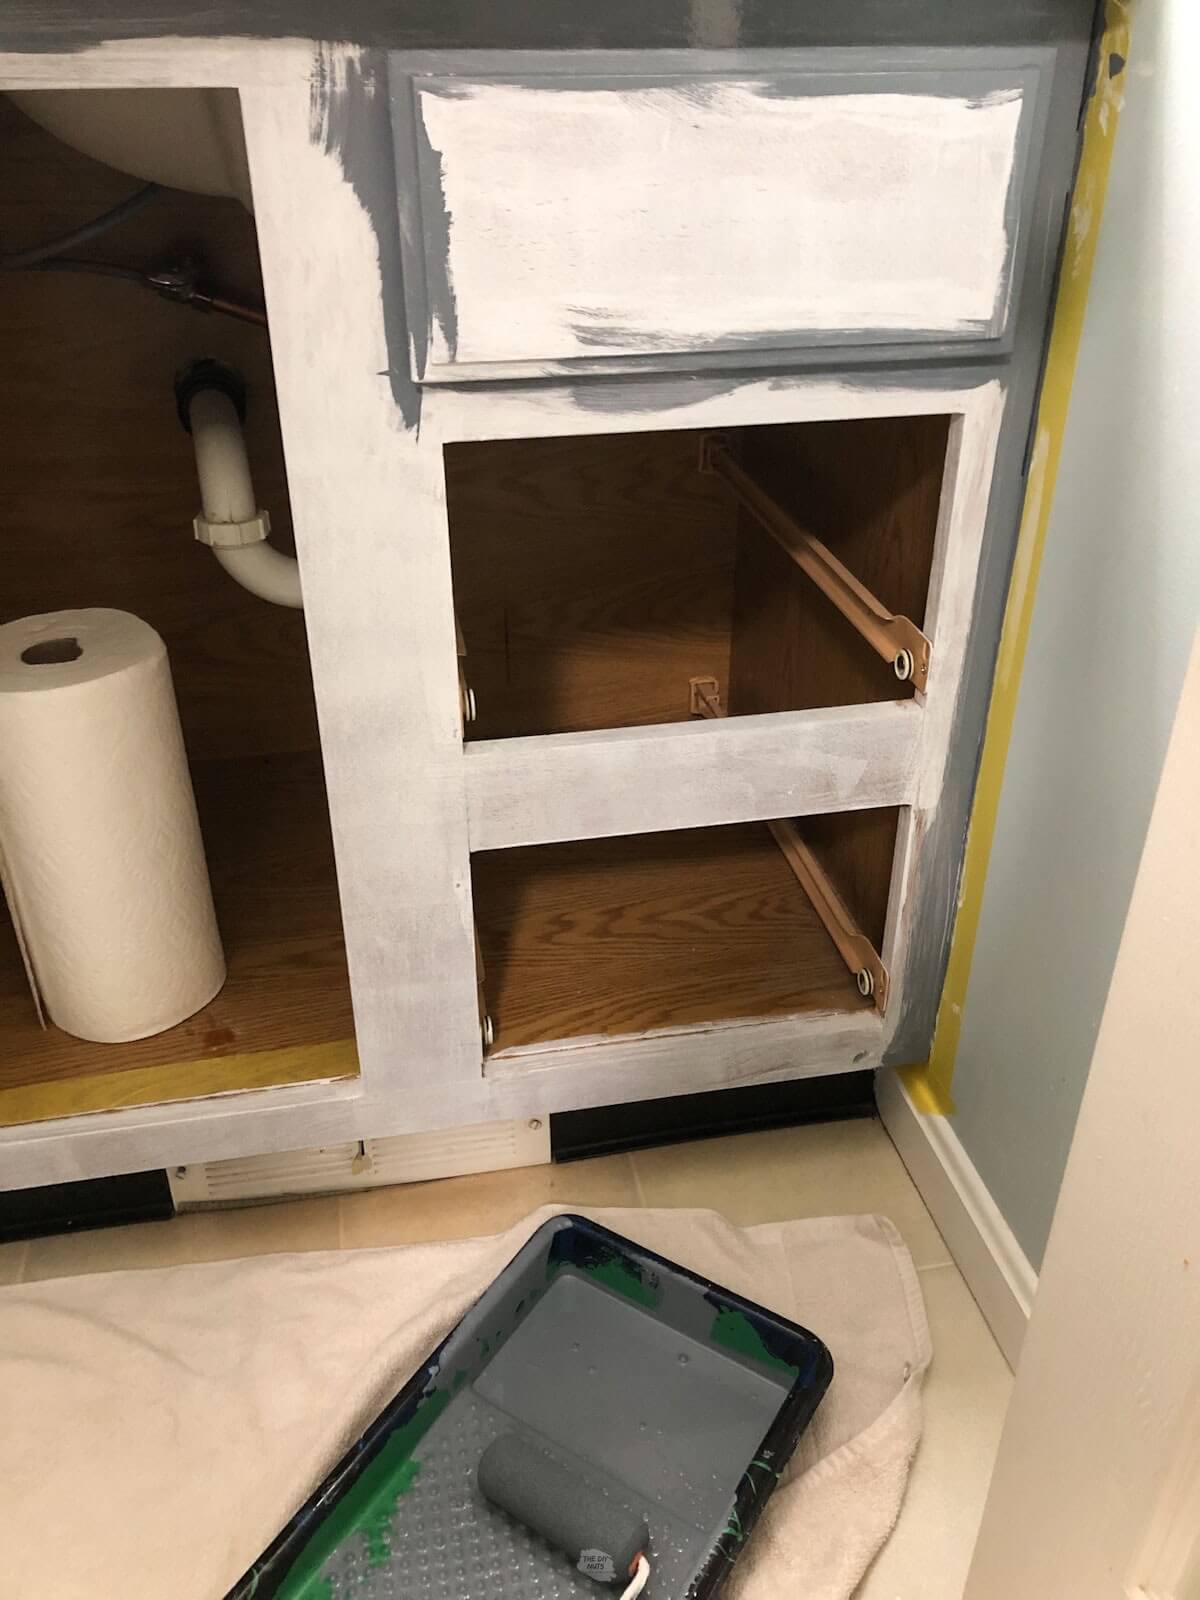
Step 5: Prime Hard-to-Reach Areas With Brush
Use a primer with a brush first in areas that can’t be rolled. The biggest thing is to make sure you cover everything without drips.
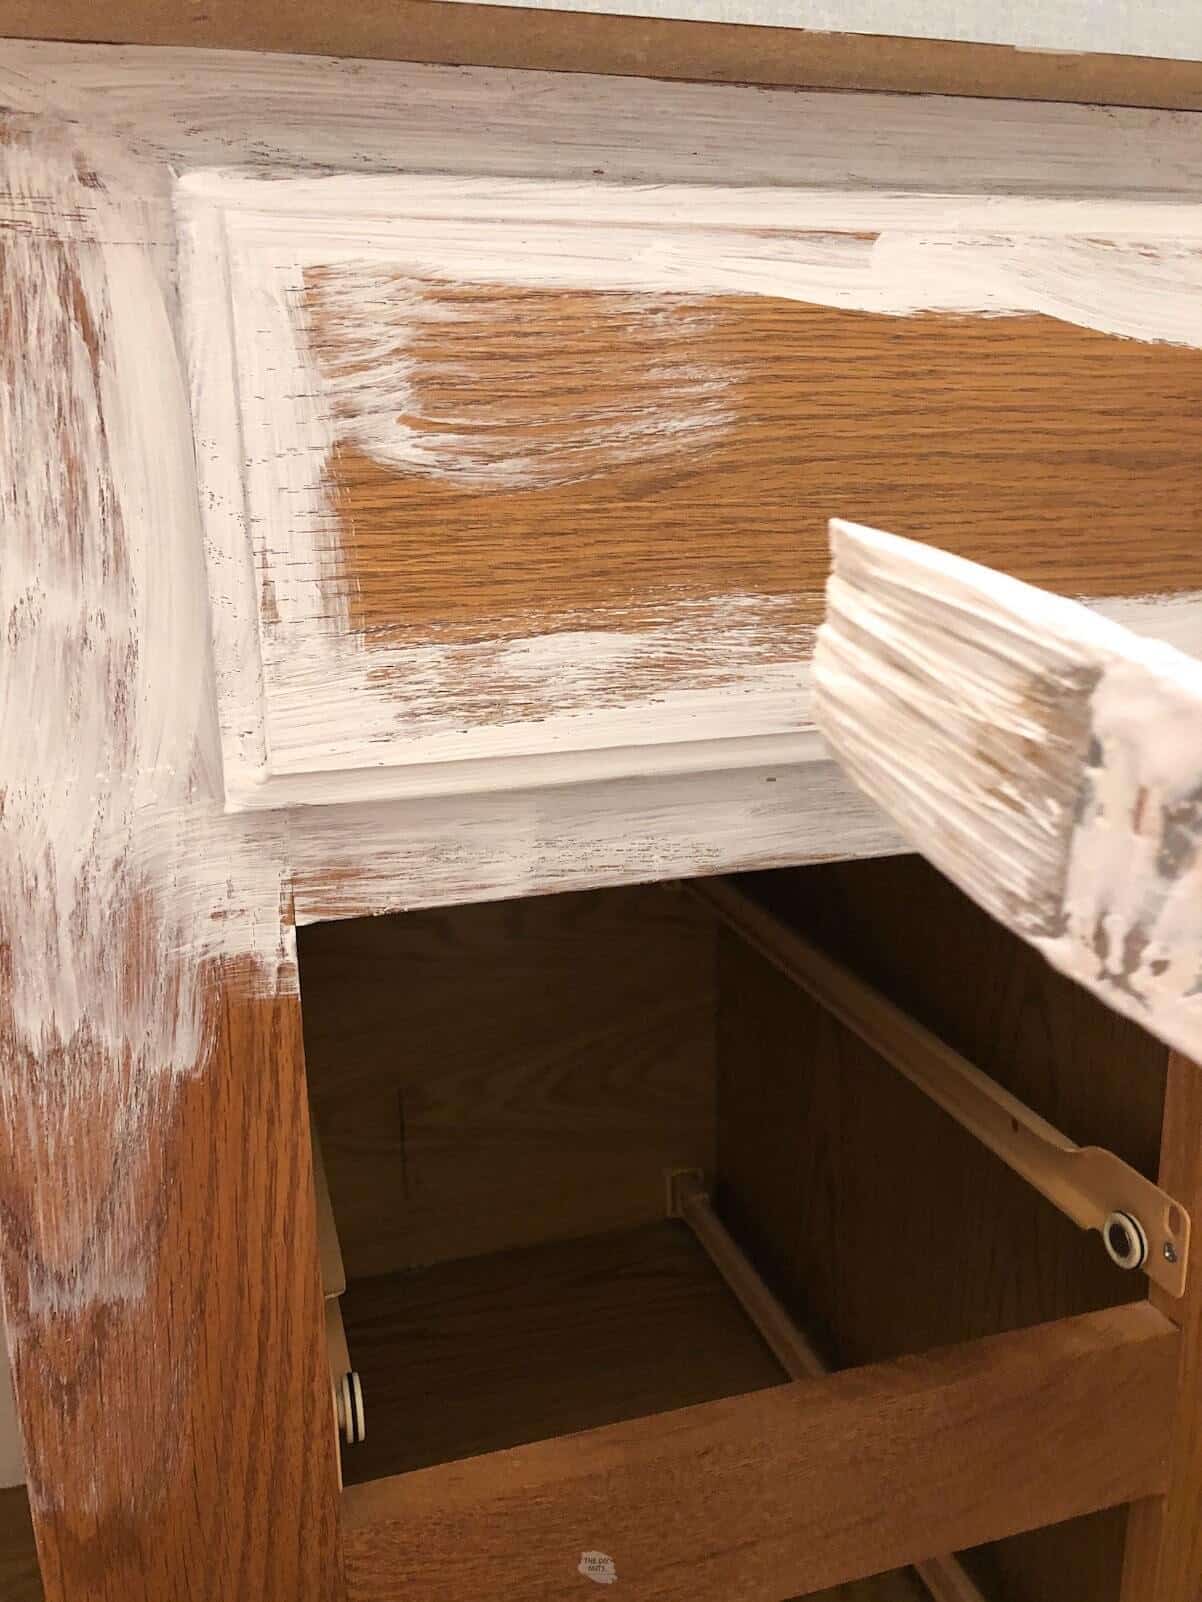
If you’re painting cabinet doors and they are like our standard construction-grade cabinet from the 1990s, make sure there aren’t extra drips in the grooves or ridges.

Step 6: Check For Drips
Once you complete the door, quickly brush any spots that appear to have too much primer. Continue to also prime the spots a roller could not reach on the cabinet frame back in the bathroom.
Step 7: Prime With A Small Foam Roller
The large flat surface can have primer applied with a small foam roller. The same principle applies to full coverage, ensuring no drips.

Step 8: Let Primer Fully Dry
Let your primer dry. The front and back of the drawers should be able to be painted/primed at the same time because you should be able to prop them up. Once the primer is dry, you will need to flip the door over and apply it to the back side.
PRO TIP: Storing your brush and roller in a Ziploc bag helps you avoid washing them every time.
How long does it take primer to dry?
The primer should dry in a few hours (Sherwin Williams says 4 hours). However, I also call myself the naptime painter, so I always paint in steps during naptime and continue the next day.

Step 9: Start Using Latex Enamel With A Brush
Therefore, I did the back of the door later that day, but waited to start with my semi-gloss latex enamel paint until the next day.

Step 10: Continue Painting With A Roller
Following the same brush-and-roller procedure, apply the latex enamel paint. Let dry and then add a second coat to the drawers, doors, and cabinet base. If you think you need a third coat, feel free.
Read this complete tutorial on how to easily paint cabinet doors before starting your cabinet painting project.

Step 11: Cover All Surfaces With One Coat Of Paint
Make sure that you evenly paint the sides and all parts of the cabinet boxes with the first coat of paint. It is very easy to miss a spot. Look at your cabinet and vanity parts from all angles to see if you missed any spots.
Step 12: Let The Paint Fully Dry & Add A Second Coat Of Paint
Repeat the steps with the grayish-blue paint at least twice. You may decide to add a third coat depending on how thickly you applied the paint.

You can choose to paint your old laminate counters, keep them as is or remove them and replace for a new look. As you can see, we replaced ours with a new counter and faucet.
Step 13: Let Your Painted Doors And Drawers Fully Cure
It is important not to rush to put new or old hardware back on immediately. Once we felt the paint was cured, we added our cabinet pulls.
Optional: Add Or Paint Hardware
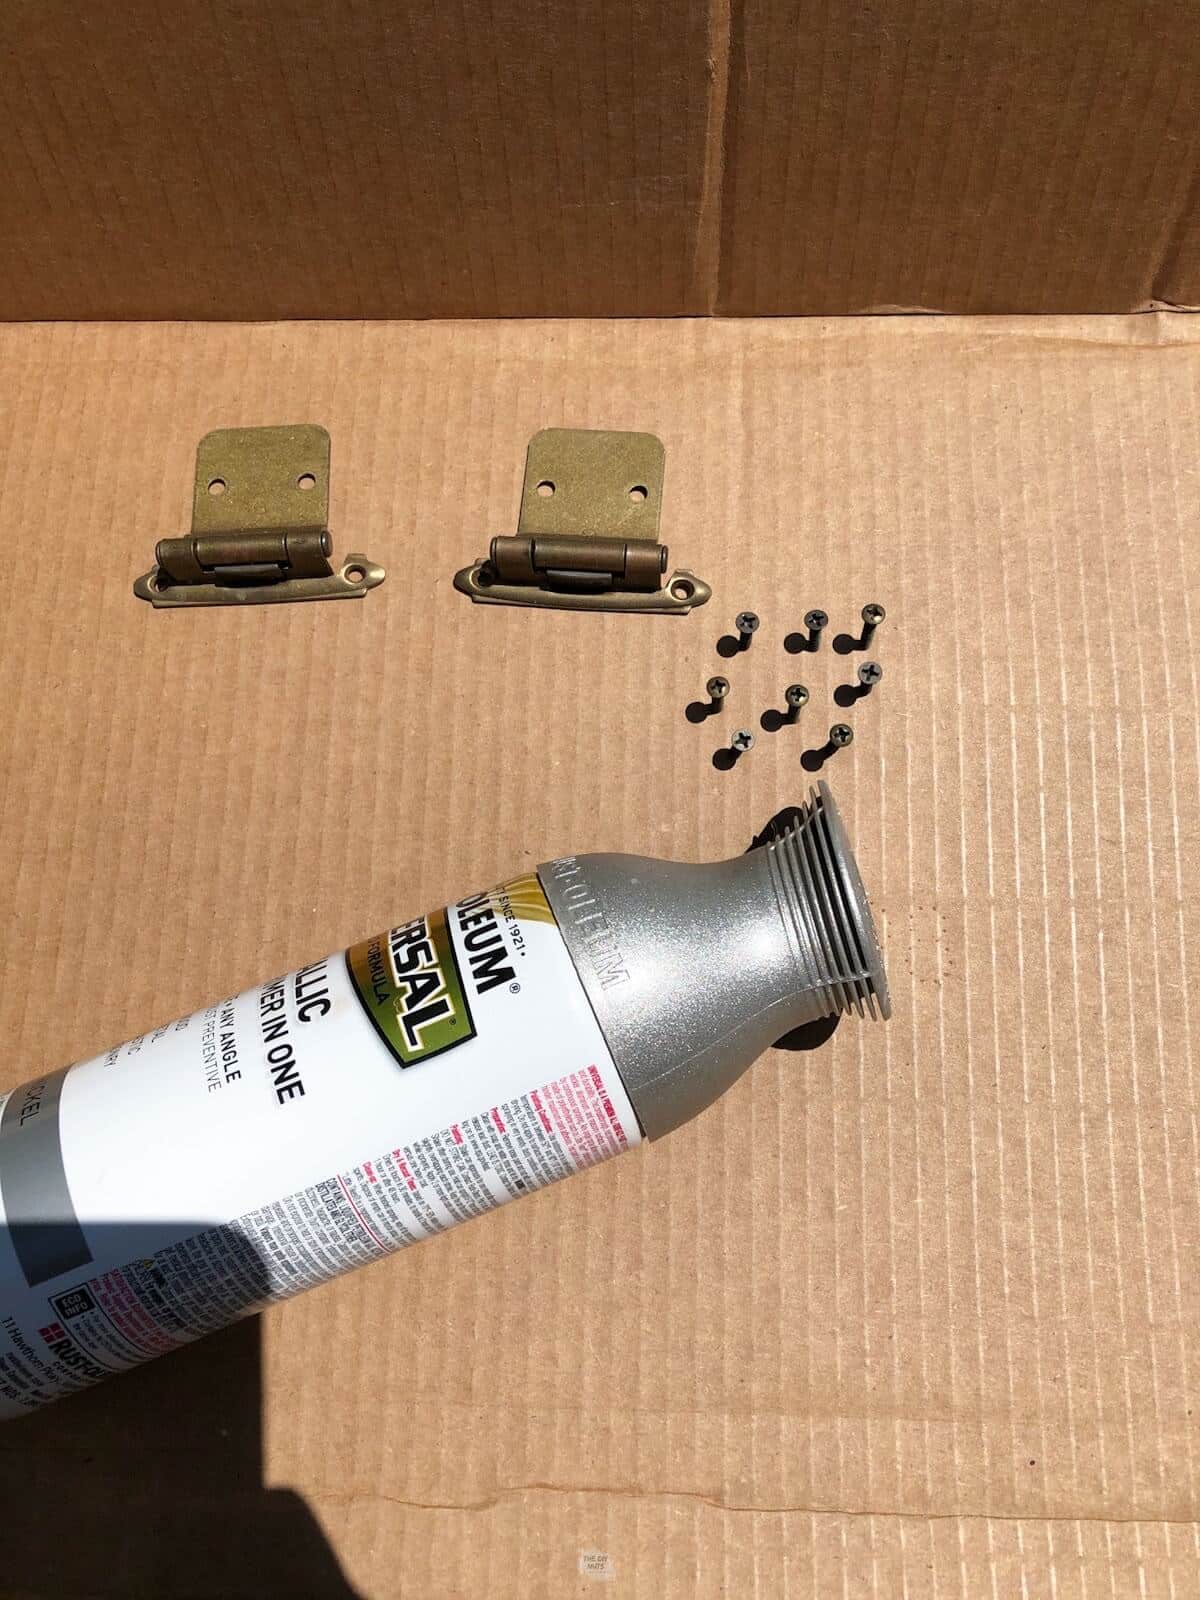
Add new hardware pulls or spray the old hinges and hardware. These large pulls came from Amazon and are only plated brushed nickel. The price was right for our kids’ bathroom makeover.
More DIYS: Get our full tutorial on painting cabinet hardware with spray paint.
You should still be very careful, as it can take paint 30 days or so to fully cure or harden.
Step 14: Add Cabinet Protectors
The last step is to add plastic bumpers on the inside to reduce drawer and door banging.
We recommend doing this about 5-7 days after you have finished painting the cabinets. Don’t forget this step. It will make your new paint job last.
Read More: 16 Unique DIY Painted Bathroom Vanities from our DIY friends. We love the different cabinet color ideas.
Tutorial FAQs
If you are like us, you only had to buy paint and hardware. If you assume that you already have brushes, rollers, etc., then this bathroom vanity makeover was done for under $75, and I have a lot of primer, paint, and deglosser leftover to use for future projects.
Since this bathroom will mainly be used by our children, we went with this countertop and sink and ordered an extra side backsplash for the corner.
We also had to purchase a new faucet. We went with a highly rated, modern-looking Kohler faucet in brushed nickel for under $100.
The shinier the surface, the easier it will be to clean. We like using semi-gloss or satin on cabinets. Semi-gloss wipes clean a little more easily than satin.
Other DIY bloggers or pro painters recommend using these fillers before sanding, along with an oil-based primer, to help remove the wood grain.
It really doesn’t bother us. Therefore, we didn’t take this extra step.
Before and After
What a fresh coat of paint can do for your bathroom cabinets is amazing. We love how the bathroom turned out, from the Charcoal Blue cabinets to our SW Grayish bathroom walls. The only thing we need to do is spray that vent black! (Thanks for the comment and suggestion from one of our readers.)
Tips
- If you are painting your cabinets white, you may want to consider an oil-based primer to prevent tannins from bleeding through. Wood tannins can cause your paint to bleed through and create yellowish or brownish spots.
- When spraying old hardware, use an old piece of cardboard so that you can stick the screws in, so it is easier to spray the heads with silver spray paint. This will allow you to get full coverage on all parts you will add to your newly painted cabinets.
- SW All-Purpose primer has been our go-to primer for our home DIY projects, but that does not mean an oil-based primer (Zinsser Oil-Based Stainblocking Primer) may be better. If you can stand the brushes’ smell and cleaning, will do a better job sealing your wood cabinets than a latex-based primer.
Follow us on Pinterest, YouTube or Facebook for more DIY inspiration!
More Budget Bathroom Ideas
You may have noticed that this bathroom also had a few other DIY projects to help finish it. You can see all the products and other DIY bathroom remodel ideas here.
- DIY Herringbone Bathroom Accent Wall – different bathroom with budget-friendly ideas
- DIY Rustic Pipe Bathroom Shelf – we added this later
- 28+ Modern DIY Bathroom Shelving Ideas – an awesome list of DIY shelves you can build this weekend.
- 7 Mistakes To Avoid When Painting Cabinets
Painting our bathroom vanity cabinets was one of the best and cheapest ways to refresh our small bathroom.
If you like this tutorial, please give it 5 stars below 🤩🤩🤩🤩🤩. Your support helps us continue to provide unique and budget-friendly DIYs.
How To Paint Bathroom Cabinets
Equipment
- Plastic Bumpers add when paint is cured to help protect your new paint job.
Supplies
- Deglosser
- Latex Enamel Paint this is what we used
- Primer
- Hardware Knobs or Pulls
- Optional: Spray Paint for hinges
- Small Paint Tray
Instructions
- Take all doors and drawers out.
- Remove all hardware and hinges as well. Place hardware in a bag and label it.
- Lightly scuff the surface of your bathroom cabinets with 220-grit sandpaper.
- Use deglosser on a rag and wipe down all surfaces getting painted.
- Use painter's tape to tape spots that you do not want to get painted. Consider spots such as a long wall, around the drawers and inside the bathroom vanity.
- Begin using a primer with a brush and a small foam roller. Pay attention to cleaning up any drips. Let primer completely dry.
- Clean your paintbrush.
- Once the primer is dry, use a latex enamel in the color of your choice to paint. Use a brush for hard-to-reach spots and a small roller for the rest.
- Let the paint dry and repeat for at least two coats of paint.
- Remove painter's tape.
- Let the paint cure as long as possible before putting cabinets doors and drawers back in.
- Add cabinet protectors inside the doors and drawers to help eliminate extra banging when they close.
Notes
- Optional: You can spray your cabinet hardware or purchase new to complete your bathroom vanity makeover.
- If needed, use wood filler to prep spots or holes in cabinets before painting if needed. Sand and let completely dry before priming doors and drawers.
- When adding new hardware on you should be very careful, as it can take paint 30 days or so to really cure or harden.
- You don’t have to paint the inside of your cabinets, but we do recommend painting the lip, and the back of the drawers for a polished look.
Going to try this vanity makeover. Ty. Have lots of honey oak – floor and cabinets. Paining the cabinets is not an option. We are going to repaint the house. Suggestions for paint color ideas. Currently a pale lush yellow. Accent dark burgundy and a bit of gray
Hi Doreen. I know what it feels like to have a lot of honey oak everywhere. I love gray paints and think a lot of them can help modernize honey oak. In our basement makeover, I left the wood trim, painting only doors and posts. The wall color down there is called Grayish by Sherwin Williams. I am a fan of a lot of gray colors. We have used Sherwin Williams Polish Concrete (our herringbone bathroom) in the bathroom and Techno Gray in our bedroom. We also have SW Liveable green throughout our whole house. I think Greens are making a comeback and this one is neutral enough. Good luck. As always, make sure you bring home samples and check out what looks good in your lighting.
If the canning is stained and the sides are made of particle board can you sand it lightly still and paint over it? How fine of sand paper??
Hi Nicole. I would think yes. I believe you are describing the same thing we had on our before cabinet. Just make sure you sand (we used 220), degloss prime your bathroom vanity cabinets before painting. Good luck. The sanding is mainly to give the primer something to stick to. We have never fully removed stain/poly when painting and our cabinets seem to be holding up.
Love the makeover! Where did you get the mirror??
This is awesome! Thank you for sharing your experiences and how it turned out! I’ve been wanting to redo one of our smaller bathrooms and get a new countertop put in and I didn’t even think about the lip in the back for when the kids take it over! Thanks again!
Hi Alex! Good luck with your small bathroom remodel!
Love this makeover! Where did you get the mirror?
Hi Allison. This mirror was bought at my local At Home store. I went back and forth about getting it and absolutely love how it added to our bathroom makeover. Thanks for the kind words!
I have the same colored cabinets throughout my house. Been wanting gray vanities for a couple of years. Your step by step instructions are easy to follow and I think I can do this.
Love the color you picked and the finished product looks great.
Thank you for posting this.
Hi Gerdy. Thanks for the kind words. So far our bathroom cabinets have held up well and we really love the look. Good luck with painting your bathroom cabinets.
Looks great! need to spray the heat great black to match.
Thanks, Ron. I do need to spray that vent to match or get a new one.
Wow, it looks like a completely different bathroom now! I’m having my bathroom cabinets redone by a local cabinet painter, and I’m totally going to use the same paint color as you!
Hi! Did you end up doing a post on how you took off the counters?
Hi Joanna. I guess you just told us a post that I never wrote about. I did document the process with pictures, so I will have to work on that this week. Thanks for asking the bathroom countertop removal question. I will come back into this comment thread and add it once I do write all about it.
I also have an old oak Merillat bathroom vanity that I plan to paint white. However, the formica top is a peachy color and I also want that white. Can you tell me how to paint the top? We cannot afford a new countertop.
Thanks
Hi Penny. Peach-colored Formica sure sounds fun. We still have the blue laminate countertops in our basement bathroom. I painted both oak vanities the same blue-gray color. I can’t recommend a specific product to paint countertops as we haven’t done it. However, I do know Rustoleum and Giani make a paint that you could use. As with any painting project, I would just make sure you prep the area really well. Check out this post by Kladiescope Living on how they painted their kitchen counters. It seems pretty cool!
I’m about to paint my oak vanity. The drawer fronts are not removal, so should I try to paint the back of the drawer front or leave it as is? Doing so would involve a lot of taping and then might still look messy. Thank you.
Hi Karen, I would paint the wood part of the inside of the drawer of your bathroom vanity. I would just make sure that you use a good painter’s tape (green Frog kind) and be very careful when applying paint if you are really worried about getting a clean line. I have also found that you can kind of scrape off any extra globs or leaks if you catch it right away.
Red Oak furniture/cabinets are highly sought after for their beautiful grains and strong durability. I would have refinished the vanity and gone with a modern rustic look. To each their own, but it now looks like any cheap, “modern” piece made out of MDF.
Hi Marco. To each its own. The sides of our cabinets were not completely solid wood, so I am not sure that was an option. We did gel stain other ones in our house. Good luck with your future DIY projects and thanks for sharing your ideas.
We followed your directions to a T and my bathroom vanity turned out great! Thank you so much for the tutorial. I was very intimidated by the thought of messing up and having to spend $1,000 on a new vanity, but this gave me the confidence to try it and I’m so glad I did. I would include photos but it doesn’t give me the option. Thank you again!!
Hi Julie! Thank you so much for the kind words. I am so happy that your painted bathroom vanity turned out so well!! I would love it if you would share your images with us at erin@thediynuts.com. I could even share them with our email list with your permission!
Thank you for sharing your process! I got my kitchen a few weeks ago and ever since I’ve wanted to update my bathroom cabinets. I think I’m going to try your process out on my downstair bathroom vanity this weekend, and I’m crossing my fingers that it turns out as good as yours!
Can you tell me now how well the Behr held up after a year and a half or maybe it’s longer?
Hi Gina. On our bathroom cabinets, the Behr has held up surprisingly well. On the railing right outside, I would say I wish that I would have used a more expensive paint. This is probably due to how the railing gets touched vs. the cabinets. The painted bathroom cabinets look as good as they did when we painted them over a year and a half ago. Good luck with your bathroom cabinet project.
Hi Erin!
I am contemplating updating my son’s bathroom. He also has the old oak look. My question is about the hardware. I absolutely love the handles on the cabinet (my vanity doesn’t have drawers). What size hole centers did you purchase?
Hi Erin! The handles we purchased were the 6 1/4 inch wide ones. Just note that these were an economical choice and aren’t solid metal. They have worked fine for our upstairs bathroom and I have even spray painted them in our laundry room. Good luck with painting your bathroom cabinets!
Great tutorial…thank you so much!
Hi Mary! Thanks for the comment. Good luck with your cabinet painting.
Beautifully done! Your directions were right on! I just completed painting my bathroom vanity. What is the best way to clean hardware? 30+ years of build up!
Hi Diane. I am glad you were able to paint your bathroom vanity! Honestly sometimes when hardware is so junky, we just buy new modern handles to match the holes that are already there. Good luck with your bathroom vanity makeover!