Easy DIY Budget Basement Makeover Ideas & Tips
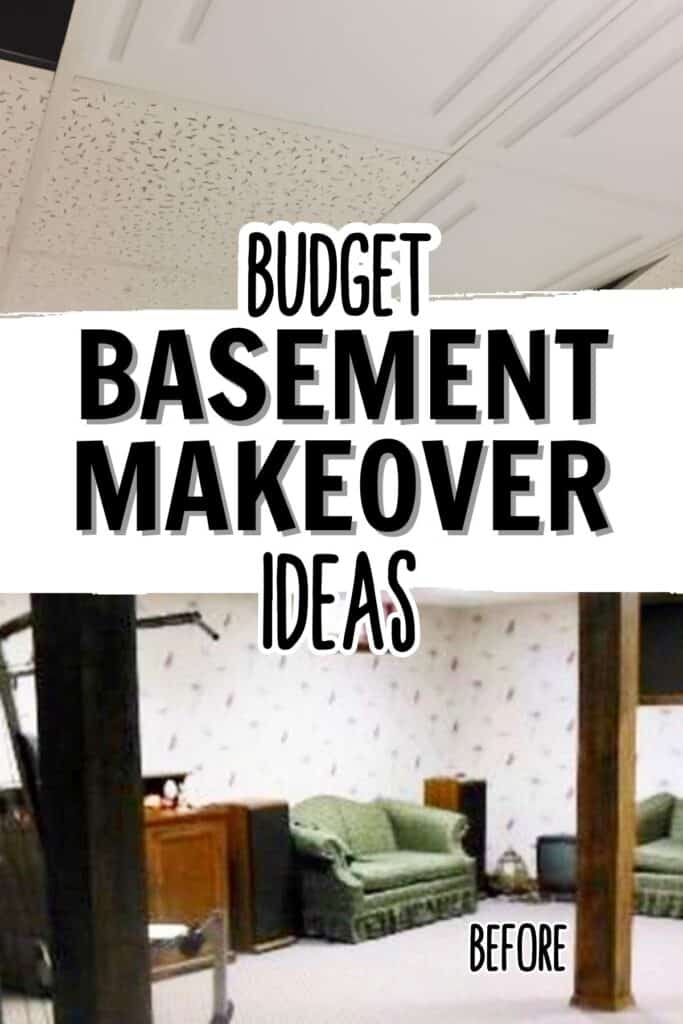
Do you have a basement that could use a refresh? Learn how you can cheaply makeover your basement to create a room in your home that the whole family will love. Whether you have a big basement or a smaller one, DIY projects can help you keep your basement renovation on a low budget.
*Disclosure: I only recommend products I would use myself and all opinions expressed here are our own. This post may contain affiliate links that at no additional cost to you, I may earn a small commission. Read our full privacy policy.
The “Before” Basement
Here are a few home improvement projects we completed in our basement. Luckily, half of our basement was “finished” but completely dated. These few DIYs and products helped us to complete a low-budget basement remodel ourselves.

Design Your Basement
Do you have separate rooms in your basement, or do you have some of your space in an unfinished basement? One of the main priorities in our basement was to designate specific areas for different things.
Our basement makeover included remodeling finished spaces, adding a creative space for our children, and creating a home gym on the other side of the basement.
Easy Ways to Cheaply Makeover A Basement
- Redo old and dusty drop ceiling tiles
- Replace flooring if needed (luckily our carpet was in good enough shape)
- Paint or get rid of wallpaper
- Paint or update some of the basement molding, doors or beams. Making a few things white can really enhance a space!
- Add extra storage space in your basement
- Add extra living spaces, such as a bedroom
- Decorate using items you already have, and enjoy your space for your family
- Create a home gym space
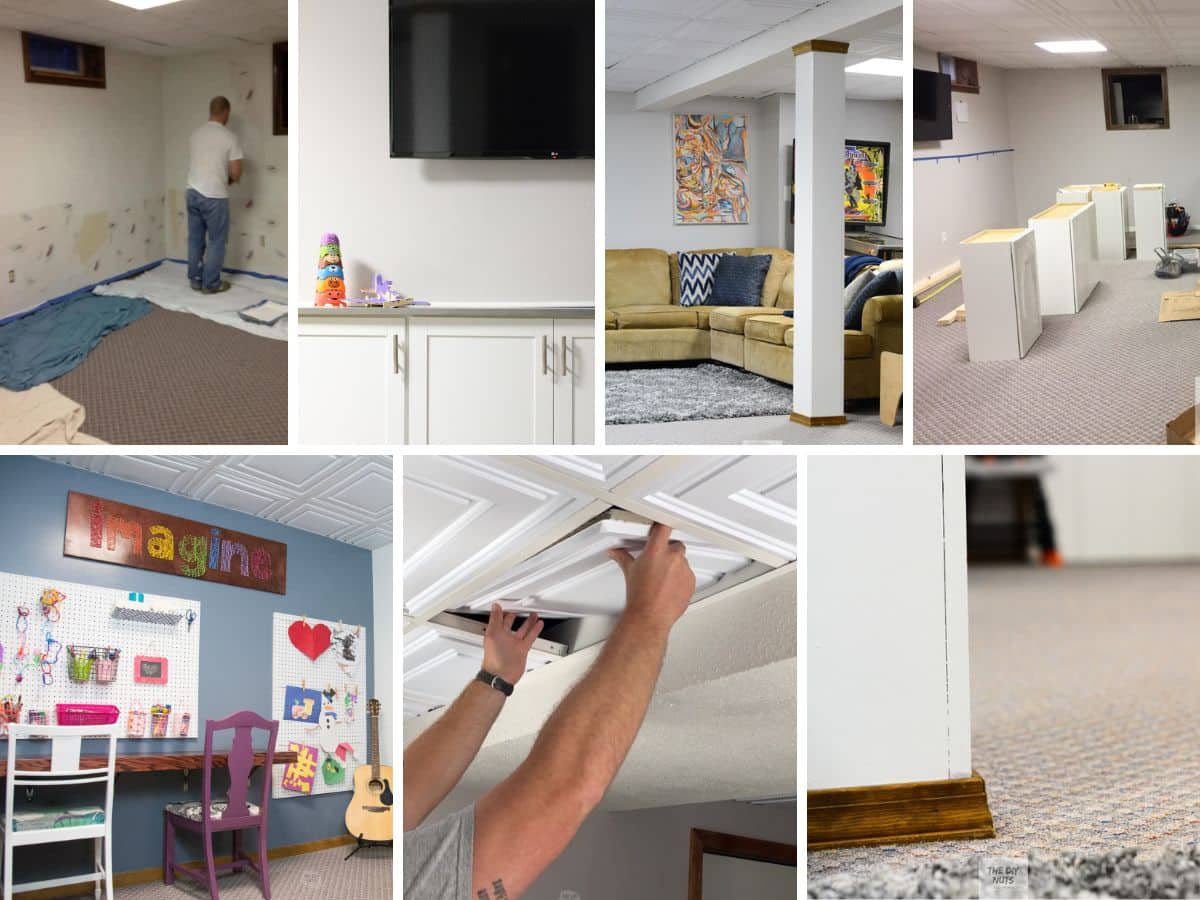
#1: Redo Basement Drop Ceiling
Our basement had a drop ceiling and probably the construction grade for all homes built in the 1990s. I researched all sorts of different ways to redo the drop ceiling. Here are a few of the best ways to makeover your basement ceiling.
Option 1: Remove The Drop Ceiling and Paint The Ceiling
Tear out the drop ceiling and paint all pipes and wood black or a solid color of your choice. If this painting method sounds appealing, here are a few tips from the bloggers at One Project Closer.
Pros
- Gain extra footage in your ceiling height
- No longer have a drop ceiling
- Looks nice when done
Cons
- Have to tear out the current system
- It is best if you spray the paint (therefore requires a lot of prep work/cover current materials, extra soundproofing from tiles gone
Option 2: Paint Current Tiles
Paint the current basement drop ceiling tiles. You could prop the tiles up, remove them, and paint them before placing them back in.
Pros
- Pretty inexpensive
- Can also leave them in the grids if you prop them up when painting.
Cons
- Time-consuming
- Still may not look the best
Option 3: Drywall The Basement Ceiling
This would also involve removing the drop ceiling grids and tiles.
Pros
- Professional looking
Cons
- Expensive to have someone else do
- Have to demo the current ceiling
- Time-consuming
- May be unable to reach the basement pipes or electrical wires easily
Option 4: Add New Ceiling Tiles
There are a variety of styles and designs to help modernize your basement ceiling.
Pros
- Looks professional
- Brightens up space
- Can easily order boxes of 10 tiles at a time
- Easy to install
- Limited skill level needed
- Limited mess
Cons
- It still takes time to replace all ceiling tiles, but not nearly as much as tearing the whole system out and then doing something else
- It is not as cheap as painting the existing tiles
Easiest Way To Redo A Drop Tile Ceiling
We chose to cover the existing tiles with decorative vinyl ceiling tiles.
You can take the old ones out, but we decided to keep the old drop ceiling tile and just add these covers. As you can see in the picture, it really brightens our space.
The tiles come in 2′ x 2′ covers or 2′ x 4′ covers, depending on your current grid setup.

Tile Installation
The full ceiling tiles were pretty easy to install. I worked in small sections. You take down the old tile and add the cover. You can place both back into the grid or just the new tiles. If one needs to be cut, use scissors to cut a cover to match the existing tile carefully.

It was amazing that just a nice pair of scissors. You do have to be careful not to cut the tile too small. It will hang down if it doesn’t fit in your current drop ceiling tracks. Once you have a bright white ceiling, you will realize how dated and dingy your old one was.
Other Drop Ceiling Tiles To Consider
And if you are a price comparer like me, links to see how much you will pay for the product we used.
Amazon
- Ceilume Stratford Tiles (the ones we used)
- 3D PVC Tiles: A more budget-friendly option
Home Depot
- Ceilume Stratford Tiles (the ones we used)
- Single Raised Panels: Slightly cheaper, but not as much depth.
- Flamingo Panel Grid Panel Ceiling Tile
- Decorative Tin Ceiling Tiles: Just in case you want to consider something completely decorative and different!
Lowe’s
I never thought I would LOVE vinyl drop ceiling tiles so much! The best part about our ceiling makeover is that I was able to do a large area all by myself with limited tools. Just take your time and work in sections, and you can get a new, modern look.

Grid Covers
You can also purchase this product by Ceilume to help cover up your drop ceiling grids. One day we might do it. It does look super nice, but right now it is not high on our priority list.
#2 Basement Wall Makeover
Our basement had ugly ’90s wallpaper throughout the living space. One of my friends said it looked like it came from the TV show Full House (not Fuller House). I had to update it, but when I tried to take a little off using traditional methods, it just didn’t seem to work.
Use A Wallpaper Sealer
Obviously, the ideal situation is to fully remove your wallpaper. However, it was impossible in our basement without completely tearing up the drywall underneath.
We had to research what to do with wallpaper and found that an oil-based sealer would work.

Recommended Sealers
- This primer and sealer would work just as well. It is the counterpart to the SW brand that we used.
- We found our wallpaper sealer at Sherwin Williams. If you ask them what product they recommend, they will guide you to it. Just make sure you work in a well-ventilated area or take frequent breaks when using the product.

How To Use The Sealer
Before using the sealer, sand the wallpaper seams. Then you roll it out like you would with regular paint.
For a basement, I think it was a perfect solution for our living space. It was a much better solution than trying to take down all the wallpaper and patch all the basement walls.
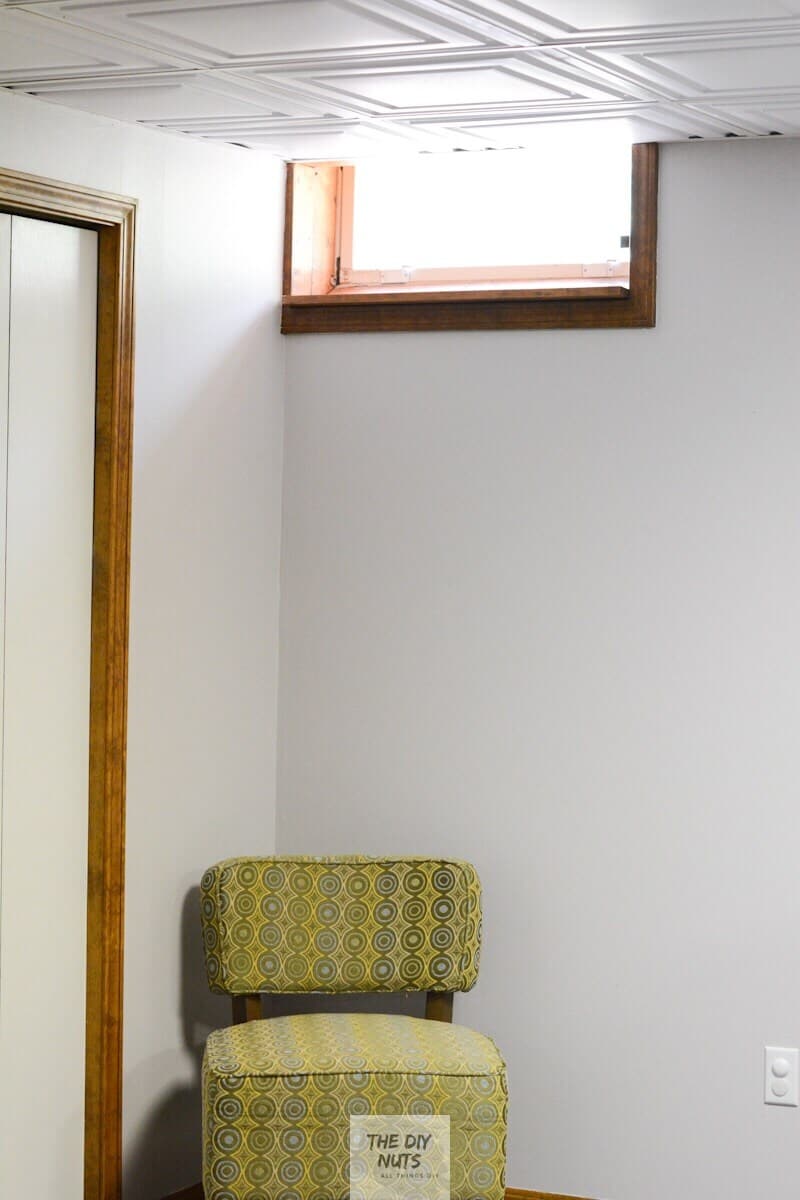
After it was done, we used a nice neutral, but cool gray. As you can see in the above picture, you really can’t tell that there is wallpaper under the layer of gray paint.
If your basement does not get a lot of natural light, you probably want to consider a light color.
#3 Update Some Wood Molding & Doors
In this house, we had OAK molding and doors everywhere! It is very time-consuming and a little messy to add a fresh coat of paint to all the molding when the carpet is already there. I really did not want to have to paint all the molding for this basement makeover.
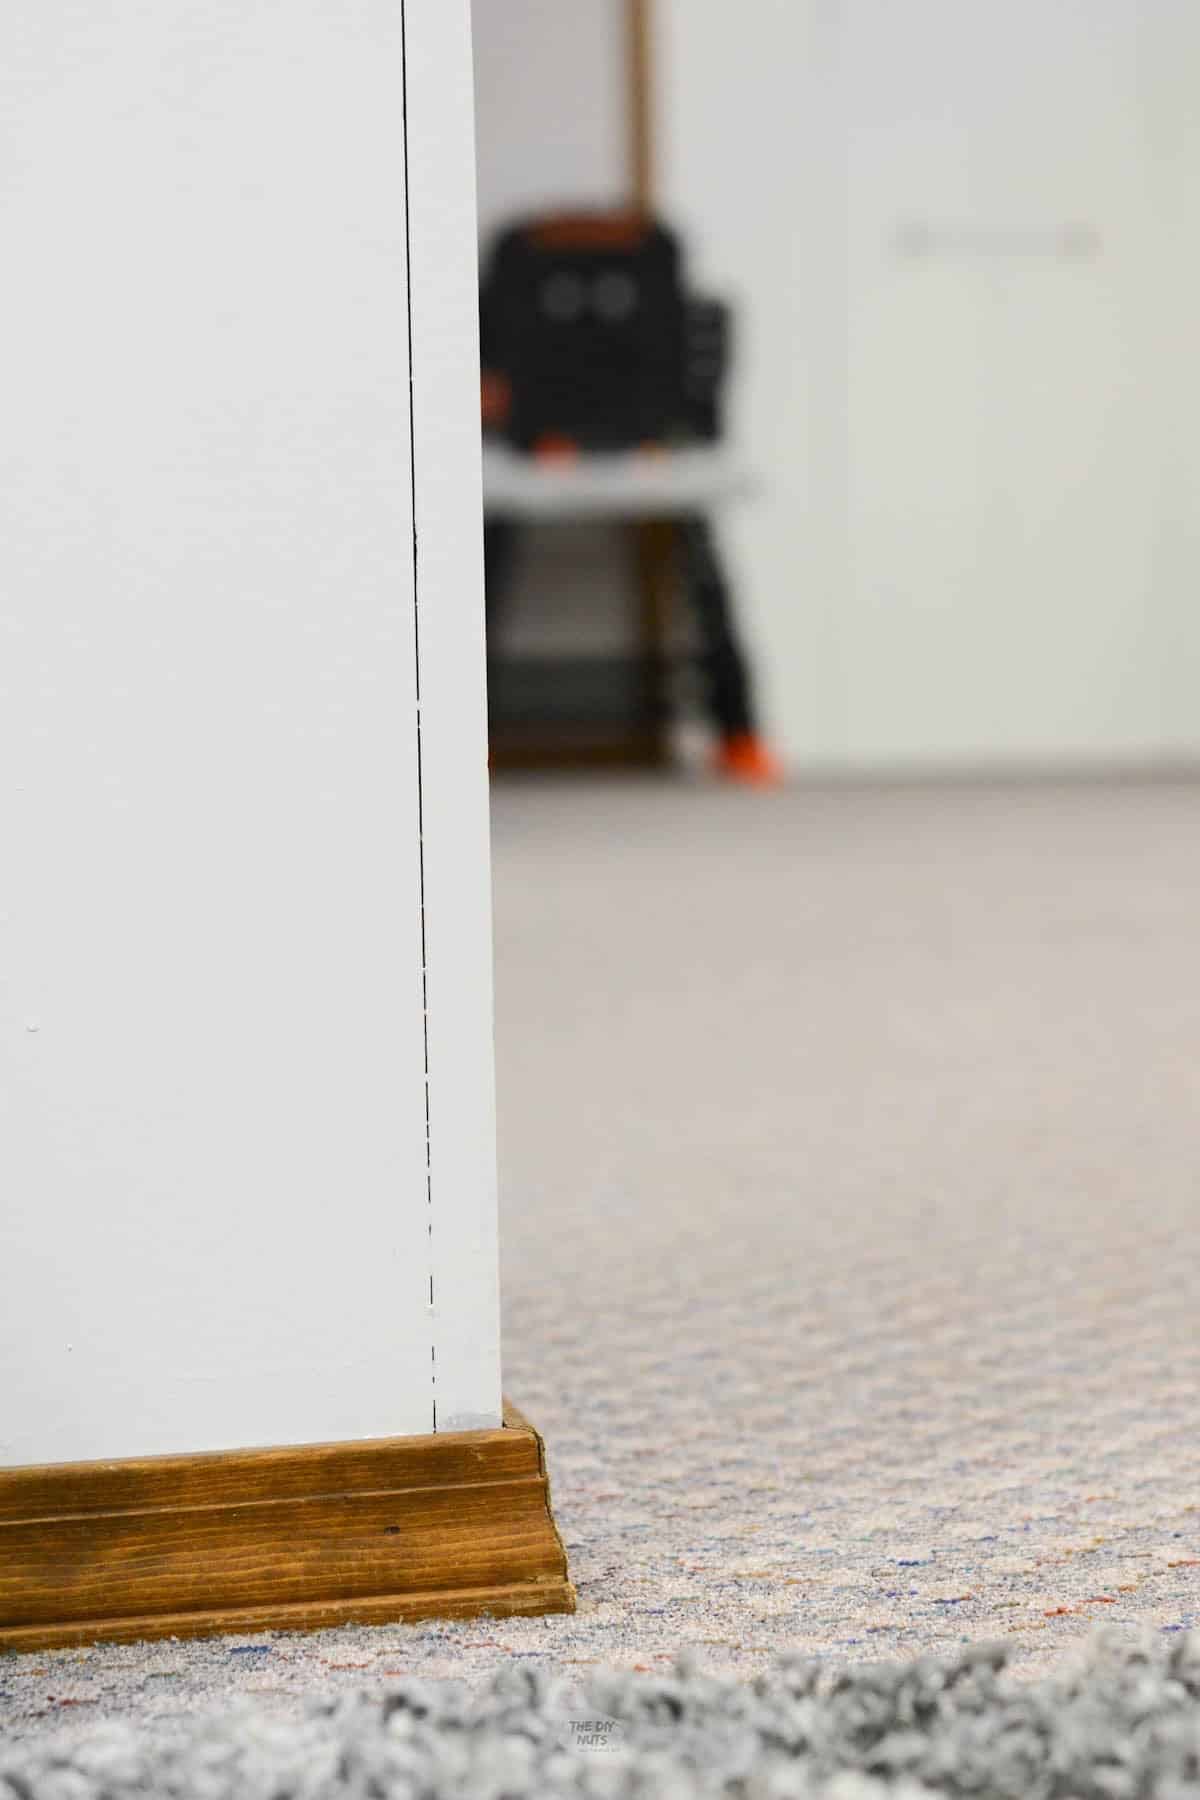
We chose to paint only the columns and doors, rather than all the molding. I am happy with that decision and would like to have some warmth in the wood in our basement.
How To Paint Oak Molding
- Use a deglossing agent to wipe down boards
- Apply a bonding primer with a brush
- Use a white enamel paint in 2 coats (at least)
Not only does it take time to do this carefully, but you also have to wait for each layer of paint to dry before proceeding to the next step.
Instead of painting all the woodwork white, I decided to follow the steps above to paint my doors and columns white, leaving the molding. This simple painting home improvement project really updated the space while saving us time.
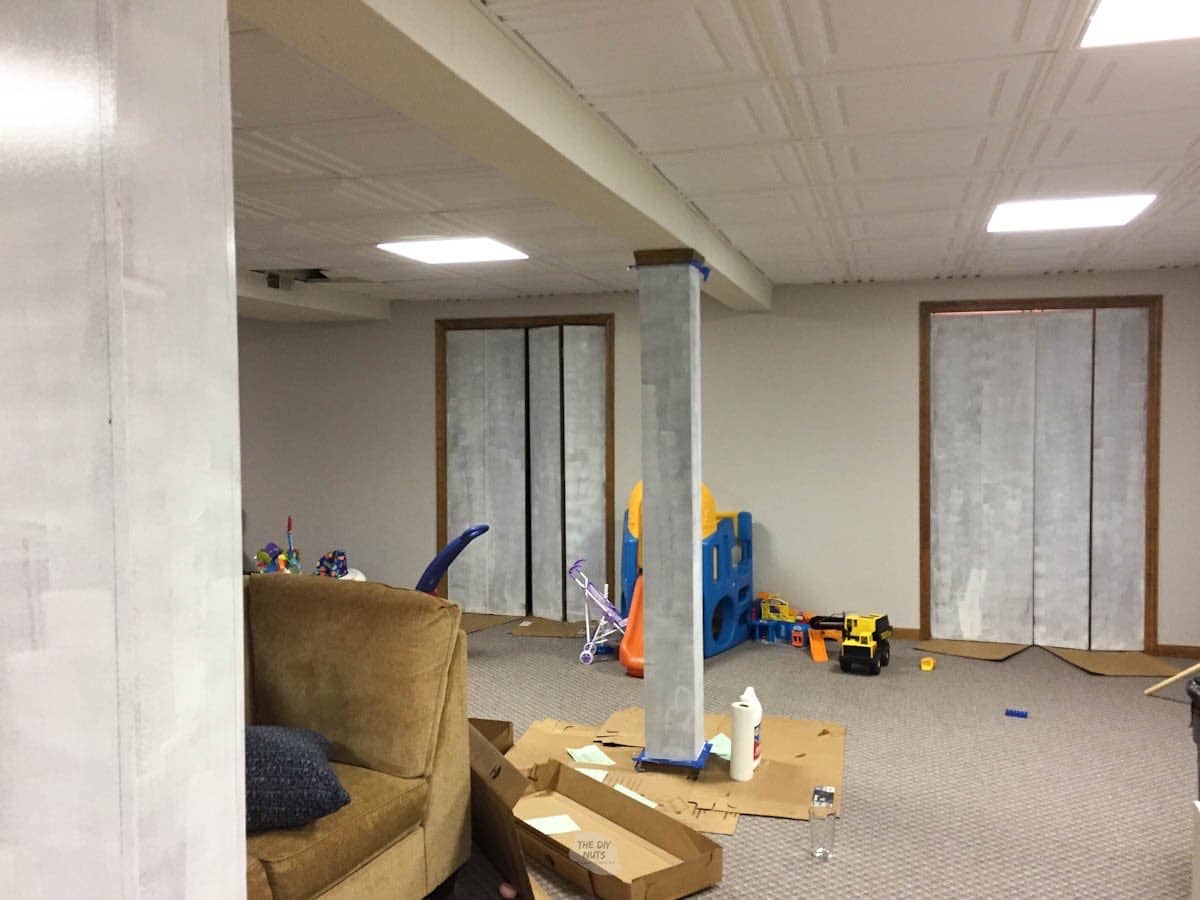
For the doors and columns, the only difference was that I used a small foam roller to apply the primer and enamel paint. I did have to trim around the columns so that I could leave the top and bottom of the molding in the wood color.
My days of getting rid of oak molding may be coming to an end after doing every single piece in two houses recently.
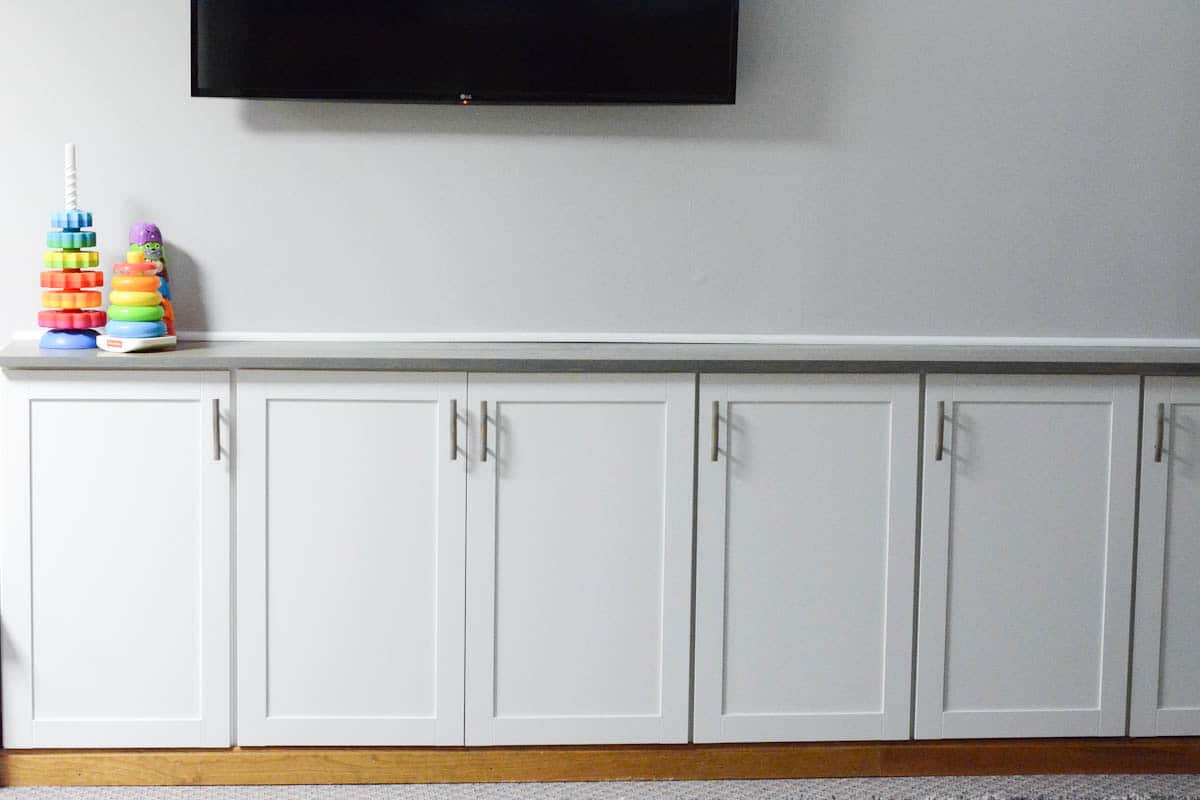
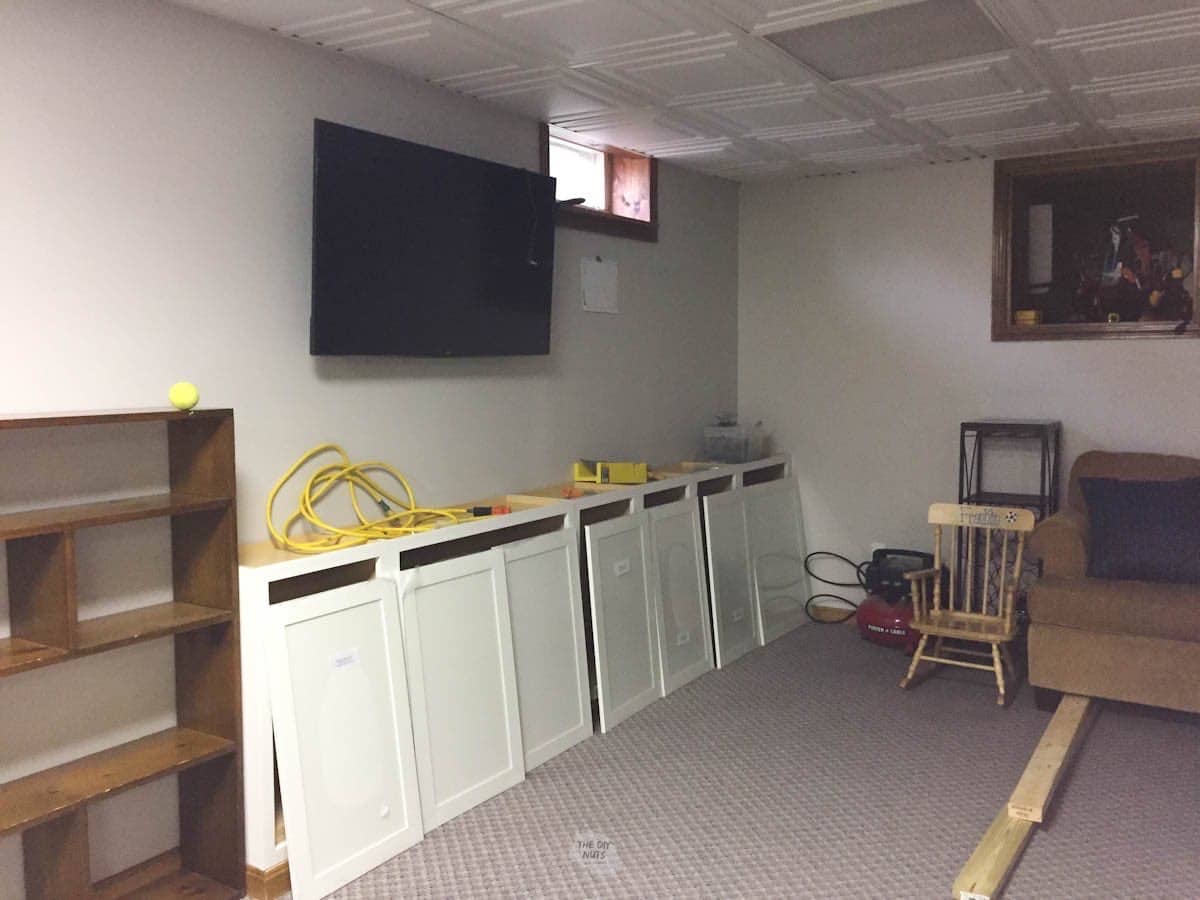
#4: Create Budget Built-in Storage
Again, I looked all over Pinterest and Google for inexpensive ways to add extra storage space to our basement. I considered IKEA hacks and different ways to create more storage. We decided that we wanted a more custom look than just taking a piece of Ikea furniture and redoing it.

An affordable way to create DIY built-in cabinets is by using stock upper kitchen cabinets as base cabinets. Before my husband could install the cabinets, he had to create a base using 2’ x 4s, so that the cabinets would be off the ground and at the proper height.
Stock upper cabinets purchase options
*We also used unprimed stock wood cabinets to add laundry room storage and shelving
Before You Order
Before you order cabinets (they will even ship to you for free from most places), you will need to decide on the size of the cabinets you want.
Because you are using standard sizes, you have to consider how many cabinets you can fit along your wall. You may have to add extra wood in the edges to make it work for your space.
Our DIY-built-in design featured one large cabinet that opened from the middle to store a variety of toys and other items. We then added smaller single cabinets to the sides to complete our basement storage.
Get Your Cabinets Level
The biggest challenge when installing cabinets is making sure they are level before securing them to the wall. You may have to use shims (or small wooden chips to make sure the first one is level before installing more.
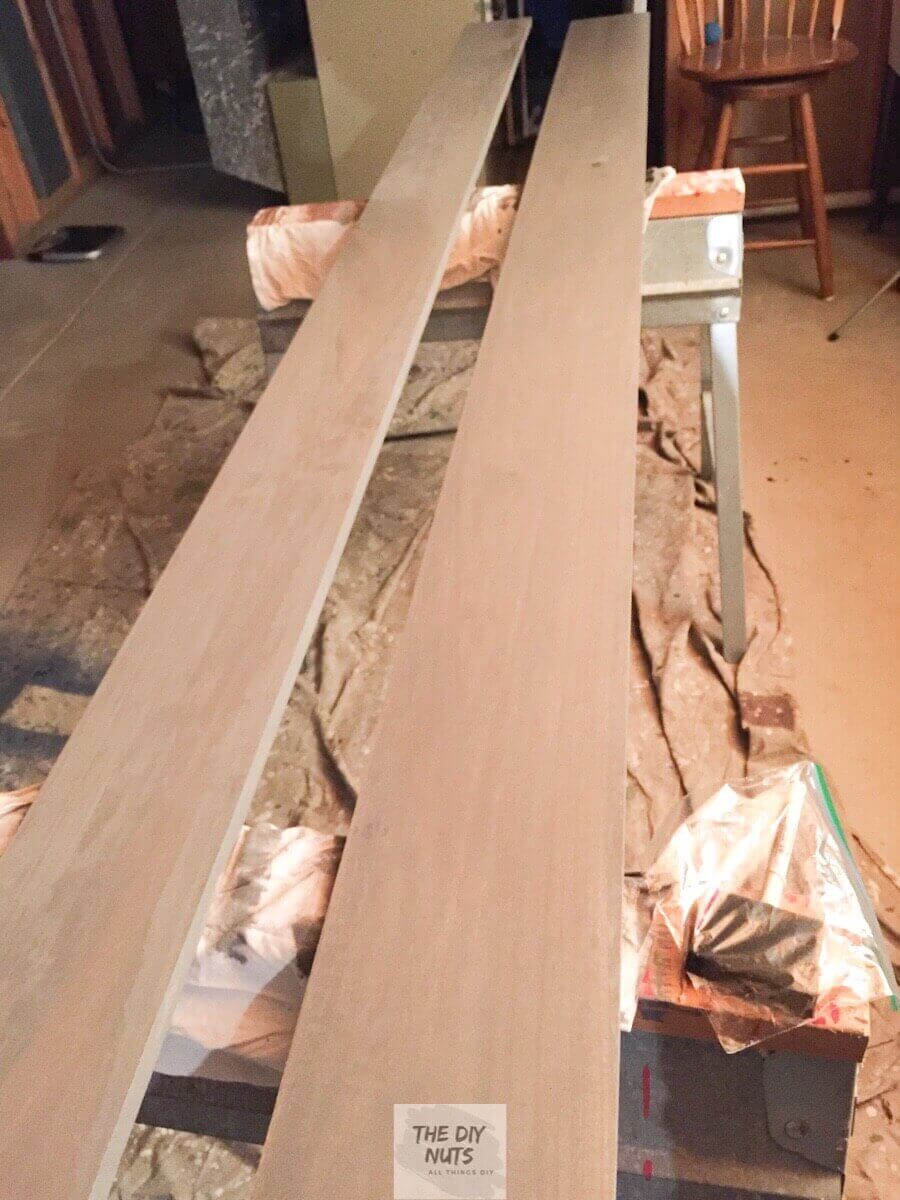
Add A Top To The Cabinets
We stained with this classic gray color two 2 1’ thick, 8″ wide, and 10 ft. long poplar boards to create the top of our DIY built-in entertainment and toy storage center. Once the cabinets were installed, we used wood glue and a few finishing nails to secure the DIY countertop.
Cabinet Finishing Touches
- Add a quarter-round to cover any gaps where our basement wall isn’t perfectly square. And let’s face it, no wall is!
- Add hardware (the ones we used) and you have your own DIY built-in storage to help keep your basement organized.

#5: Organize Your Storage Area
My husband and I were going to add other shelving on top, but then decided we really didn’t need it. It was a great way to add a more built-in look on a budget.

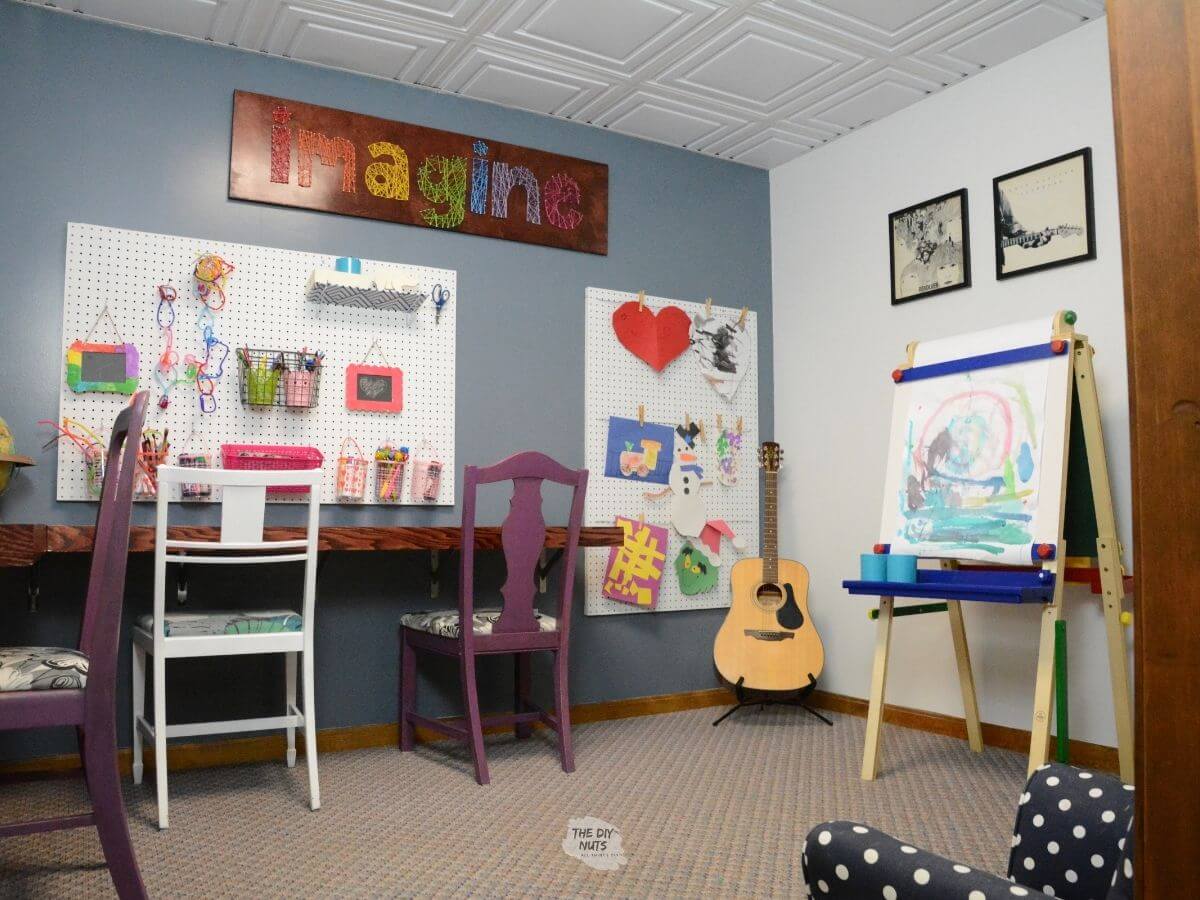
#6: Create A Craft Area For Kids
Before our budget-friendly basement makeover, we knew we had to figure out what to do with an ugly room right off the main basement area. This basement room used to be an old office with green golf wallpaper.
Therefore, we sealed the wallpaper using the steps above and added the vinyl PVC ceiling tiles to modernize this basement space. We then worked to create a fun craft room for our children.
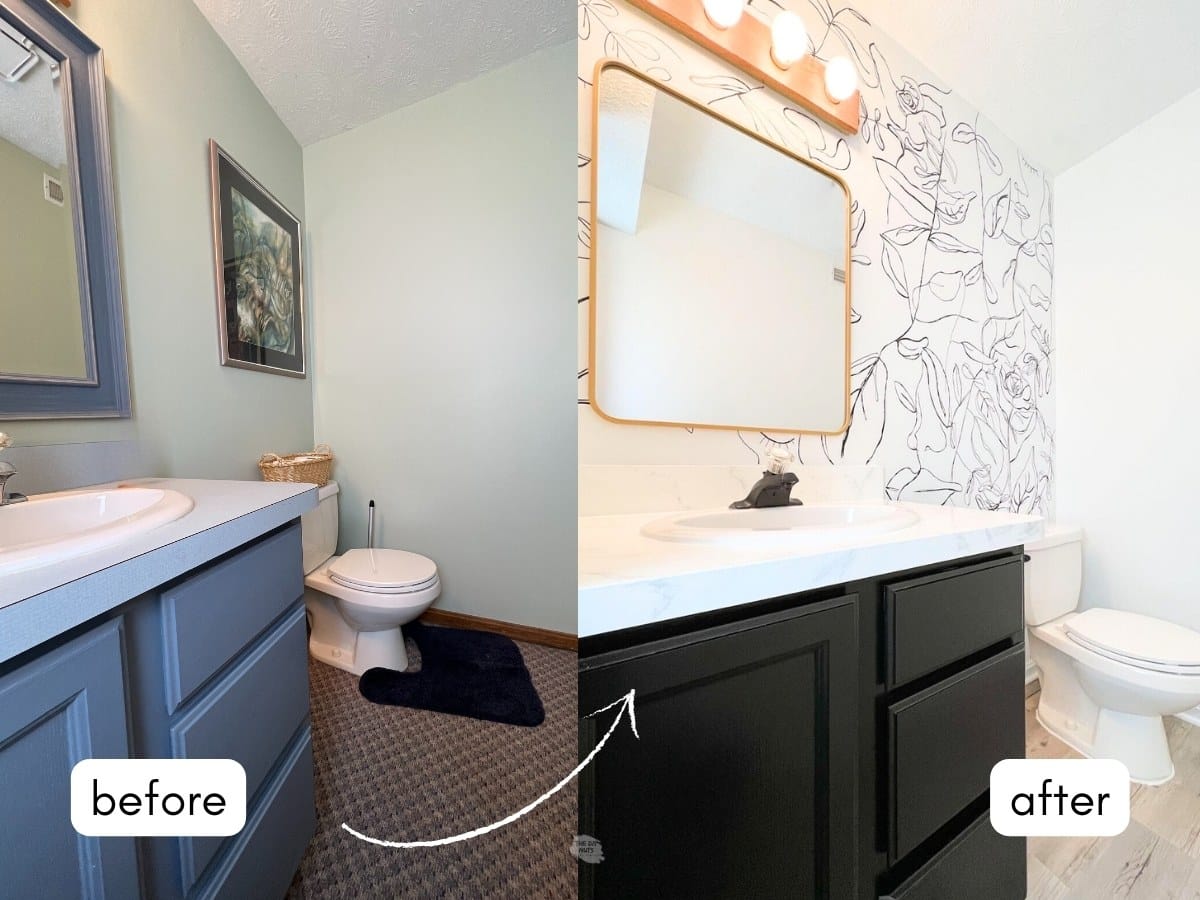
#7: Work With Existing Features
This basement also had a bathroom that needed a low-cost remodel. You can read all about the DIY projects we were able to take on. By working with the existing cabinet and light fixture, we were able to renovate this space for under $300.
#8: Create A Home Gym
Adding carpet tiles to the concrete floor on the unfinished side of our basement created a workout space to add our gym equipment. This easy DIY project was a good idea because you can always replace individual carpet squares if needed.

#9: Decorate For A Finished Look
Add Artwork
We did so many fun DIY projects to change this room, from our large string art to using these record cover frames to add DIY artwork to the walls.
Add Area Rugs
Sometimes you can’t replace your basement flooring. While we would love brand-new flooring, it wasn’t in the budget. Adding area rugs in your large basement will help break up the space and create different zones. For example, this rug was placed with a sectional to create a family room vibe.

Follow us on Pinterest, YouTube or Facebook for more DIY inspiration!
Basement Makeover FAQs
Using light colors on your walls, ceiling, and even in your decor can help to make a basement feel brighter and more spacious without adding windows. You can also install ample lighting fixtures, strategically use mirrors & artwork, and declutter the space to maximize openness.
Do-it-yourself projects such as painting, adding extra storage, decorating, and adding new light fixtures can really make an impact in your old basement. Updating your ceiling or flooring with budget-friendly materials can help to cheaply makeover your space. Lastly, create functional zones within the basement, designating areas for activities such as a TV or entertainment zone, a reading nook, or a mini home office, to fully utilize all available space.
Related Home DIYs
- DIY Basement Storage Shelving Idea
- DIY Waterproofing For Basement Walls
- How To Hang Shelves On A Cinderblock Wall
What is your favorite DIY home makeover project? I always get a thrill when I can transform something in our home so cheaply. Our DIY budget basement makeover really gave us the space we needed to create a kids’ area, home gym, and living area!
I love this. You guys did a great job. I love the tips to keep it in budget!
Thanks, Amy. I love when DIY projects are pretty inexpensive!
Great tips for anyone looking to remodel their basement! Thank you!
Thanks, Lissa. I am always looking for inexpensive and DIY ways to update any room in our house!
It looks so cozy and welcoming. Very nice makeover. You can even rent it out. 🙂
Thanks, Andrea. We love that we were able to make extra space for our family to use in our basement.
We redid our outdated-but-finished basement recently too! I had never even heard of drop ceiling covers. They look great! We went with removing the drop ceiling and painting black (a lot of work) and we didn’t have wall paper but we had chair rail that we removed. We also installed cheap LVP from Floor and Decor. Thanks for sharing!
Awesome work! Yes, I think since our system was still in place, the new tiles were the easiest thing for us. I did not want to have to paint and create a large mess since we were keeping the carpet that was there.
I love the vinyl ceiling tiles they look so expensive! And that storage is absolutely gorgeous. I wish I had a basement this space is so family functional. Great job, Erin!
Hi Jenn. One of the reasons we bought this house was because it had such a large basement. We just needed to update it and make it work for our family!
That is smart thinking! Definitely, something we will look for if and when we decide to move from our home. Our town actually does not have a lot of basements because of flooding. We have a dirt basement that is just gross. I often think of filling it in and moving the gas and water into the stairwell. But that’s a huge cost haha.
Hi Jenn! We were lucky that this basement was “finished” and just needed updating. I don’t have any experience with dirt basements. Our old house was a on a crawl space, but the ground was still concrete.
Those drop ceiling tiles look amazing! Such a great change on a budget and they sound really easy to install. Where did you get your artwork from? Or did you DIY it?
Hi Rachel! I am an artist/teacher from a family of artists! So the paintings in this post that you see are some of my dad’s that he did in college. I love using all our artwork in our home decor!
Love this!!!!!!! Definitely subscribing to your site for some DIY inspiration 🙂
Hi Monica! Thanks for the kind words! I do love sharing DIY ideas that do not break the bank!
Love these ideas – super practical and informative article! Now I want to go redo everything!! Definitely will be checking out your blog for more DIY how-to posts!
Hi Christine! Thanks for the kind words. I love sharing practical DIY ideas that are pretty inexpensive.
Beautiful space! What a great spot for your family to enjoy time together. You’ve encouraged me to finish our basement sooner than later!
Hi Melissa! Thanks for the kind words. We do hope this basement space will be able to grow with us throughout the years. I am sure more DIY projects will be added a little by little to make it exactly what we want!
Fantastic stuff! I wouldn’t have thought it was a basement at all. We have a lot of building and decorating to do in our house and I’m definitely going to keep your tips in mind.
Hi Eliza! I am so happy you didn’t think this was a basement as that was the whole point of doing all these DIY projects! We love having one more space that we can use as a family!
Great tips! I wasn’t sure if you could paint ceiling tiles or not, but we have a few tiles that have been cut to fit specific shapes that need something done with them. I may try that rather than buying new ones and having to cut them exact. At least if it doesn’t work, I won’t be out a lot of money.
Hi Sherry! The covers I mentioned are able to be cut with scissors. You can just take your existing tiles down and lay on top of the covers as a template to make sure you get the right size. Good luck with painting or redoing your drop ceiling however you choose!
You did a great job in renovating the basement! All in a budget too! Really interested now in that drop ceiling tiles! Well done!
Hi Mallie! Feel free to ask me any questions about the drop ceiling tiles. I did a lot of research before I finally went with the new drop ceiling tiles that covered my old and gross ones! We love that people love our DIY basement makeover that didn’t break the bank!
Oh man it looks so good!! I wish I had a basement.
Hi Sydney. Thanks for the nice comment. I am so happy we bought a house with a basement, even if we had to do a little DIY basement makeover!
Hi,
We’ve done several DYI home projects. Always seems to be a combined effort of hiring some pros and us 🙂 I wish I’d know about that wall covering for existing wallpaper several years ago! It’s all gone now! Thank heaven’s and I feel your pain. Man we needed it! And your ceilings look great. I’d never thought of that! Awesome job.
Hi Brenda! Some DIY projects are worth asking for help. We for sure have experienced that is all of our home projects. Thanks for the kind words. I really couldn’t get over how a drop ceiling makeover changed our basement.
I love this, it looks stunning. Thank you for sharing.
Thanks, Renicia. I am glad that you loved our DIY basement makeover!
Love your ideas – they all seem so doable by the average person. I love that – it gives me hope!
Hi Lisa! Yes, I would say all of these DIY basement makeover tips are very doable!
Looks great! My basement is also on my list of things to do. Right now, it is a catch all for everything. 🙂
Hi Gina! I know how difficult it is to keep things organized. We just really needed space in our basement for our kids to go! It is nice that we were able to do that pretty cheaply!
Beautifully done!
Hi! I am so glad you approve of our DIY basement makeover!