How To Paint Already Painted Wood
Do you want to change the color of painted wood in your home? But don’t want the hassle of completely stripping the paint? Here is how we painted over already painted wood in our home.
*Disclosure: I only recommend products I would use myself and all opinions expressed here are our own. This post may contain affiliate links that at no additional cost to you, I may earn a small commission. Read our full privacy policy.
Can I paint over old paint on wood?
We will show you how we repainted our mudroom cubby and kitchen cabinets using these painting steps. If your original paint job was done well (and the wood was properly primed) you don’t need to strip and sand the old paint off. Make sure to inspect the surface you are painting fully.
In our house, we have had several wood-painted projects that we have decided to change up the color or refresh with a new color.
Note that any time you are painting a previously painted surface your old paint may contain lead. Please take proper safety precautions when working on your particular situation. You can always buy a test kit before sanding the surface.
When do you need to prime already painted wood?
You don’t always need to prime already painted wood. If the old paint is in great shape, doesn’t have chipping, and seems to adhere to the surface then you should be able to get away with following the steps we used to repaint our wood cubby.
If you are unsure of the type of paint used, finish or how it was sealed, you may want to consider using an adhesion primer (like water-based Kilz or Zinsser Bin). Just note, if we can avoid using oil-based primers and paints we normally do.
What paint not to use?
There are also primers and paints in one. We don’t recommend those for painting wood. For walls, we think certain brands work just fine. But with wood, I would always air on the side of caution.
Can you paint latex over oil-based paint?
Some people will say as long as the paint is fully cured you should be okay. However, if you know you are painting over oil-based paint then I would use a primer so that you don’t end up with chipping and peeling paint.
Also, one thing to note is that you need to make sure that your paint is fully cured no matter what paint you are using. Fully cured paint can take up to thirty days. A good test is when you are able to scrub or clean the wood without ruining the paint job.
Not sure if you have oil paint on your original woodwork? Glidden shares how to do an oil paint test here. You can test a small area of the paint by rubbing denatured alcohol on a cotton ball to see if the paint comes off.
Do you need to strip paint before painting?
If you have peeling paint, you will need to scrape off paint and possibly use a paint stripper like Citri Peel. Sanding the surface before painting will also allow your primer and paint to start fresh. Just note that not all painted surfaces will need this to happen, but don’t skimp on prep if you have areas that are not in the best shape.
When You May Want To Sand And Use A Primer
- The original surface is too glossy
- The quality of the original paint job is sloppy
- Going from a dark color to a very light one-priming may save you on the coats of paint you need
- New paint does not seem to adhere to the surface. You can test a small area as we did when we painted backsplash tile.
Recommended Supplies
Make sure that your wood and previous paint job are in good shape before starting this project.
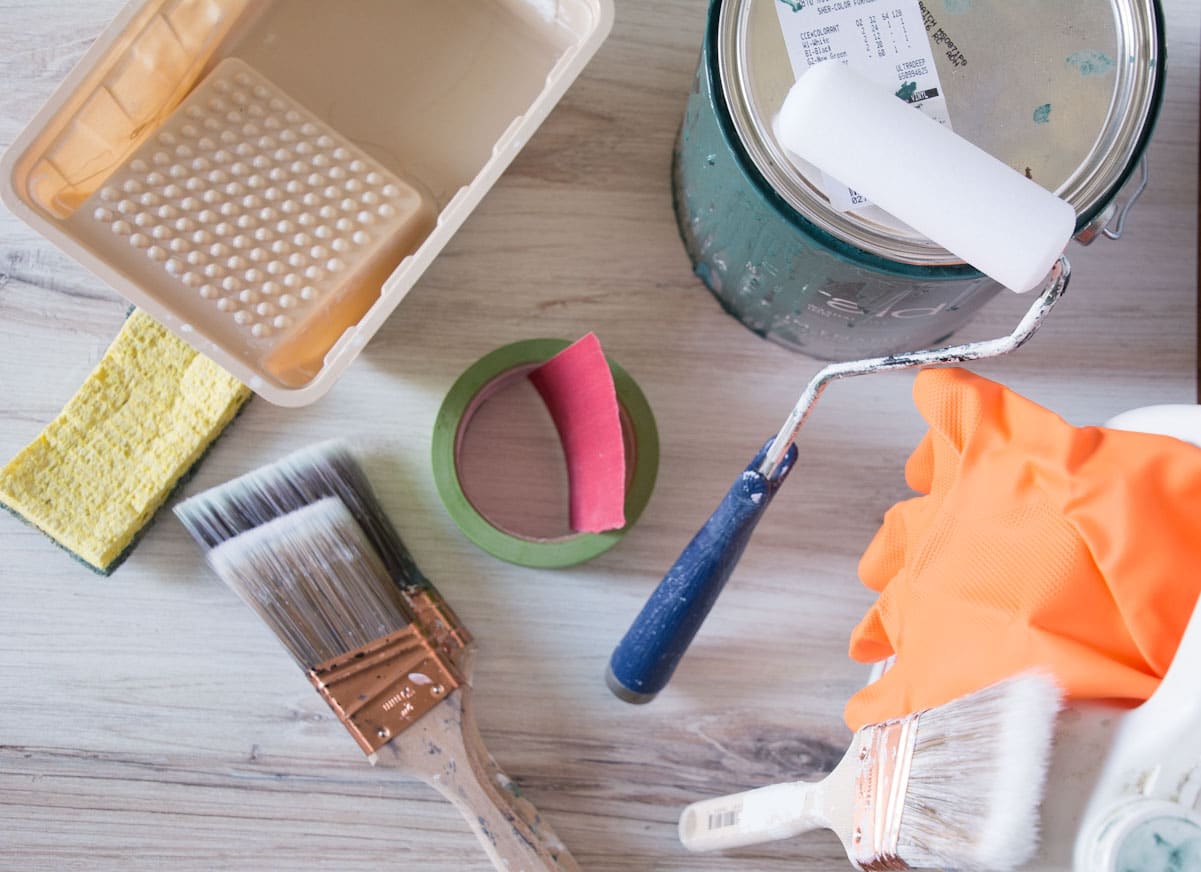
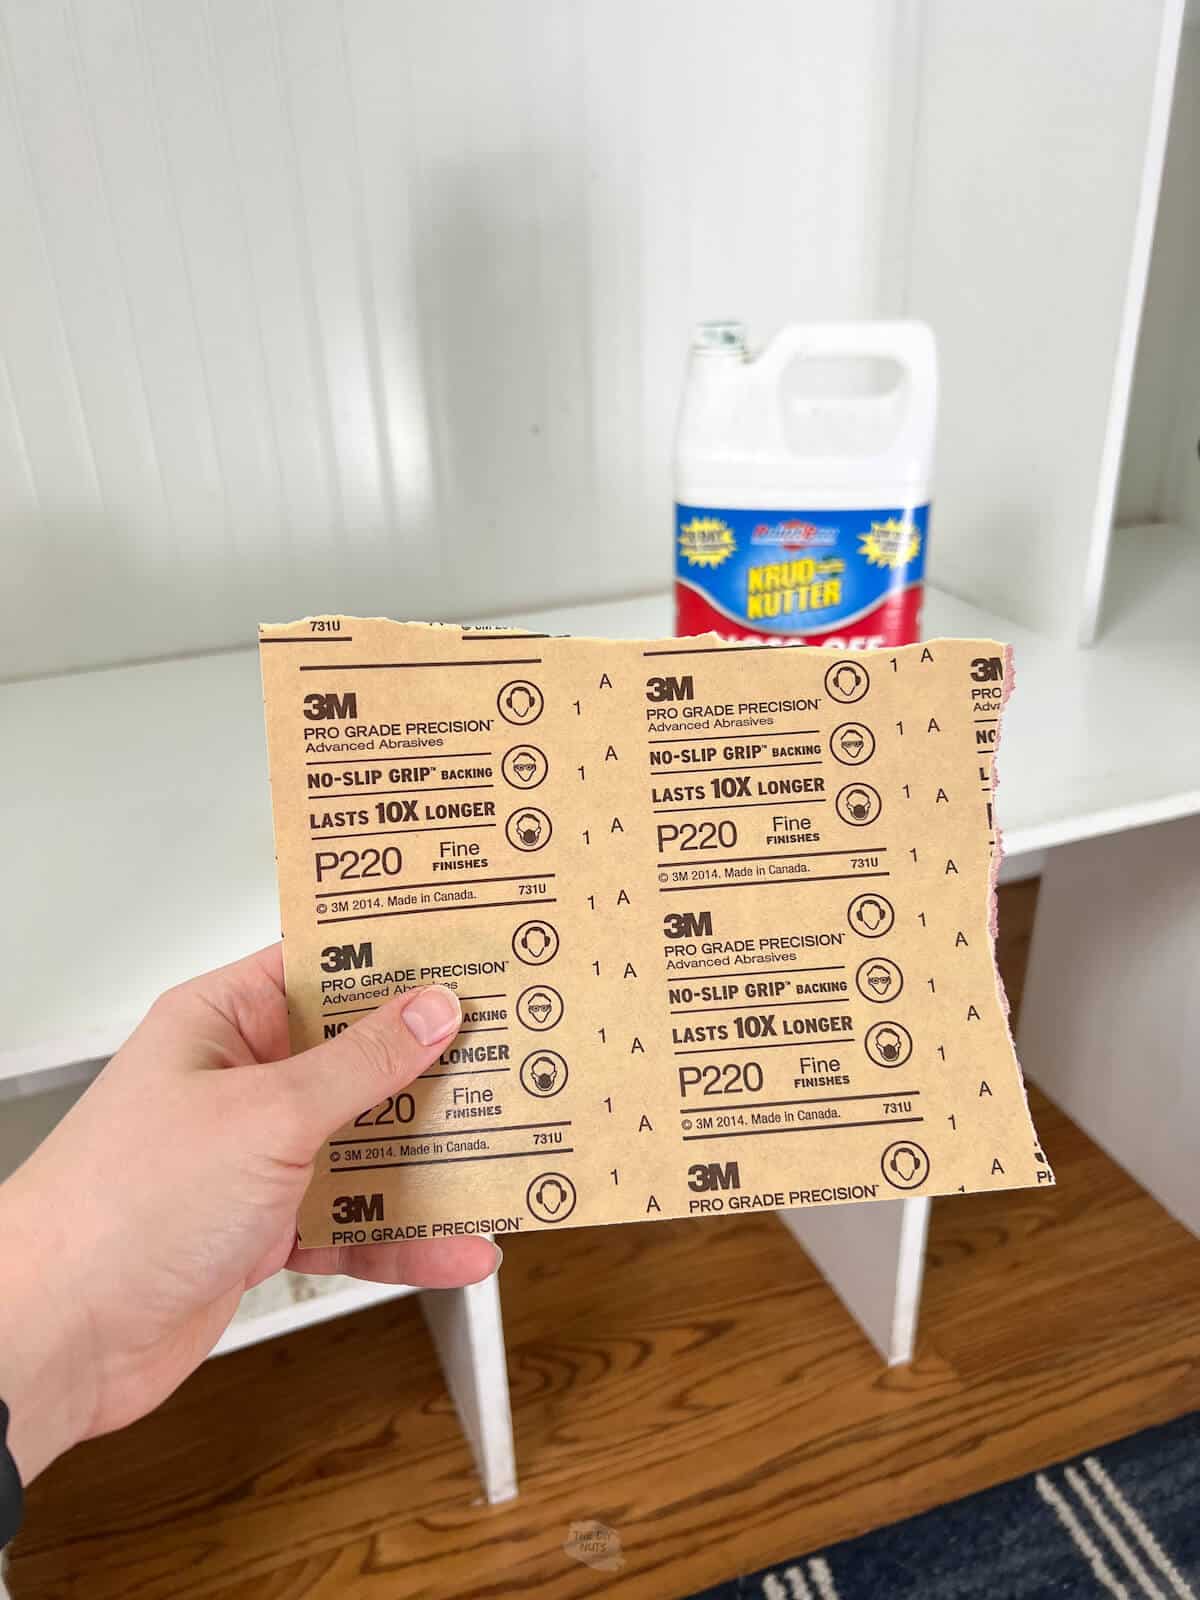
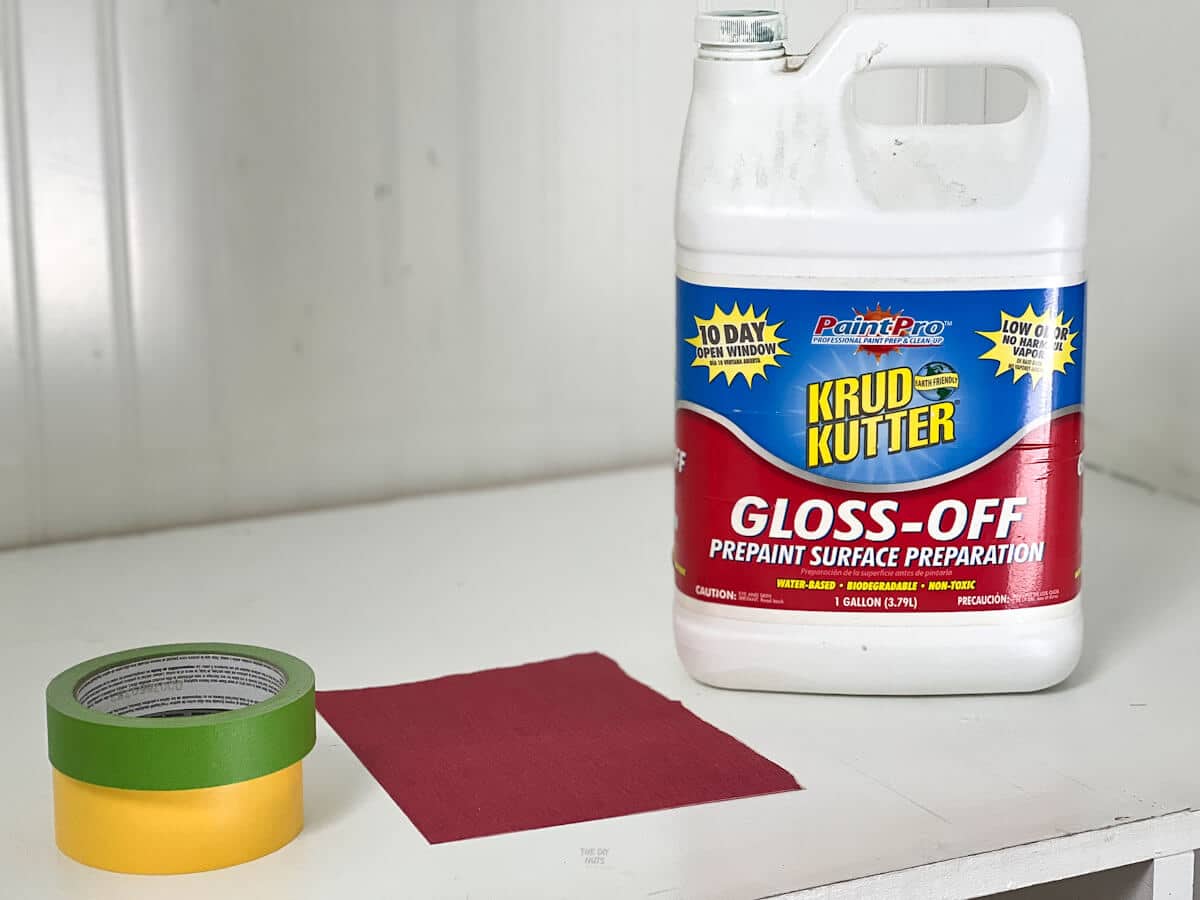
- 220 Sandpaper
- Deglosser
- Old Rag
- Enamel Paint meant for wood such as Sherwin Willams Urethane Trim Enamel Paint
- Small Foam Roller & handle (here is why we think a small foam roller is best for cabinet painting and more)
- Synthetic Paintbrush
- Small paint tray
- Optional: Wood filler and/or painter’s tape
New Paint Color Used
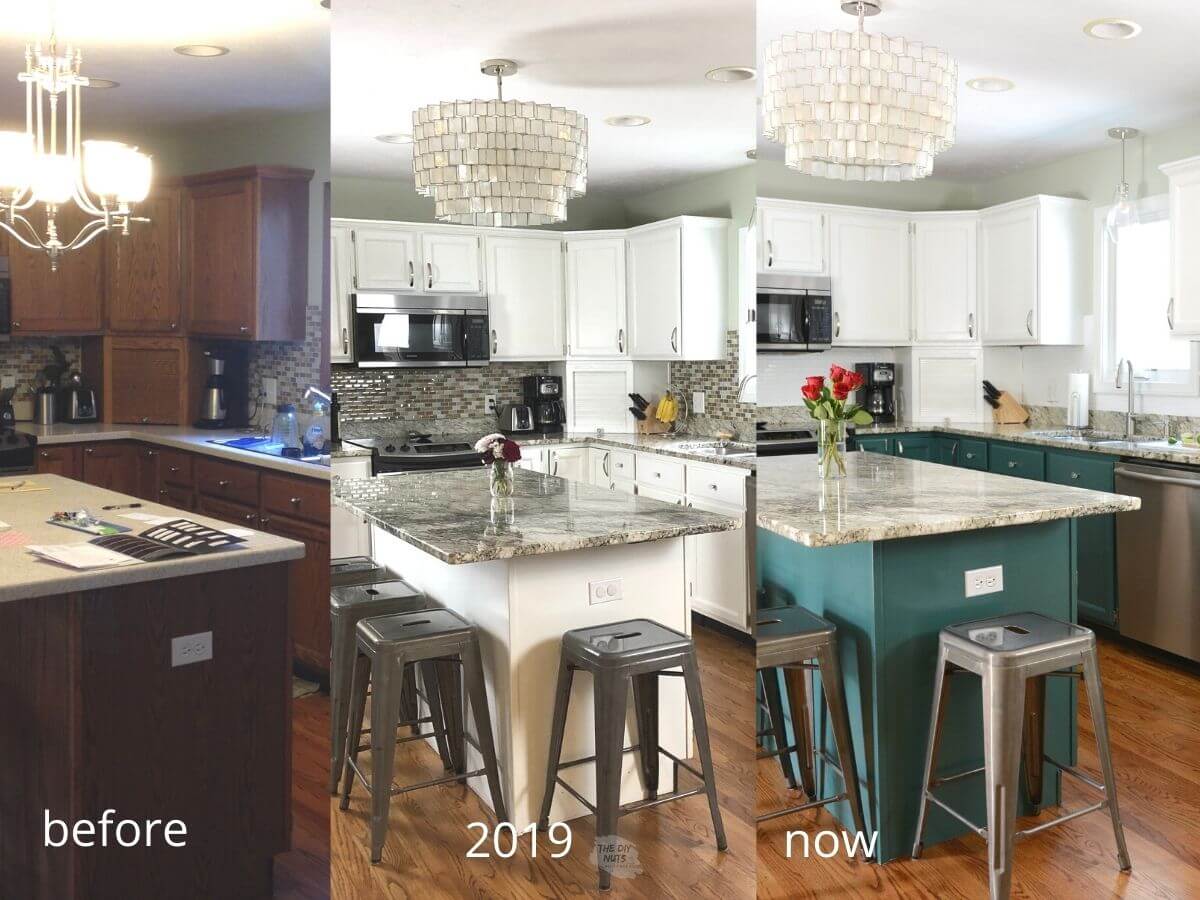
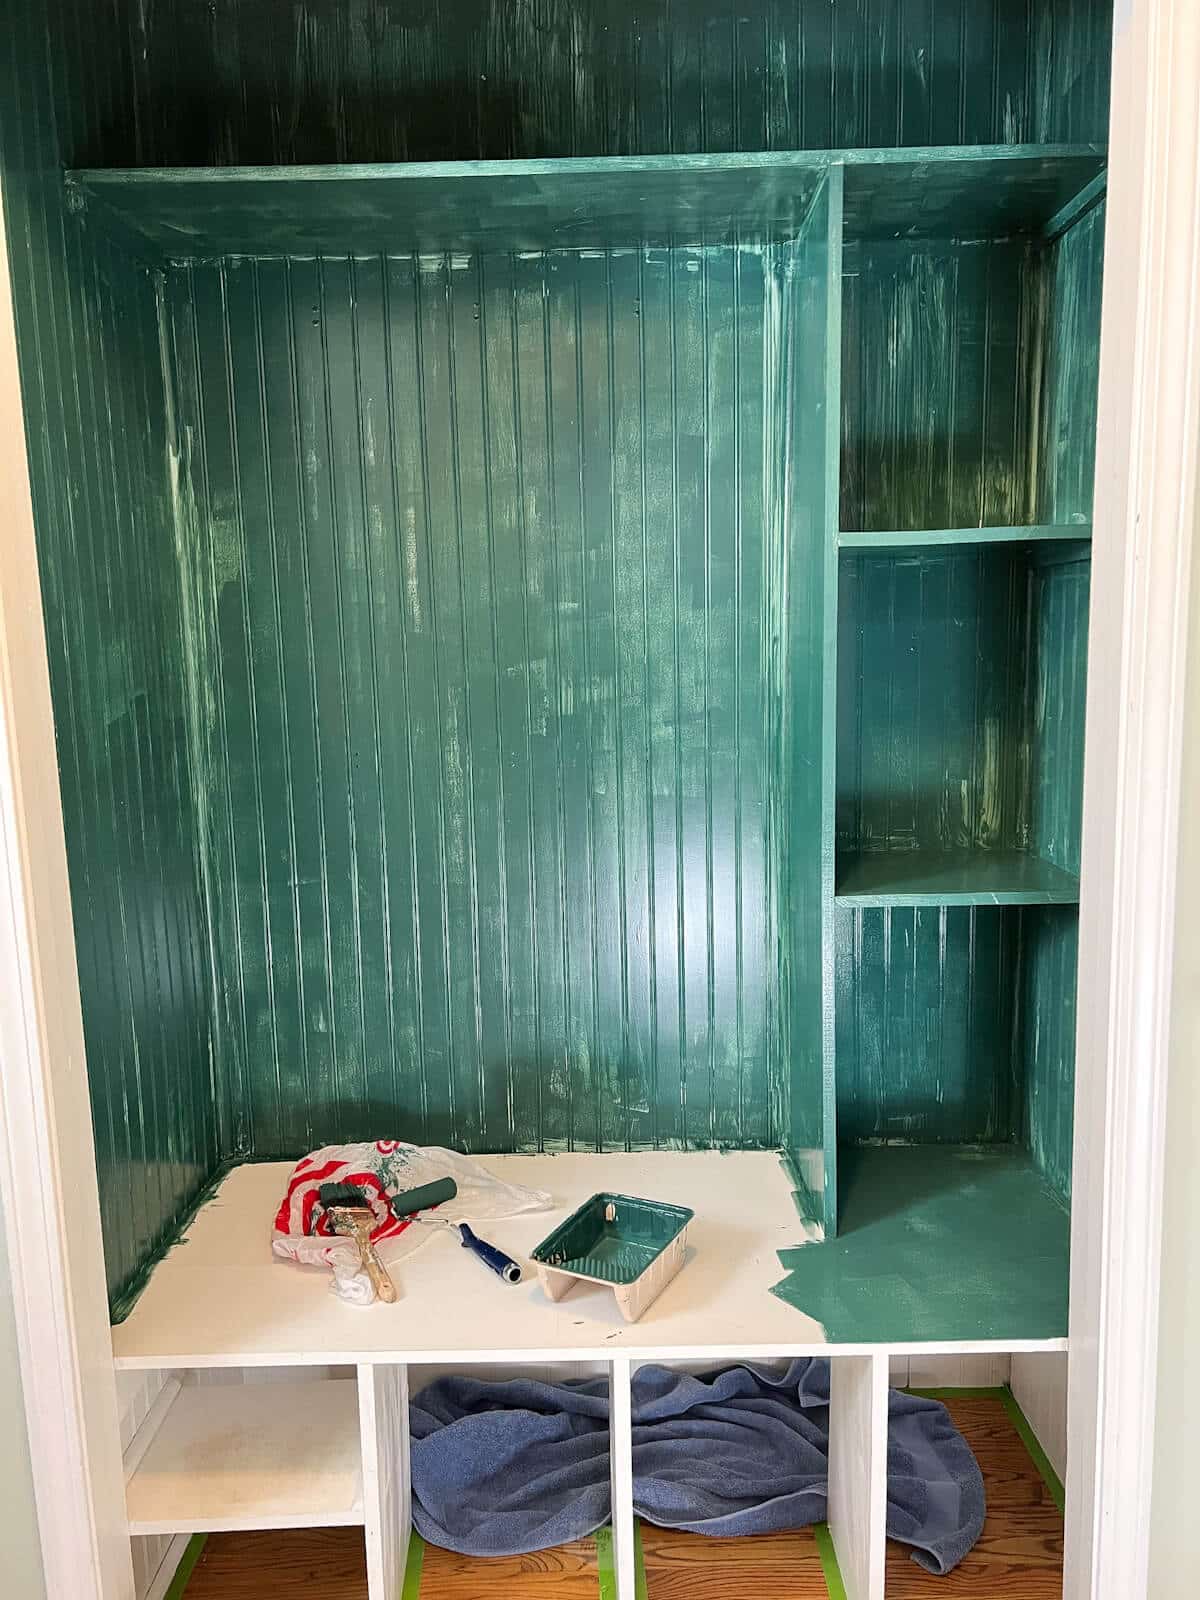
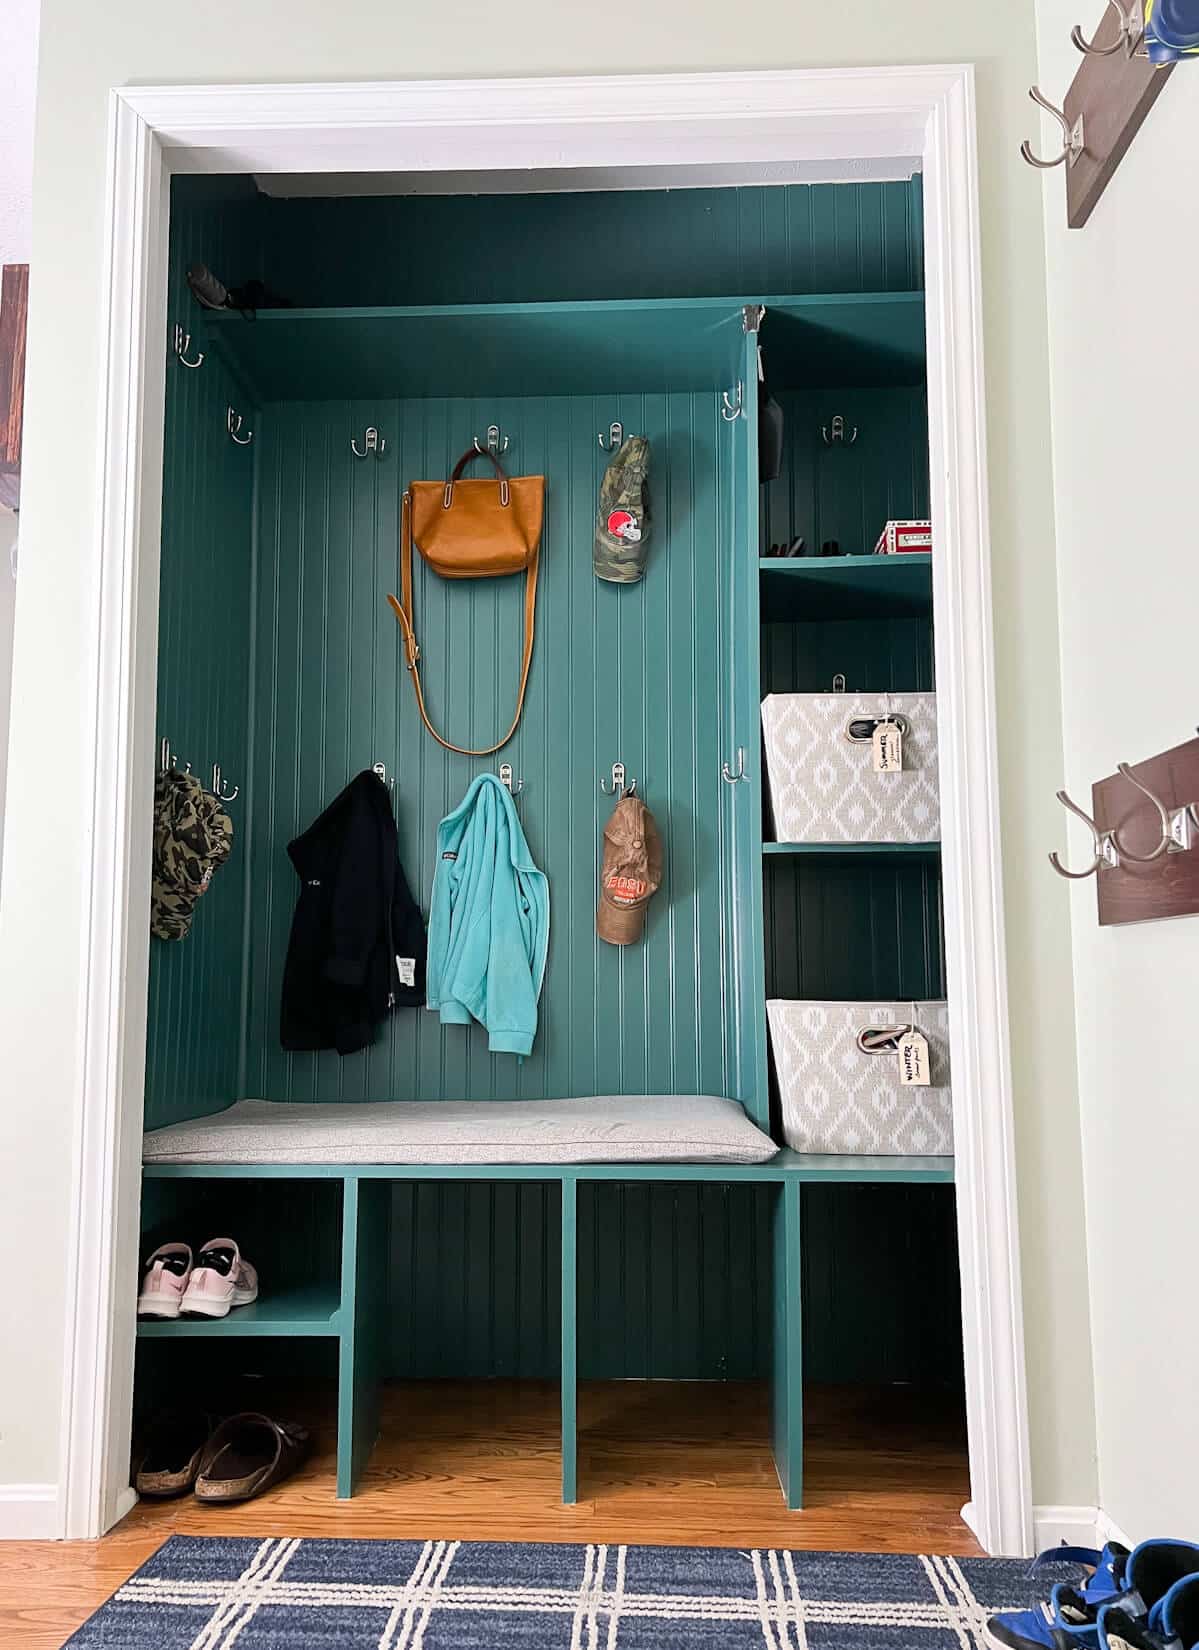
For reference, the following painting project was painting over Sherwin Williams Proclassic in semi-gloss with Sherwin Williams Emerald Urethane Trim Enamel in Semi-gloss. The blue-green paint color is Rookwood Sash Green. The paint color matches the cabinet color used in our kitchen makeover.
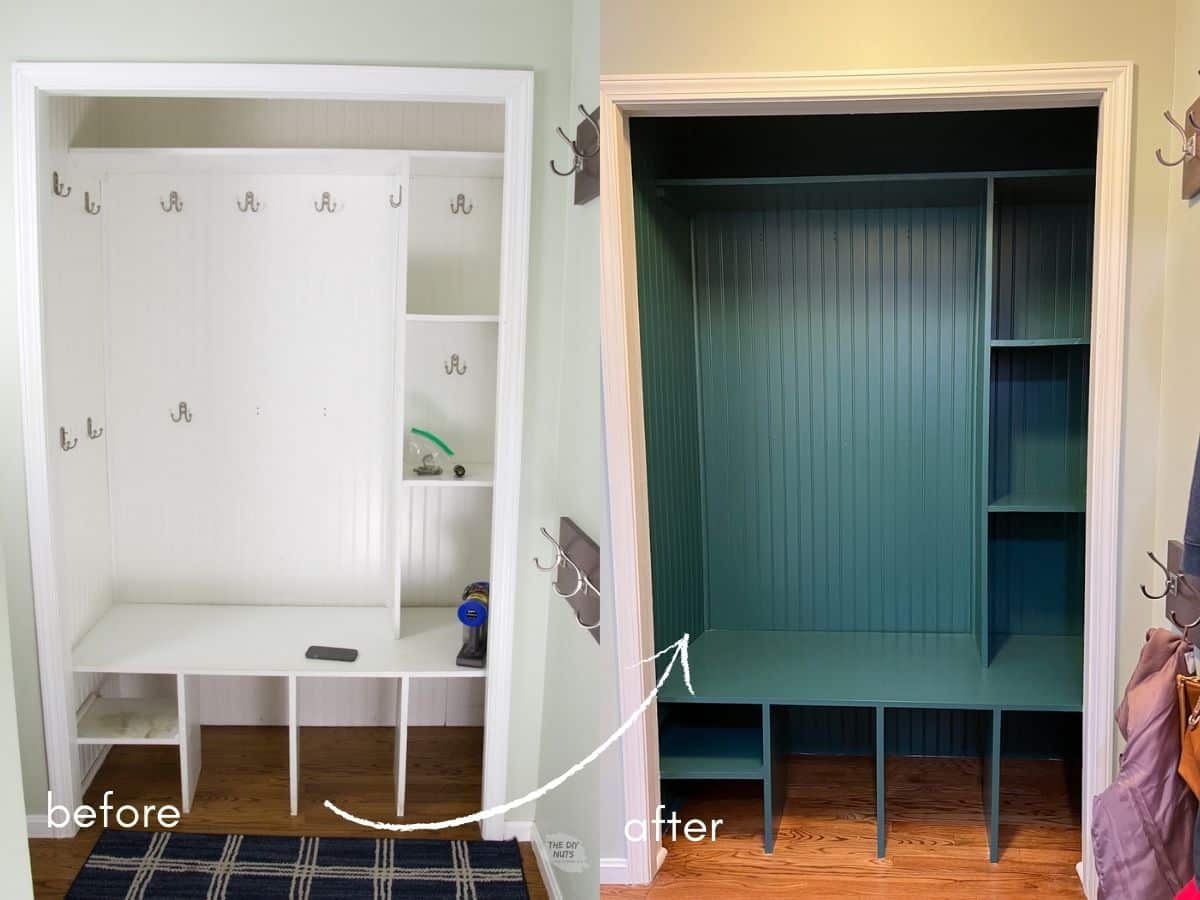
White Painted Wood Cubby
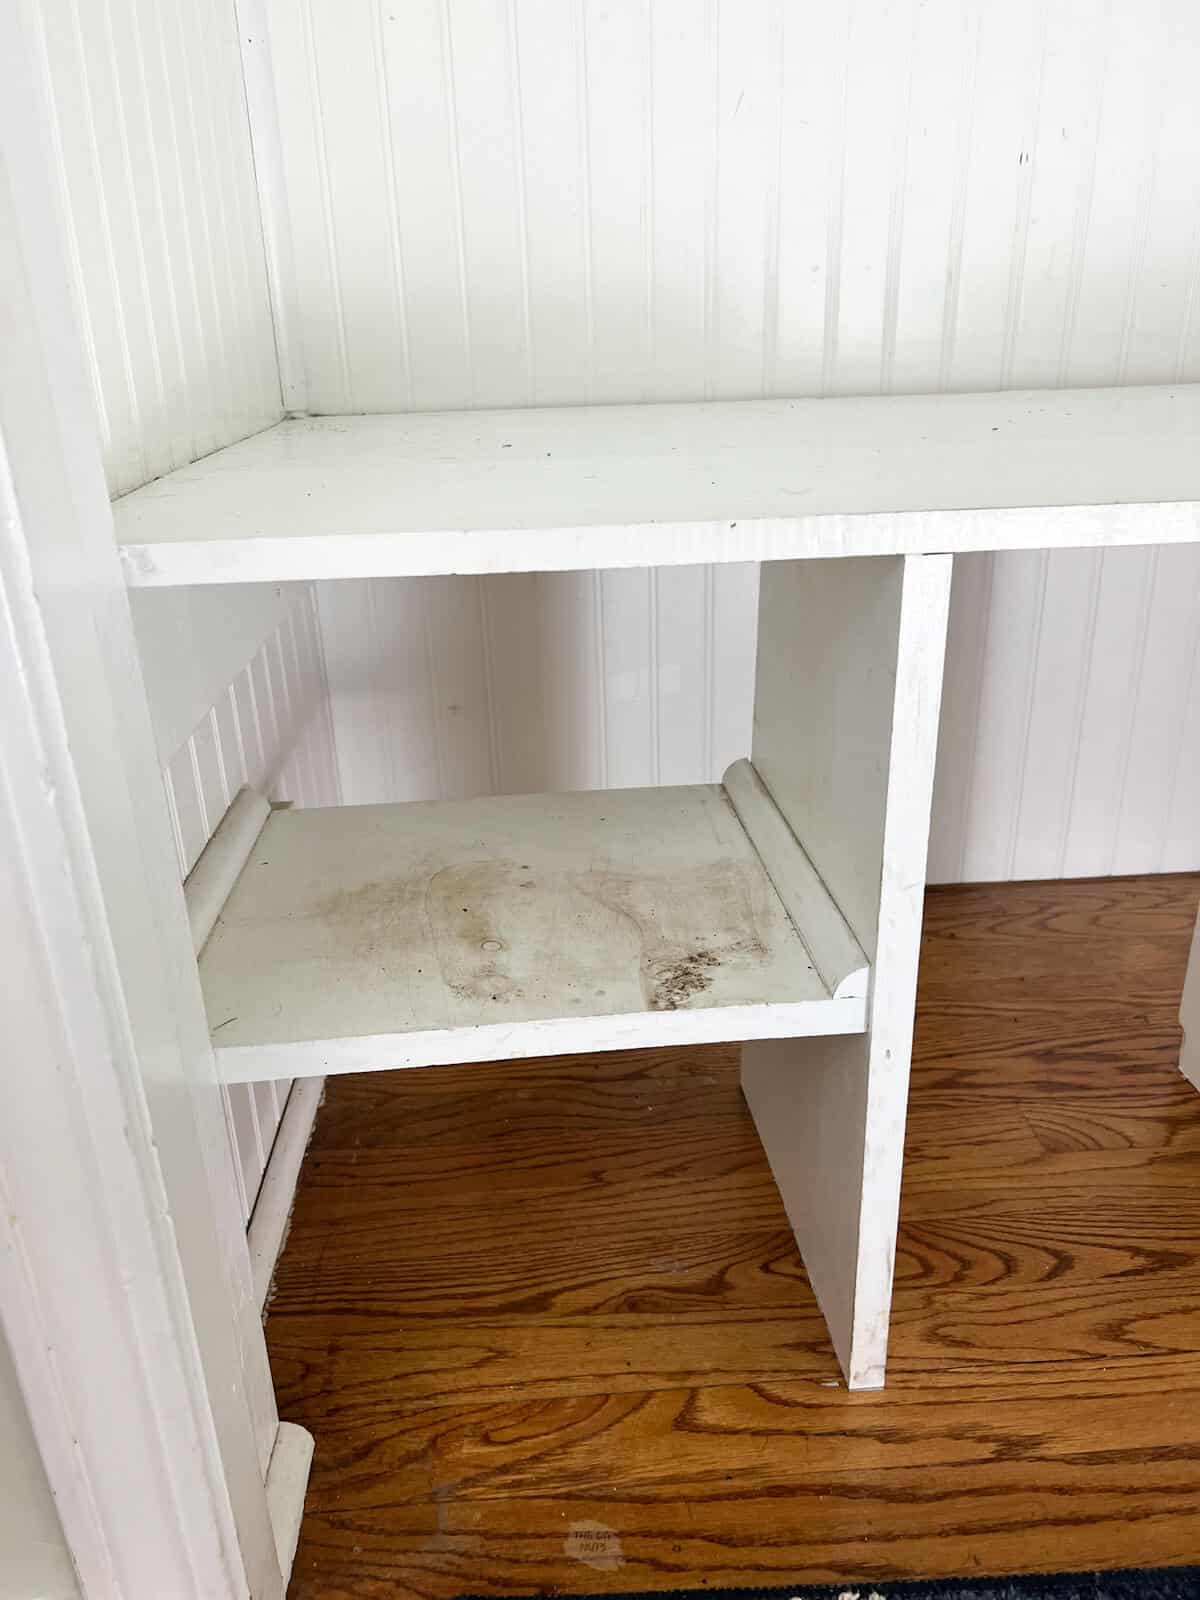
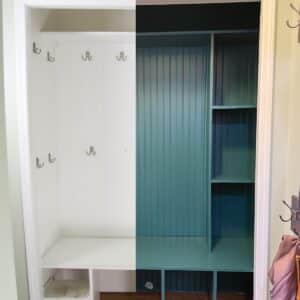
Here is our closet mudroom closet painted with SW Proclassic Pure White after 6+ years of use.
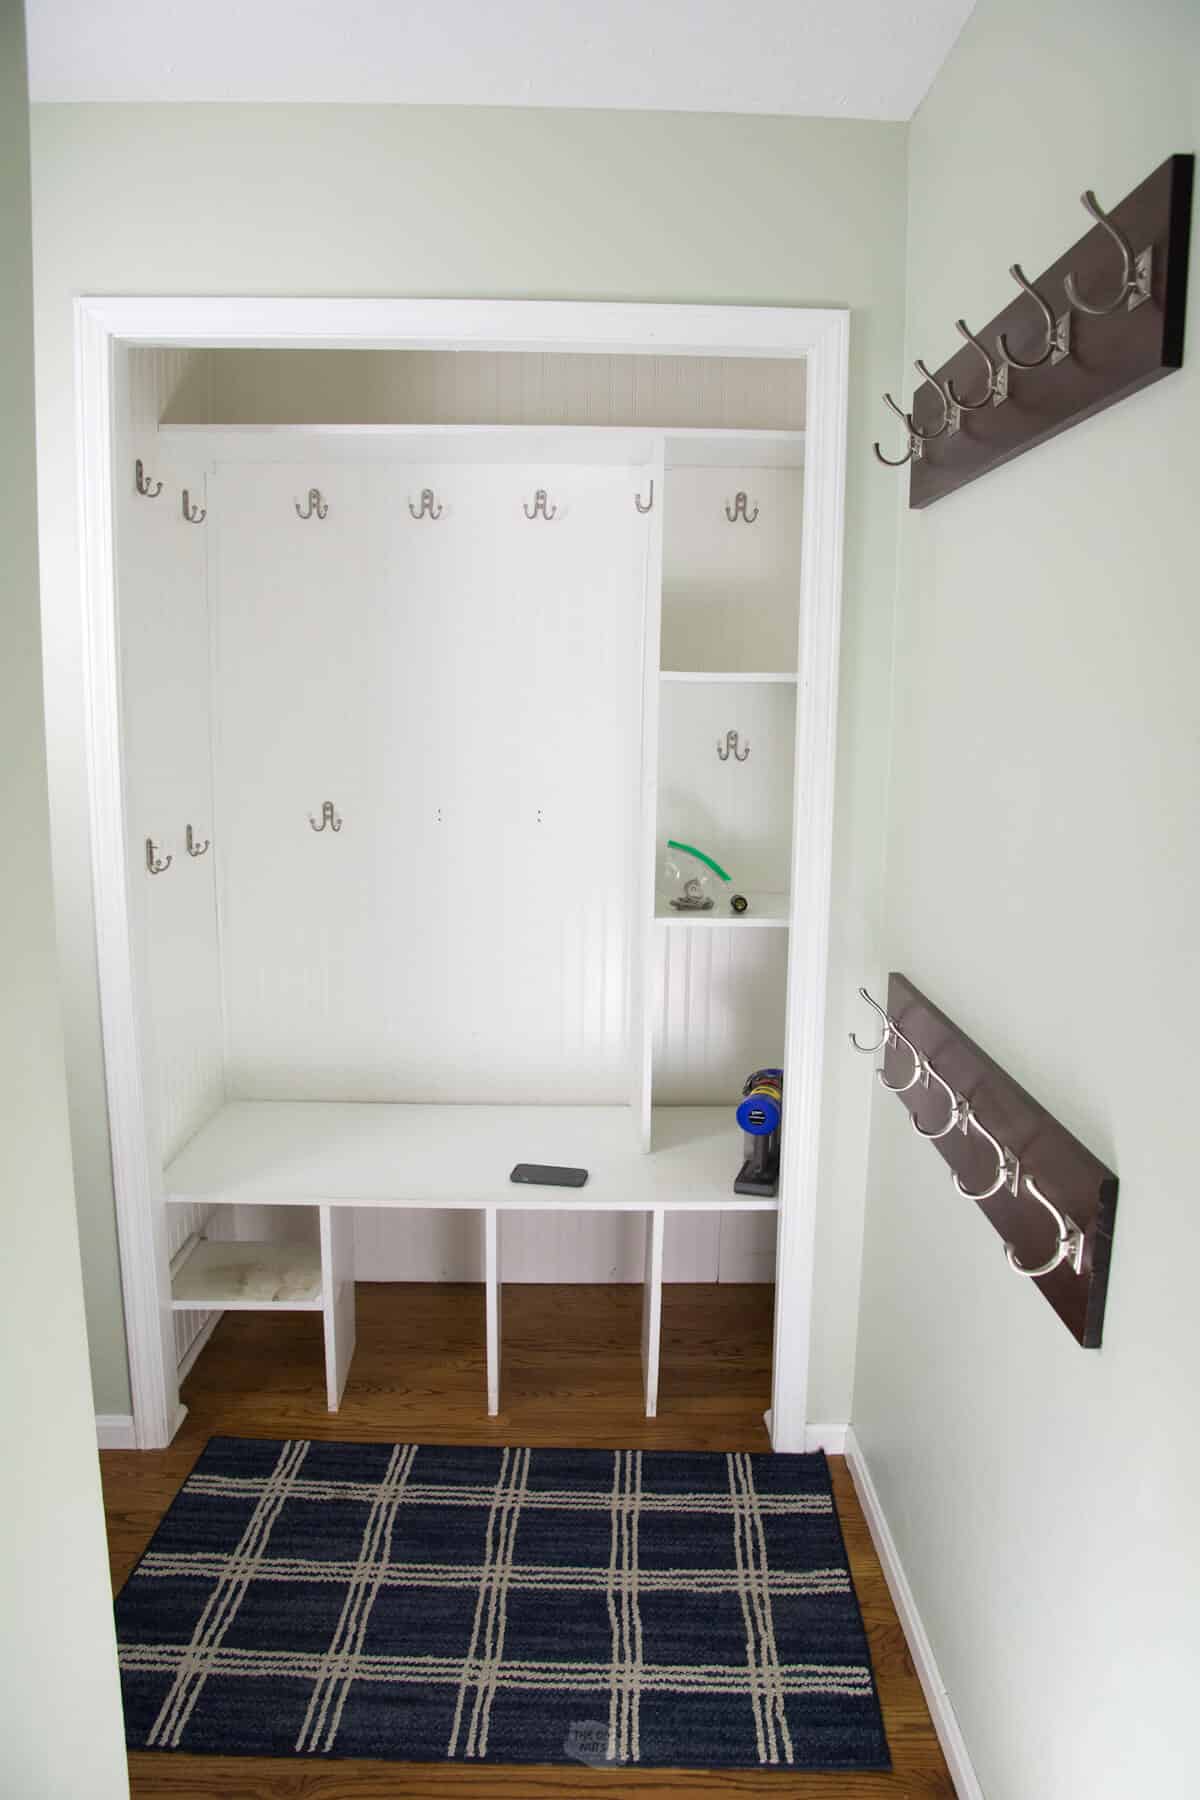
A Little Wear and Tear Is Okay
As you can see this cubby has definitely had a little wear from a real family using it as their drop-off point. The paint job itself was in decent shape. The edges of some of the wood had worn off a little due to pulling baskets in and out. And the one shelf was definitely super dirty from shoes being there.
Can you use this method to also repaint painted cabinets?
Yes!! We also did this method to repaint painted kitchen cabinets and I absolutely love the outcome! A year later, we haven’t had any chipping or peeling. The self-leveling paint (Emerald) is honestly amazing!
How to Paint Already Painted Wood
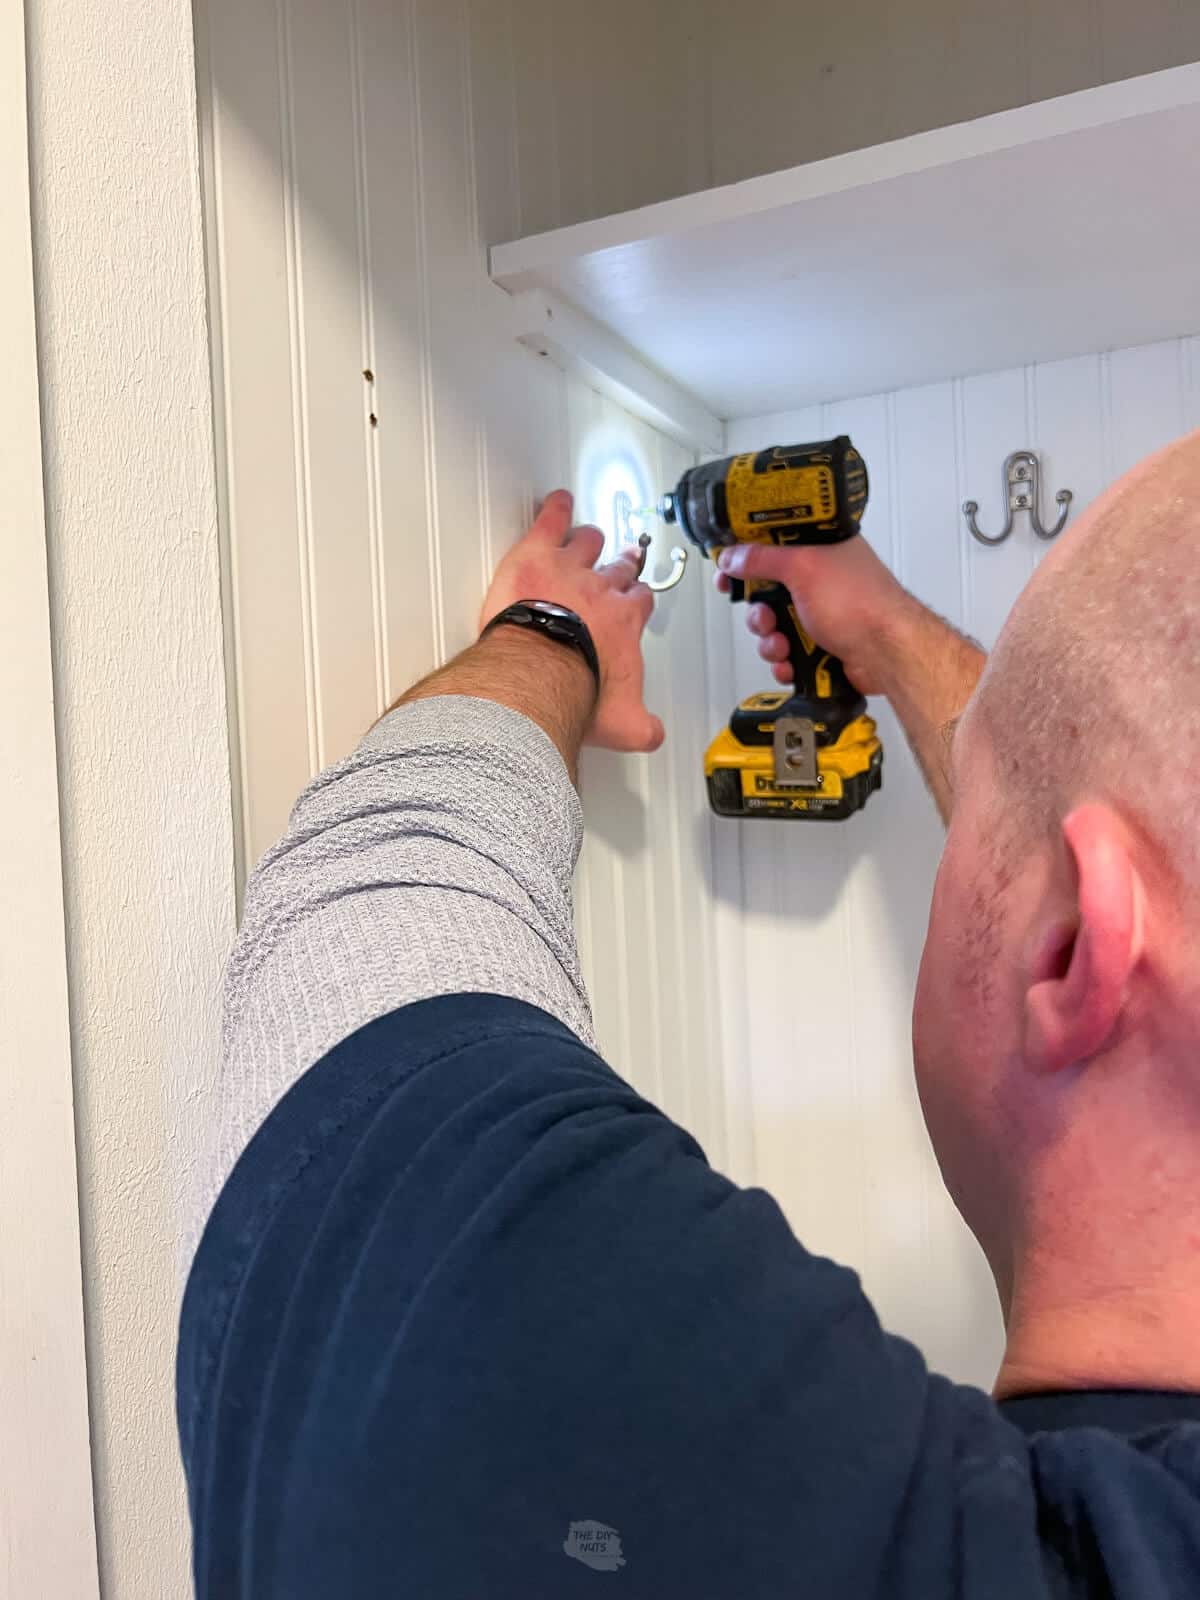
Step 1: Before you begin, remove hardware and/or fill holes with wood filler if you are not replacing with the same size hardware.
Step 2: Use 220 sandpaper to lightly scuff up the old paint job and surface.
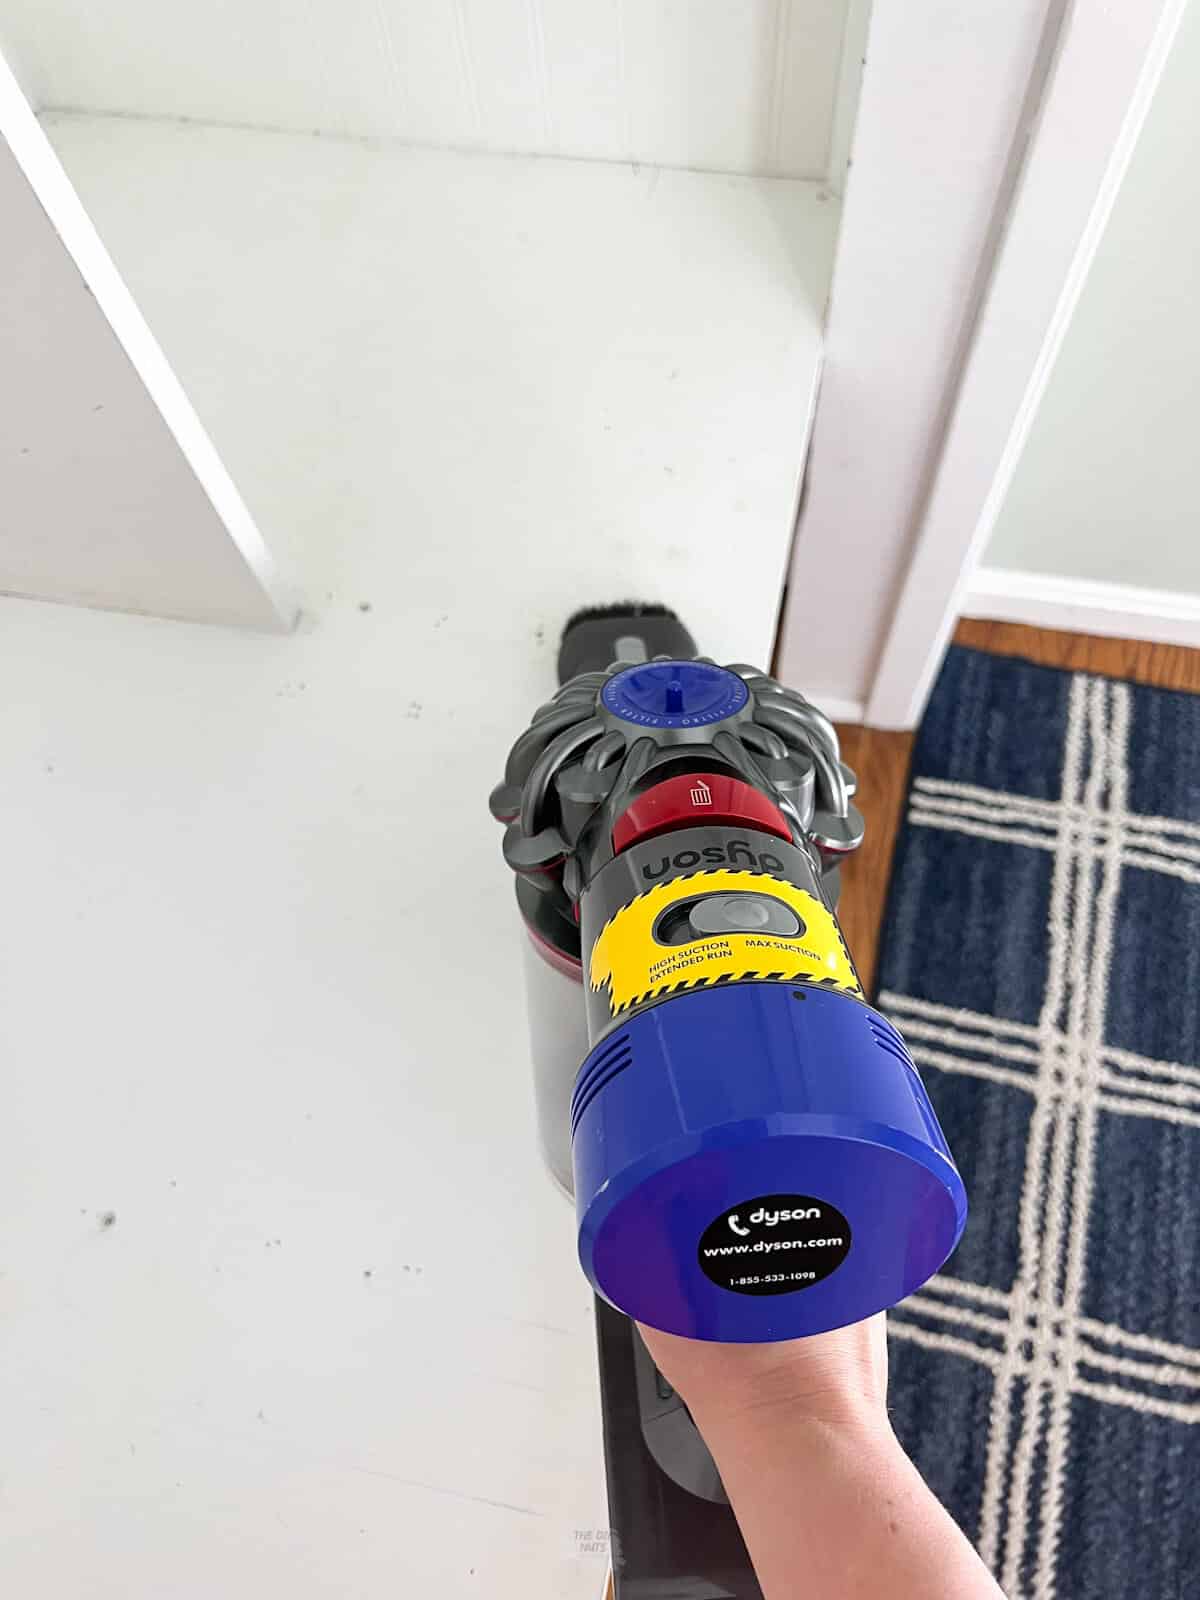
Step 3: Remove dust and dirt with a handheld vacuum.
Step 4: Use a rag and a deglosser to wipe down all surfaces needing to be painted.
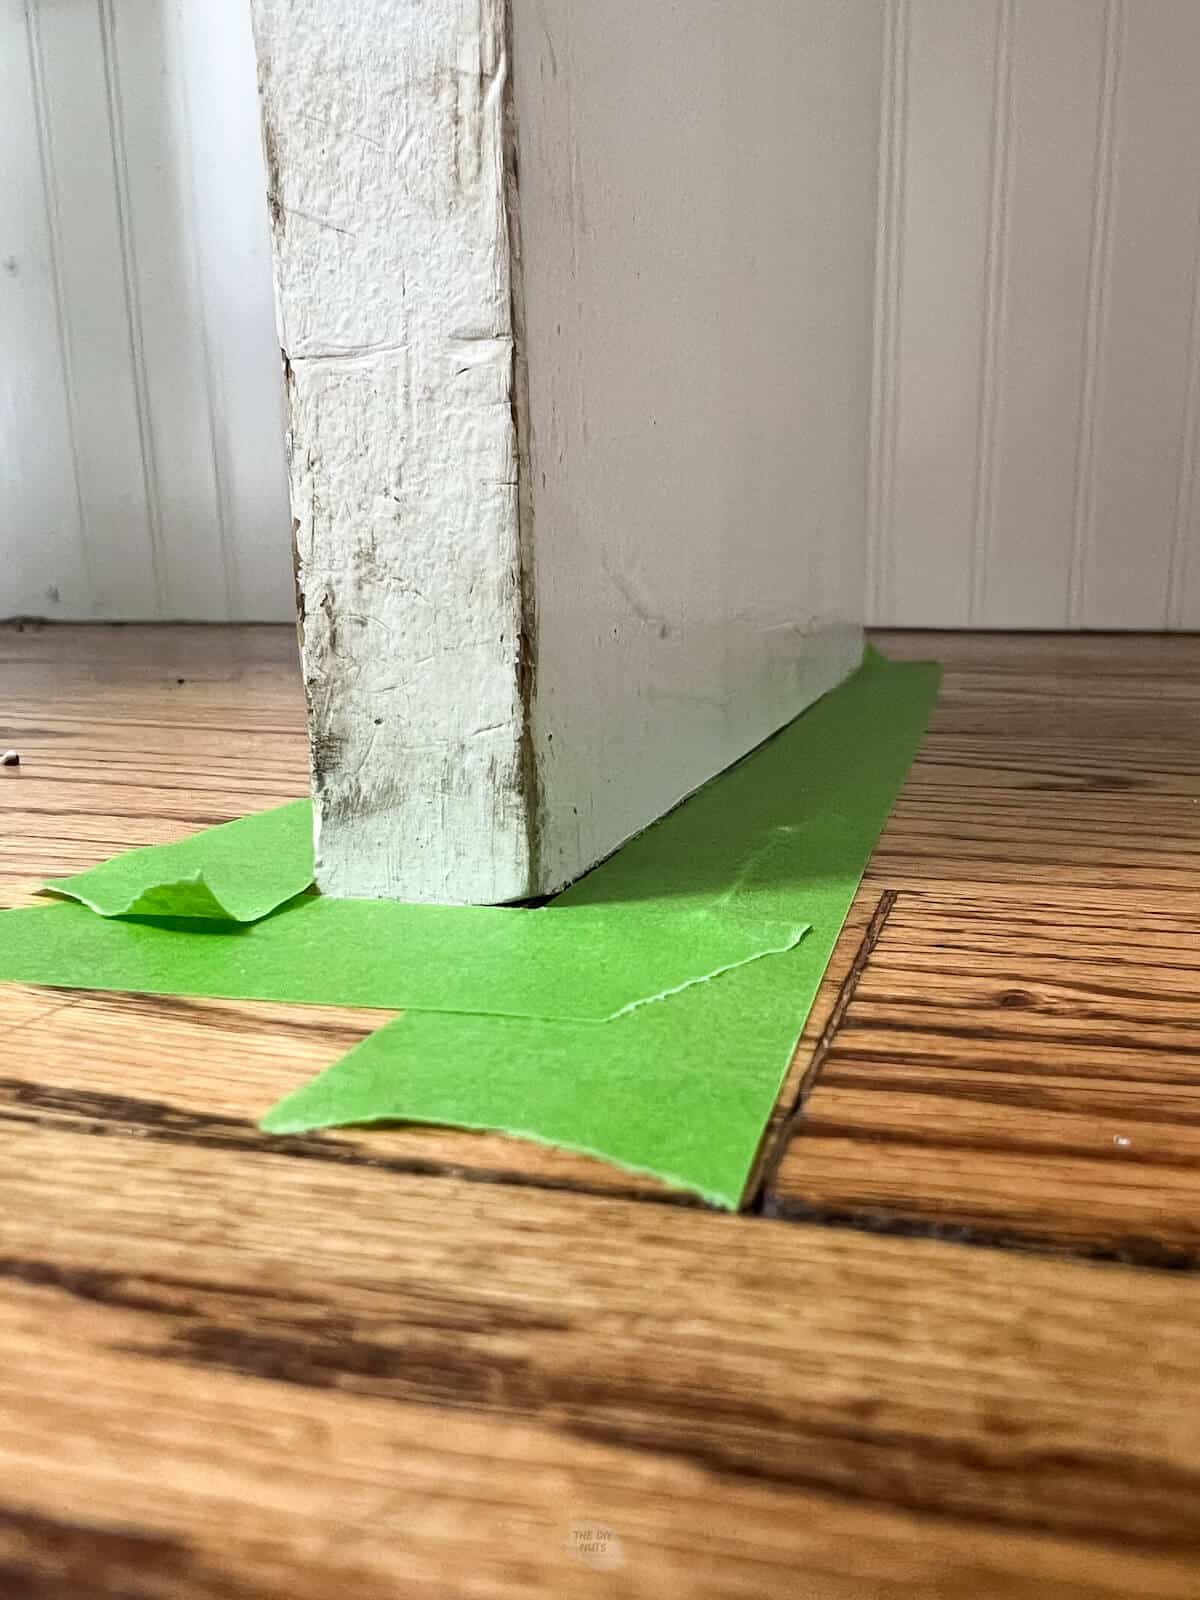
Step 5: Tape out any areas and add a drop cloth.
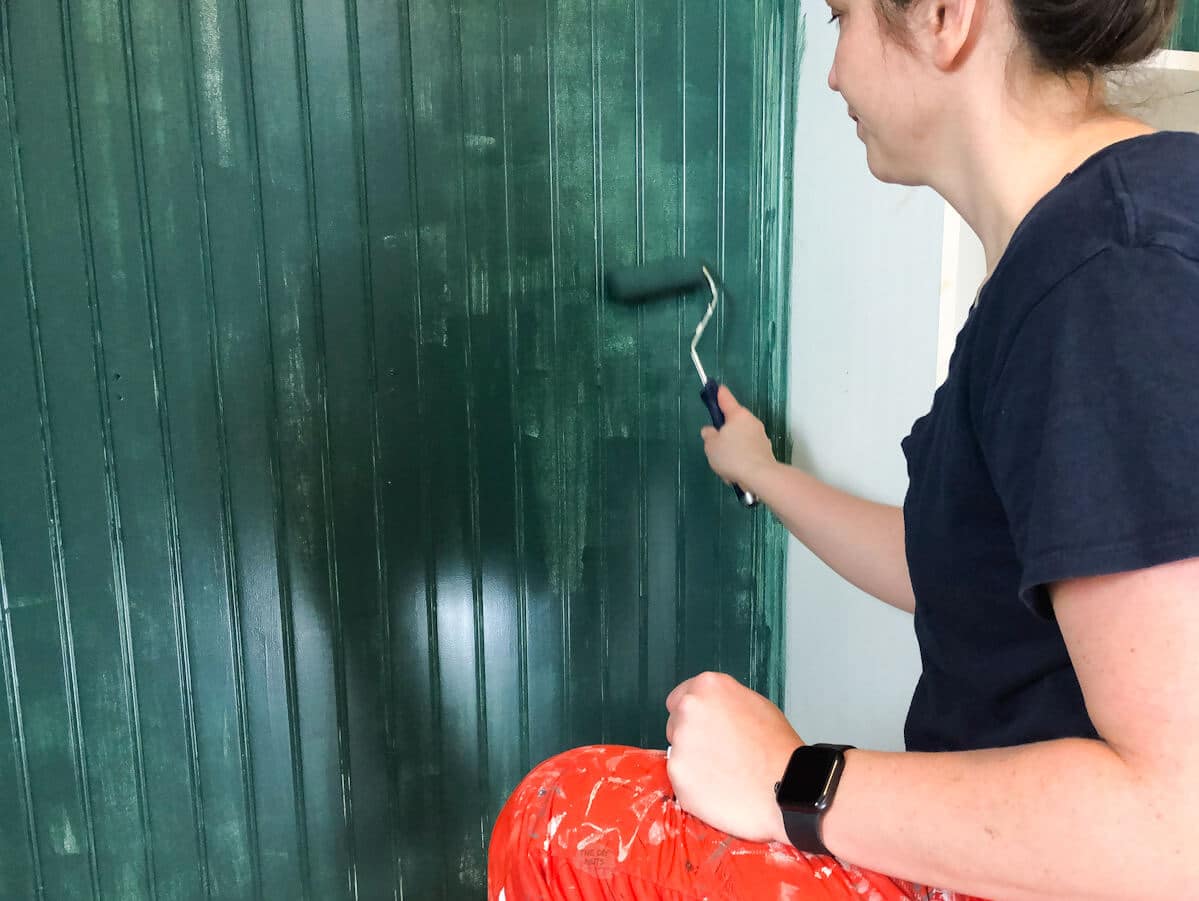
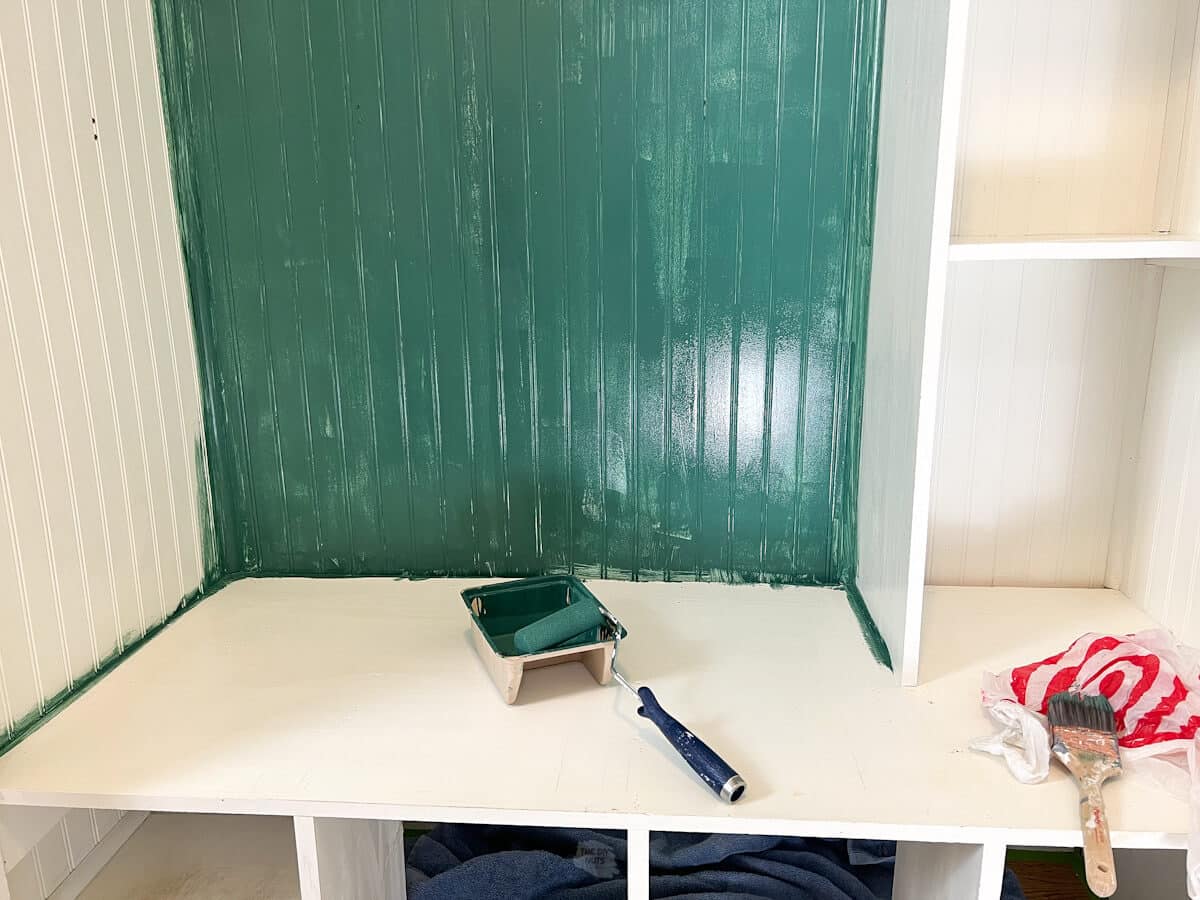
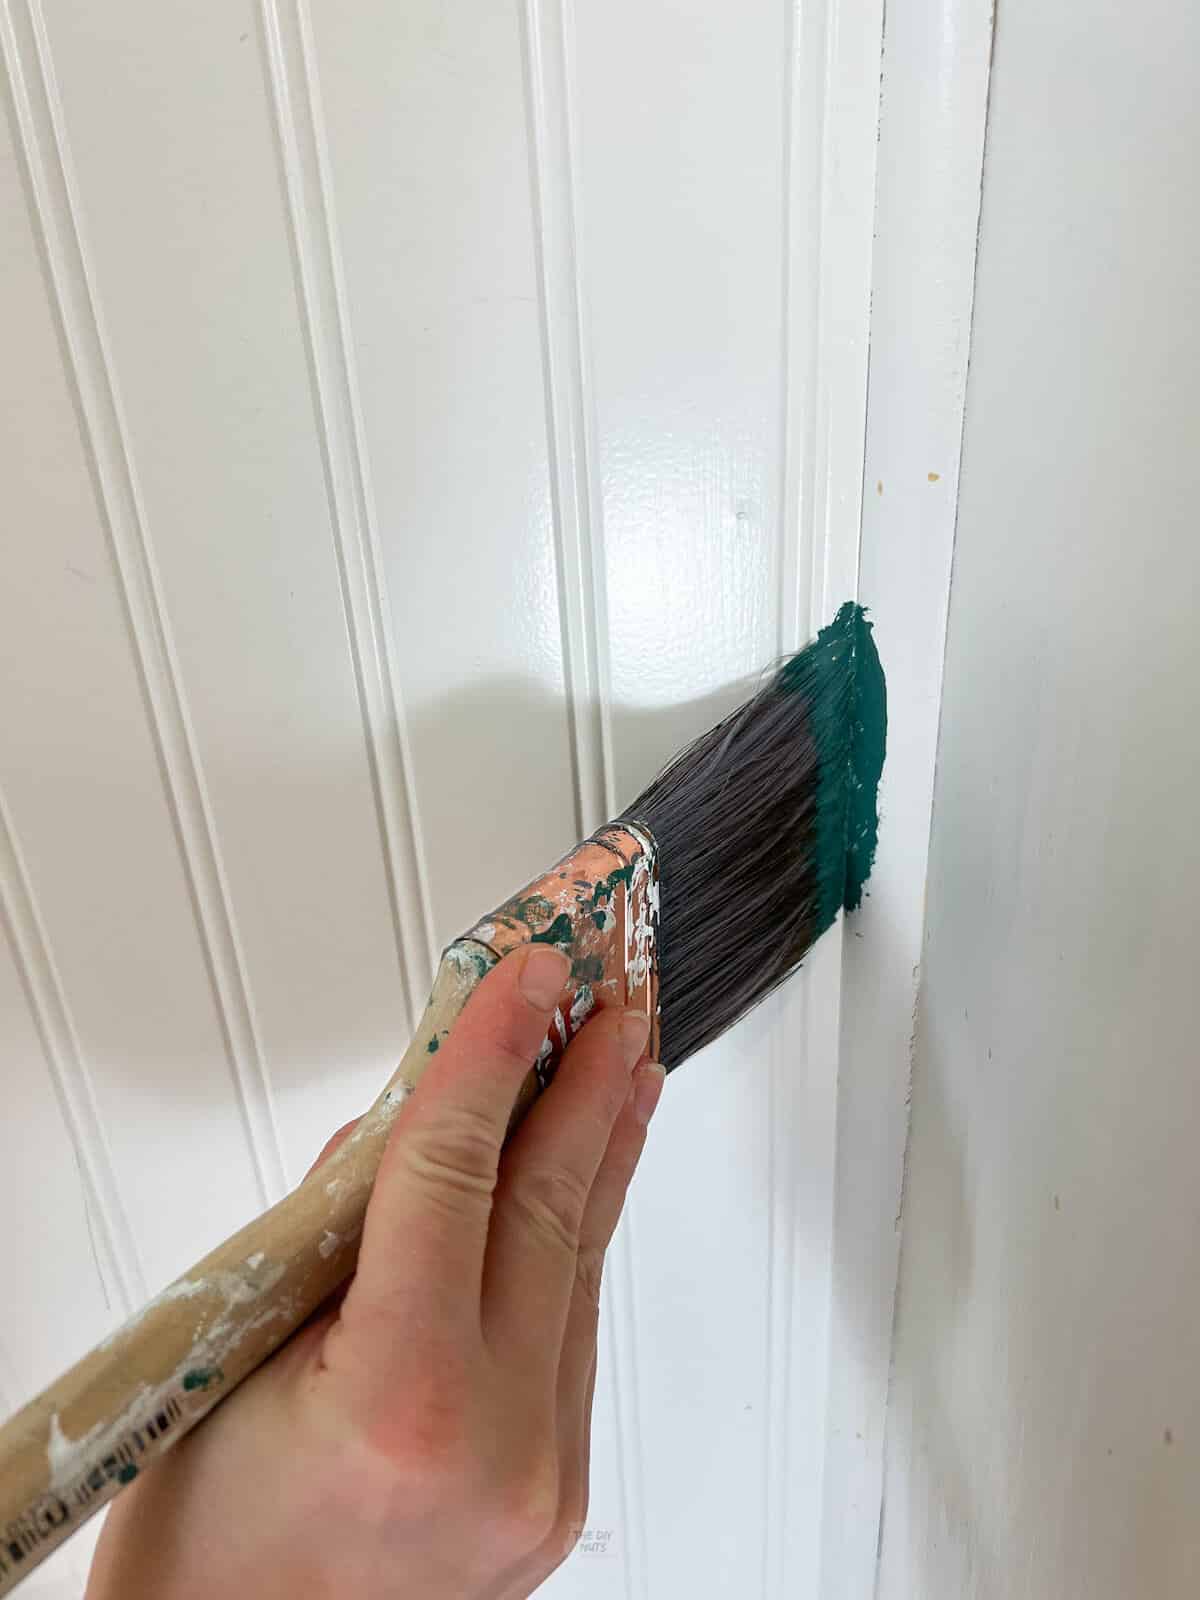
Step 6: Use a brush to trim out areas that are hard to reach. Since this is beadboard here, we had to also go into the creases of the board.
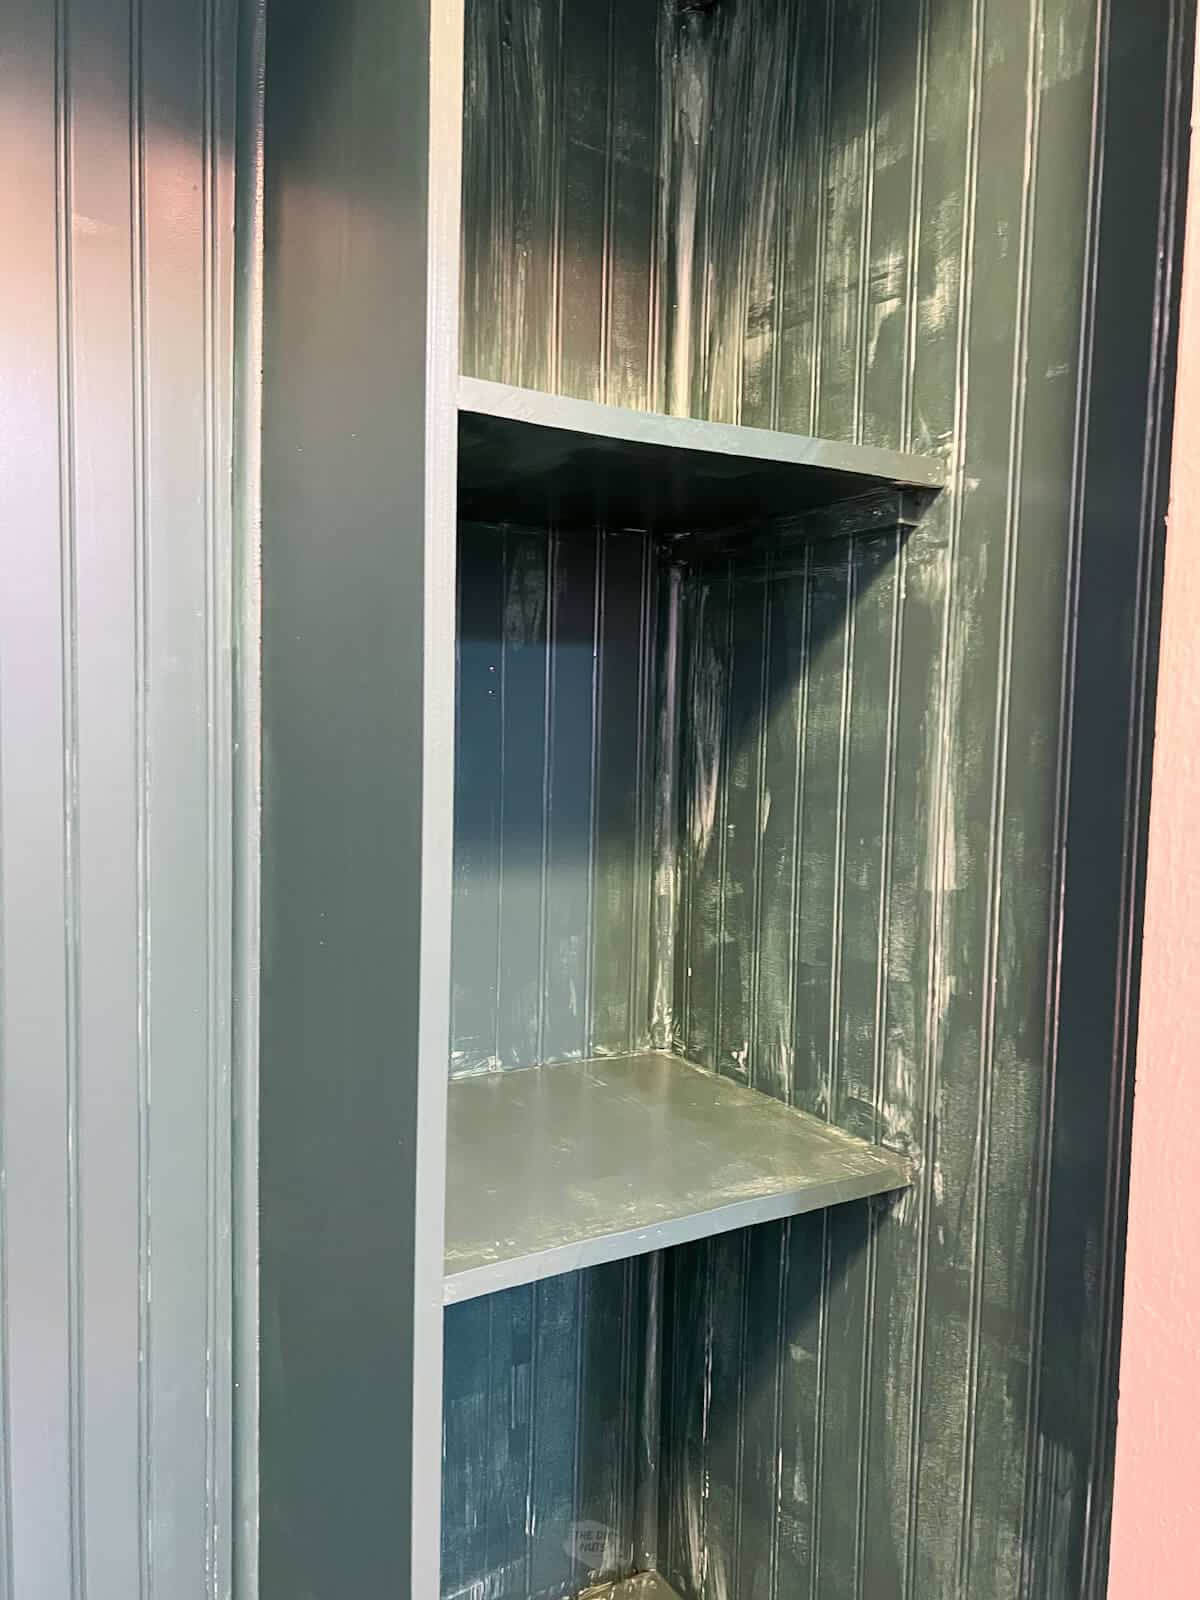
Step 7: Use our favorite type of foam roller and mini paint trays to apply a thin layer of the Emerald paint in semi-gloss. Don’t worry if the first coat of paint is splotchy.
Step 8: Let each layer dry completely before repeating the painting steps.
Step 9: Let paint fully cure before adding back hardware and other accessories. You can even spray paint your hardware for a fresh look before adding it back on. We love trying to wait a week to not mess up our smooth new paint job.
Notes About Our Wood Repainting
- At our local paint store, they actually said we could just scuff up the paint surface with a green Scotchbrite sponge and not even sand since our original paint job was in such good shape.
- We only lightly scuff the surface with sandpaper and really didn’t think it was that much extra work.
- We always suggest taking pictures of your project to the actual paint store in order to discuss the project with them. Once you find a few places you trust, you will always go back to them for advice.
- Don’t just buy the cheapest paint. Make sure you are purchasing and using a trim paint that is meant for wood.
- If you are unsure of the type of paint used originally, add a little extra prep with priming.
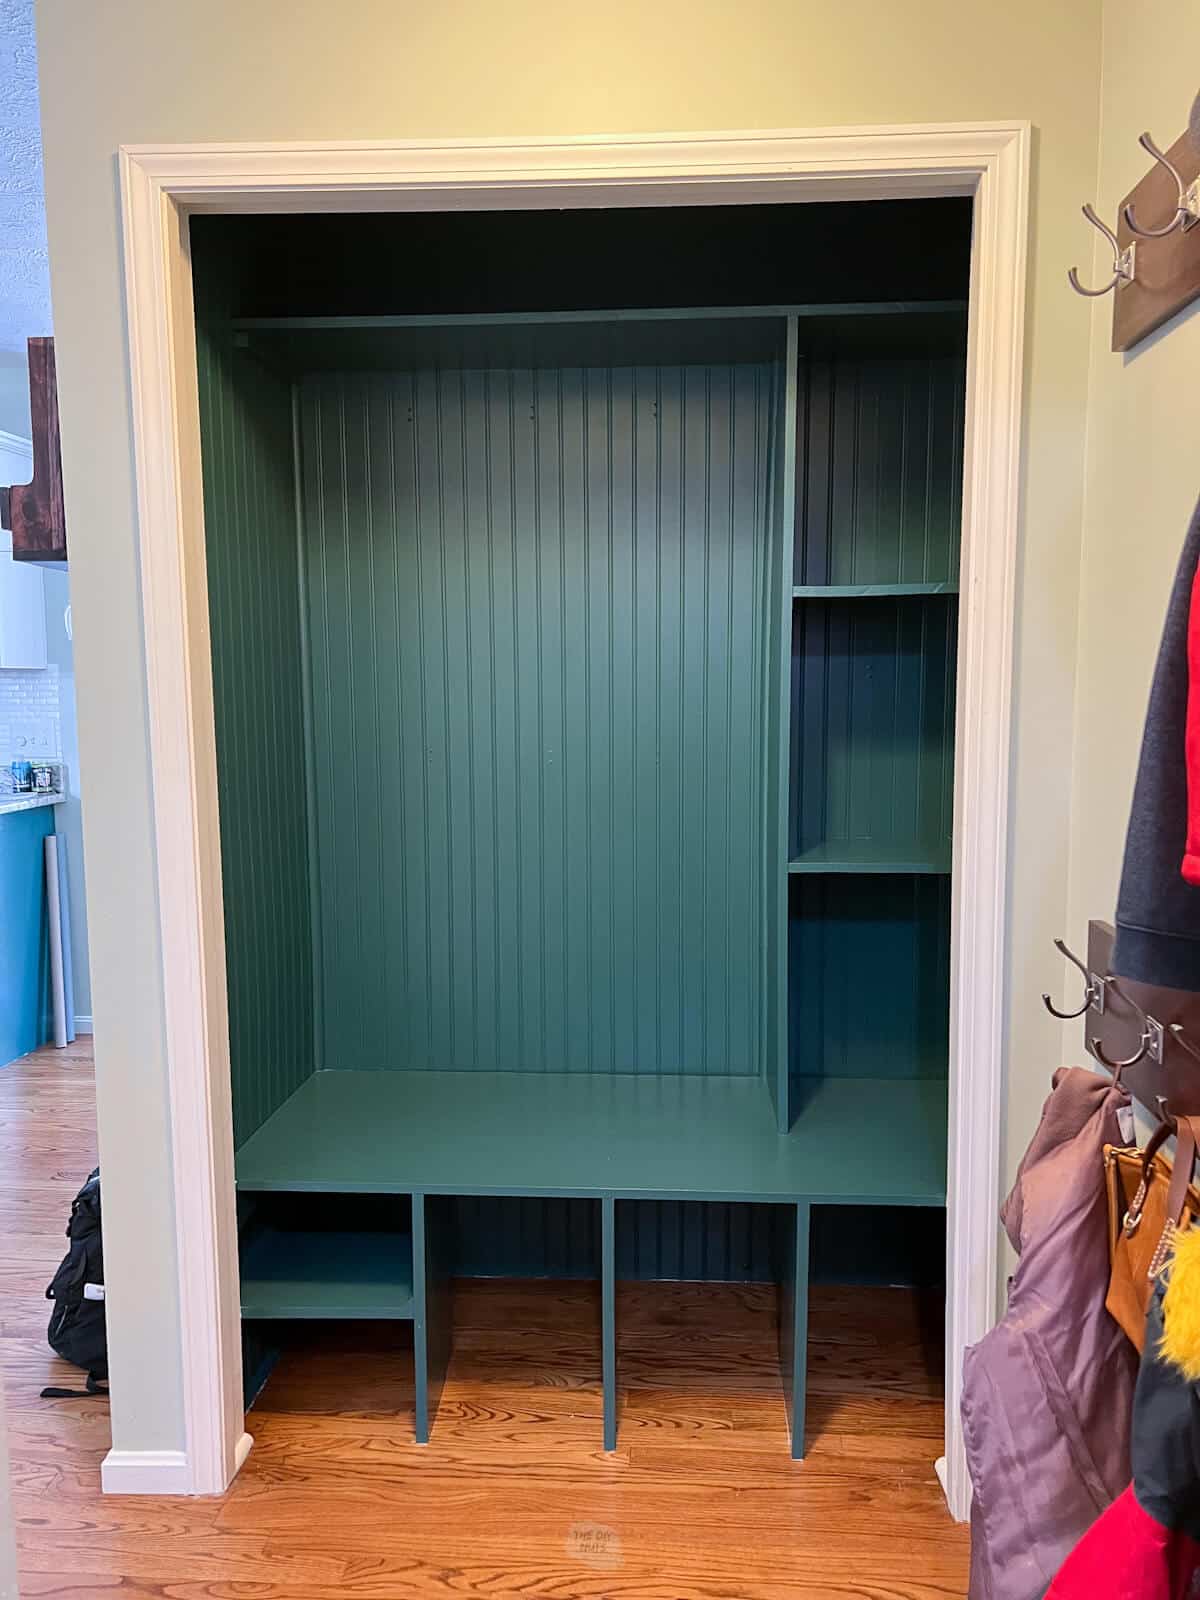
The “Before” and “After” Painted Wood Cubby
Here is our finished repainted cubby. The paint really was all the space needed to feel fresh again.
How-To FAQs
Yes, if you are using the same type of paint (latex over latex) and as long as the paint is in good shape. Some people will say that you can even paint latex over fully cured oil-based paint.
If you are unsure, I would test an area first or use a primer.
If the wood has been painted before, you will need to use fine sandpaper (220) or a green Scotch-Brite pad to roughen the surface. We then recommended removing dust with a vacuum and wiping it down with a deglosser before painting your new layer.
Most repainting projects will not require a primer. You may need a primer if the original surface is too glossy, the quality of the original paint job is sloppy, are going from a dark color to a very light one, or the new paint does not seem to adhere to the surface.
Related Posts
- 40+ Homemade Shelving Ideas
- Best Light Green Paint Colors
- 25+ Things To Spray Paint
- Easy DIY Paint Project Ideas
Follow us on Pinterest, YouTube or Facebook for more DIY inspiration!
We are so happy that we chose to just repaint the painted wood cubby.
How To Paint Already Painted Wood
Equipment
- Paintbrush
Supplies
Instructions
- Use 220 sandpaper to lightly scuff up the old paint job and surface.
- Remove dust and dirt with a handheld vacuum.
- Use a rag and a deglosser to wipe down all surfaces needing to be painted.
- Tape out any areas and add a drop cloth.
- Use a brush to trim out areas that are hard to reach.
- Use a small foam roller and mini paint trays to apply a thin layer of the Emerald paint in semi-gloss.
- Let each layer dry completely before repeating the painting steps.
- Let paint fully cure before adding back hardware and other accessories. We love trying to wait a week to not mess up our smooth new paint job.
Notes
- Make sure to properly clean and degloss paint. You do not want dust and dirt in your fresh layer of paint.
- You can use a green Scothbrite pad instead of sandpaper to lightly scuff the surface.
- If areas of wood are showing through, you can prime those before painting.
- Avoid bubbles with a small foam roller by doing light coats.
- Always check for drips as you are working. If you see a drip after it has dried, you can lightly sand and repaint that area.
saved me alot of work.thhank you”
Hi John. I am glad you were able to easily paint already painted wood!