Easy DIY Laundry Room Cabinets & Shelving

Do you need help organizing your home? The laundry room is no exception. Adding DIY wall laundry cabinets and open shelving above your washer, dryer, and utility tub can really help declutter your space.
*Disclosure: I only recommend products I would use myself and all opinions expressed here are our own. This post may contain affiliate links that at no additional cost to you, I may earn a small commission. Read our full privacy policy.
Have a small laundry room? We will show you how we utilized the height of our room to fully add more laundry room storage.
Factors To Consider For Your Laundry Storage Design
- How tall should your cabinets be?
- Do you want the cabinet to cover the whole wall?
- Do you want to add a mix of shelving and cabinets?
- What colors would like your cabinets to be?
- Are you comfortable covering your water shut off?
- How high do you want your cabinets to be hung?
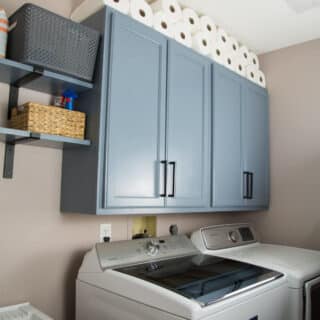
Wall Cabinets For Laundry Room
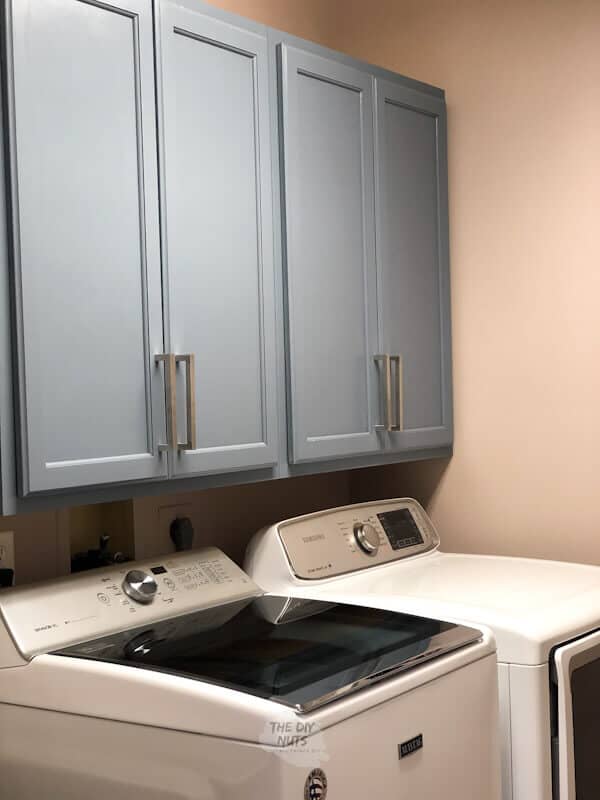
Consider using the whole space above your washer and dryer. For us, that meant choosing to get two 30” x 36” height cabinets to fit our space above our washer and dryer.
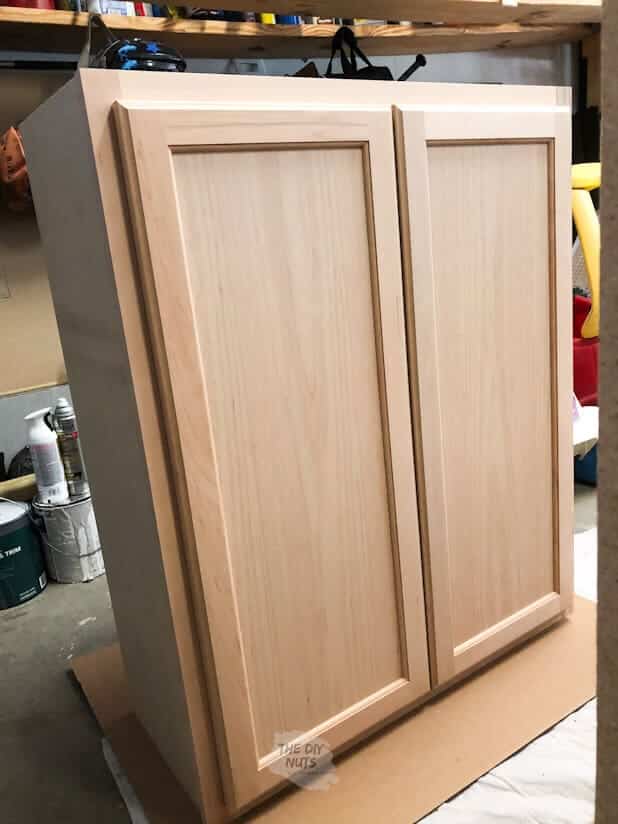
Stock cabinets are a great way for you to get the height you want while keeping this DIY project pretty inexpensive. The quality of these cabinets is what you would expect.
You could spend a lot of money and get a custom-built laundry room. One day, we may end up making our laundry room larger and reconfiguring the whole space. But for now, this was the best option to keep the laundry room storage idea within budget.
Would you use these cabinets in a kitchen?
We do like the look. These Home Depot stock cabinets were perfect for our laundry room. However, we would not recommend these upper stock cabinets if you were using them in a kitchen or other high-traffic areas, since parts are still made of particleboard.
Our Design
After the new washer arrived, I started looking at ways to improve the functionality of our space. We debated about adding cabinets across the whole wall.

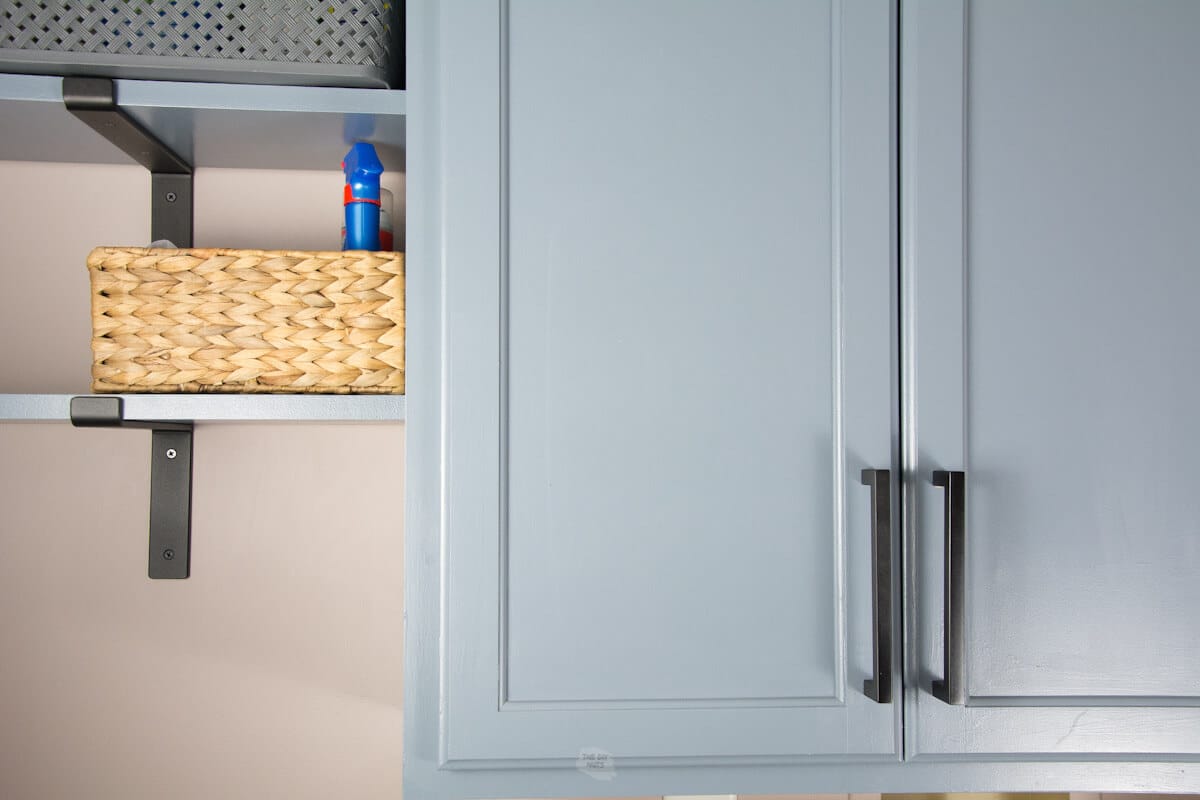
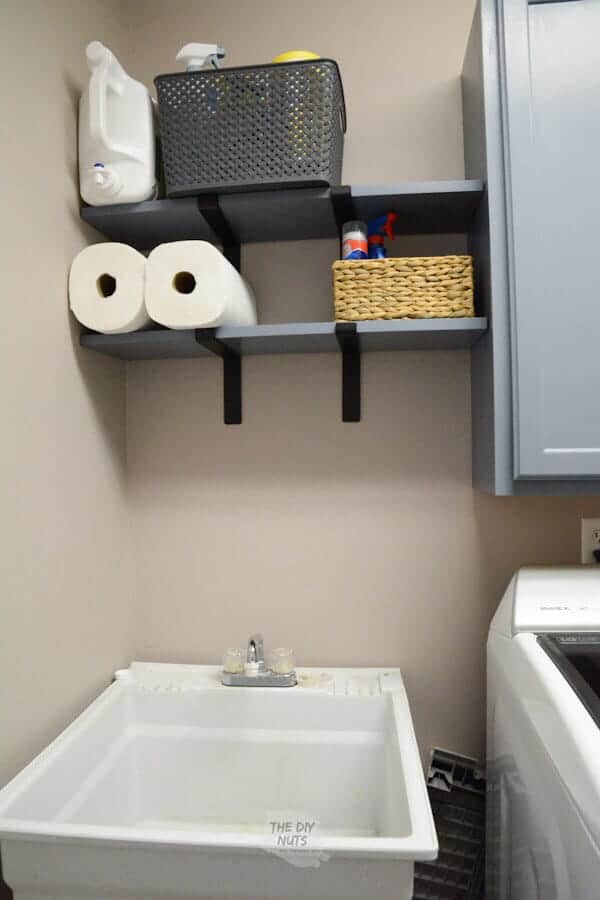
We had to factor in the utility tub that is next to our washer and dryer. Putting open shelving there would keep that space more open and accessible. We decided to keep the cabinets above the washer and dryer and to use open shelving above our utility sink.
How To Paint Laundry Cabinets
Full disclosure: I ordered a paint sprayer and really wanted to try it on this project. But I was using the same paint color on rollers for our bathroom vanity and oak railing makeover.
Therefore, I ended up just using brushes and foam rollers, as I did when I painted the bathroom vanity cabinets.
Con To Painting Stock Cabinets
I do think that these cabinets would have probably turned out a little better if I had sprayed them. The cabinets were not nearly as forgiving as solid wood oak cabinets that I was also painting at the same time.
While these worked for our laundry room cabinets, I would say they are far from perfect. I may even end up having to sand a few areas and try to retouch some areas that seemed to take the paint inconsistently.
Recommended Painting Supplies
- Old Rag
- Enamel Paint in Semi-Gloss (We used this paint in Charcoal Blue)
- *Latex Primer-We use Multi-Purpose Latex Sherwin Williams Primer
- Brush- We like using a Purdy 2 ½” Angular Trim Brush or equivalent from Wooster
- Small High-Density Foam Roller (these rollers are a must for a variety of DIY projects)
- Small Roller Handle
- Small Paint Tray-I love how sturdy & cheap these are
- Hardware Pulls or Knobs- Here are the pulls we used. These pulls are plated, but don’t look like it when they are up.
- 220 Sandpaper
How To Paint Laundry Room Cabinets And Shelving
Step 1: Sand Cabinets
Lightly sand the cabinets with extra-fine sandpaper (220) to remove any rough spots you see. The doors had some wood shavings or extra particles on them.
I did not think I needed to do this, and I regret it. You can learn from my mistakes to get a smoother finish.
Step 2: Clean Wall Cabinets
Wipe down the cabinets with a damp rag before priming.
Step 3: Prime Doors and Cabinet Box
Use a primer (we love SW latex primer) with a brush and foam roller to completely cover the areas you need. I did not prime and paint the parts of the cabinets that I knew would not show.
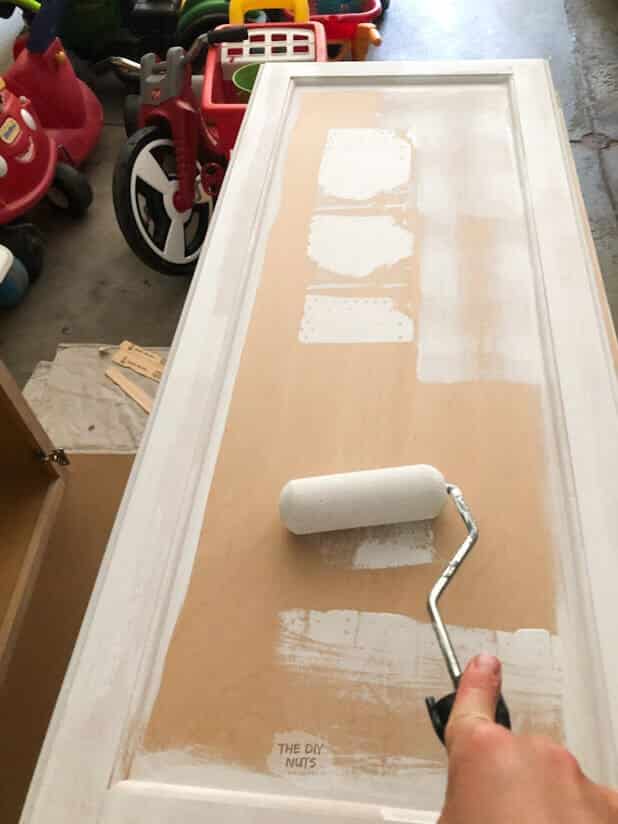
Step 4: Use Latex Enamel Cabinet Paint
Once dry, start painting the first coat of enamel paint. Use a brush and a small roller, and apply at least two coats. Propping doors with 2x4s will make this easier for you.
PRO TIP: Store your brush and roller in a Ziploc bag when you are not using them. This works as long as you are finishing your painting project in a timely manner.
Once they are dry, you can hang your cabinets.
Read & Watch More: Step-by-Step Tutorial For Painting Cabinet Doors with A Brush and Foam Roller (With Video)
Recommended Supplies To Hang Laundry Cabinets
- Stud Finder
- 4’ Level
- Pencil
- Shims (maybe)
- Cordless Drill
- 3.5” Screws
- Tape Measurer
Before You Begin
Plan your design and heights for your laundry cabinets and shelves.
Our Mistake
At first, my husband just assumed putting the cabinets all the way to the ceiling would be a great idea. Luckily, I was easily able to see that I did not like the current height before my father-in-law and husband did too much work.
Make sure you can reach your items while leaning over your washer. I realized I wouldn’t be able to reach the top shelf, or even much of the bottom shelf, if they stayed that way. You don’t want to have to get a ladder out to reach most of your items.
How To Install Laundry Room Cabinets
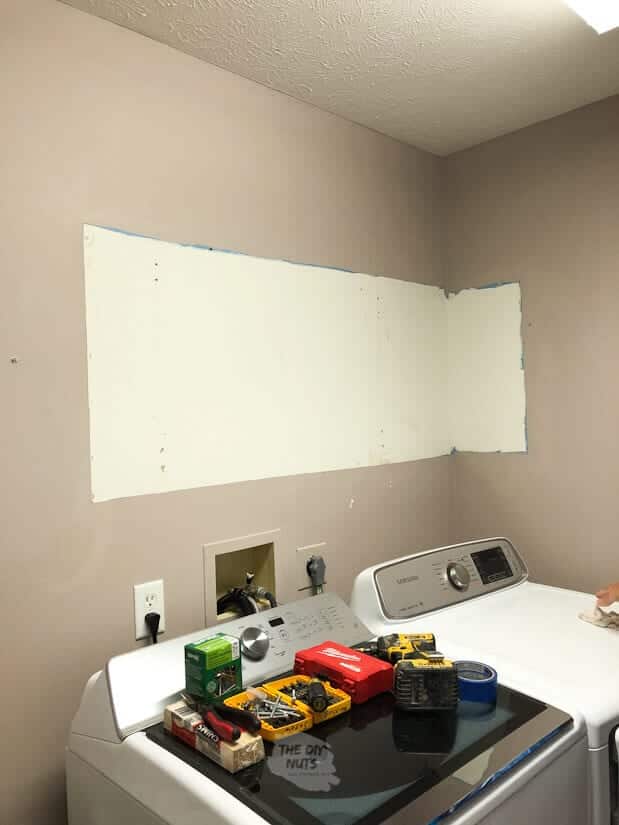
Step 1: Remove Old Items and Prep Walls (if needed)
Remove any existing cabinets or shelves.
We had to take down both, but luckily, we repurposed the old shelf and added it to our garage for extra storage! The wire shelf may need to be sold on Facebook using these tips.
Use drywall mud to fill any spots left by previous shelving, and paint the room or touch up with the existing color. I love this color of Temperate Taupe by SW.
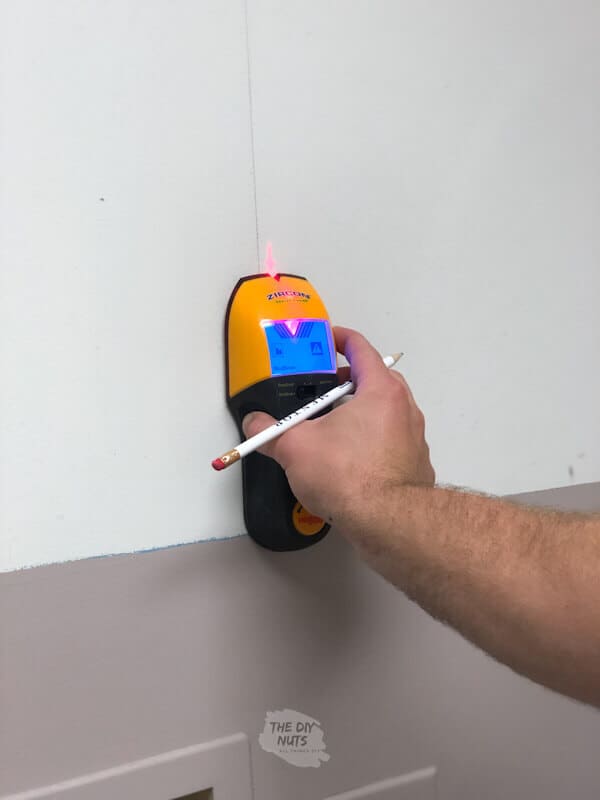
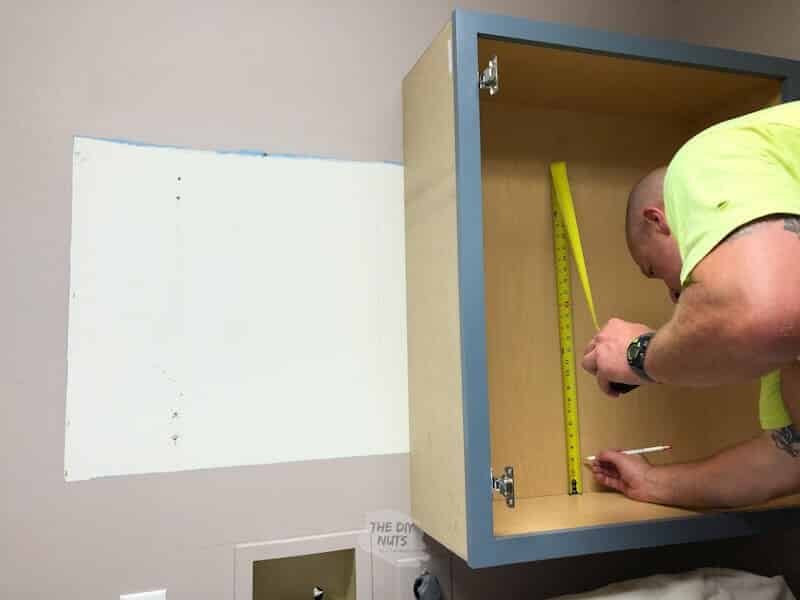
Step 3: Mark A Line For The Bottom Of The Cabinets
Use a 4’ level to mark the line where the bottom of the cabinets will go. This will determine the hanging height of the cabinets and the amount of extra room at the top.
Step 4: Plan The Exact Location Of The Wall Cabinets
Put up and hold up cabinets while a second person puts a 4’ level on the face of the cabinets vertically to see if they will be plumb.
If they are not plumb, use wood shims to plumb (you might have to do this if the wall is in/out). Luckily, our laundry room was pretty square and we did not have to do this!
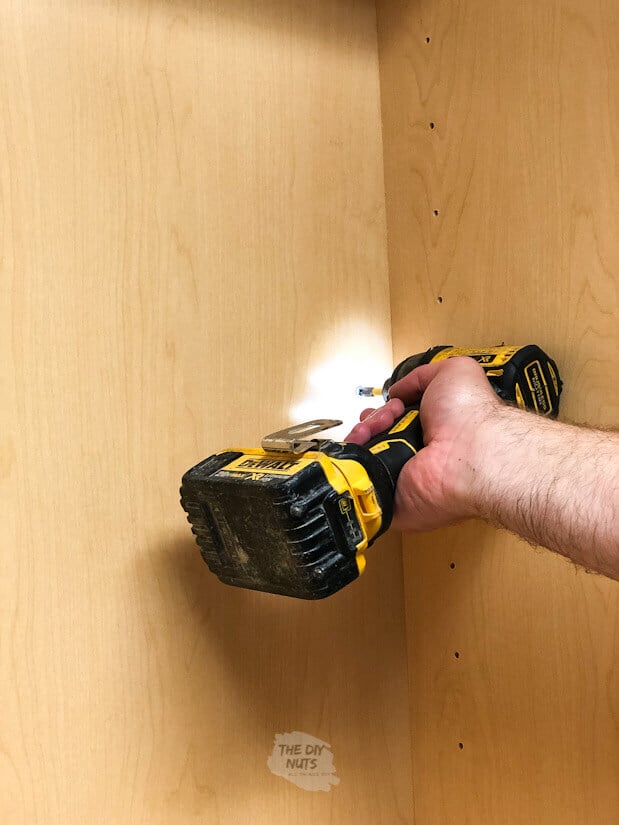
Step 5: Attach Laundry Cabinets To Studs
Use a cordless drill and 3.5” screws to anchor cabinets to studs. Each cabinet ideally would be anchored to two (2) separate studs that are typically located 16” apart.
Step 6: Find Studs
The big trick is to use a tape measure and your brain to transfer the stud location from the wall to the inside of the cabinet. You have to subtract the thickness of the cabinet’s sidewall.
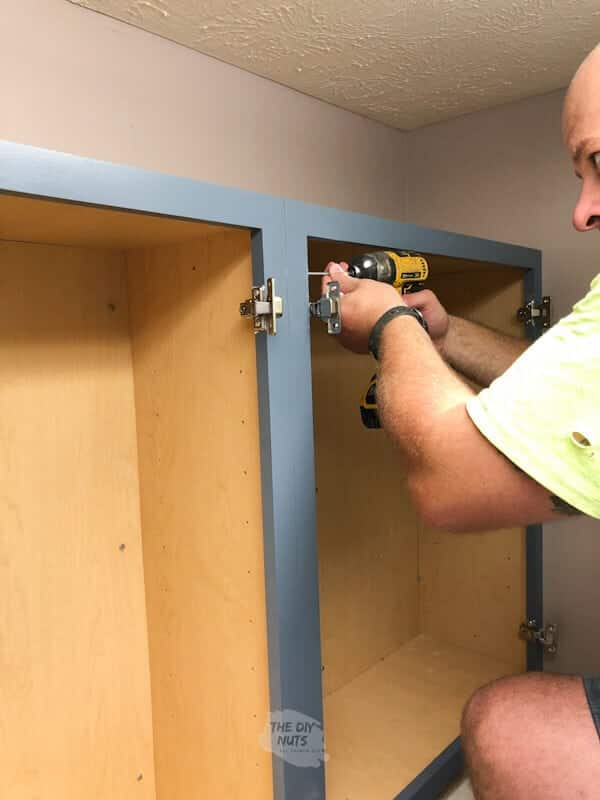
Step 7: Drill Cabinets Together
Once the cabinets are hung, drill and add a screw horizontally behind the doors to attach them.
Step 8: Add Door To Cabinet Boxes
Put the doors back on the cabinets. You can also try to put the painted doors back before hanging, but we just thought this way was easier.
**Optional: Add hardware to your cabinets or leave them without. We loved the look and price of the hardware we used in our recent bathroom vanity makeover, so we decided to order those handles again.

How to Build Extra Laundry Shelving With Cabinets
Adding open shelving above the utility was a must. One day we may also add a spring rod under the bottom shelf to hang dry clothes when needed.
Recommended Supplies For Open Shelving
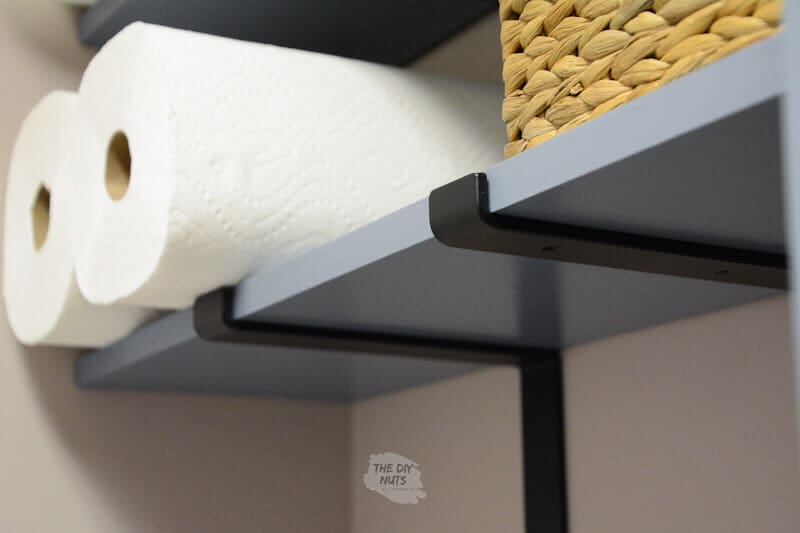
- 2 sets of these brackets to help create two shelves above our utility sink next to the cabinets.
- The brackets come in a variety of sizes, and we chose the 9.25” width so we could cut 1 x 10” to our desired length.
Step 1: Cut 1 x10″ Wood To Size
Cut boards to size. Our shelves are 30″ long to fit the entire wall space.
Step 2: Prime and Paint Wood Shelves
After cutting the boards, we primed them using SW latex primer and the same latex enamel paint that we used on the cabinets.
Step 3: Attach Brackets To Studs
Attach the shelving brackets to studs using anchors and the hardware provided with the brackets.
Step 4: Place Wood On Shelf Brackets
You can see the tiny screw that you can use once your boards are on the shelf brackets.
Organize Your Laundry Supplies Easily
Once the laundry shelves were completed, it was so lovely to get them completely organized and ready to use. The only dilemma we have now is deciding whether the brushed-nickel hardware pulls go with the black farmhouse shelving brackets.
We decided the metals did not go together. DIY is always a process.
Did you know you can spray paint hardware?
UPDATE: Recently, we painted the hardware black to match the existing farmhouse shelf brackets. It looks much more put together with matching metals.
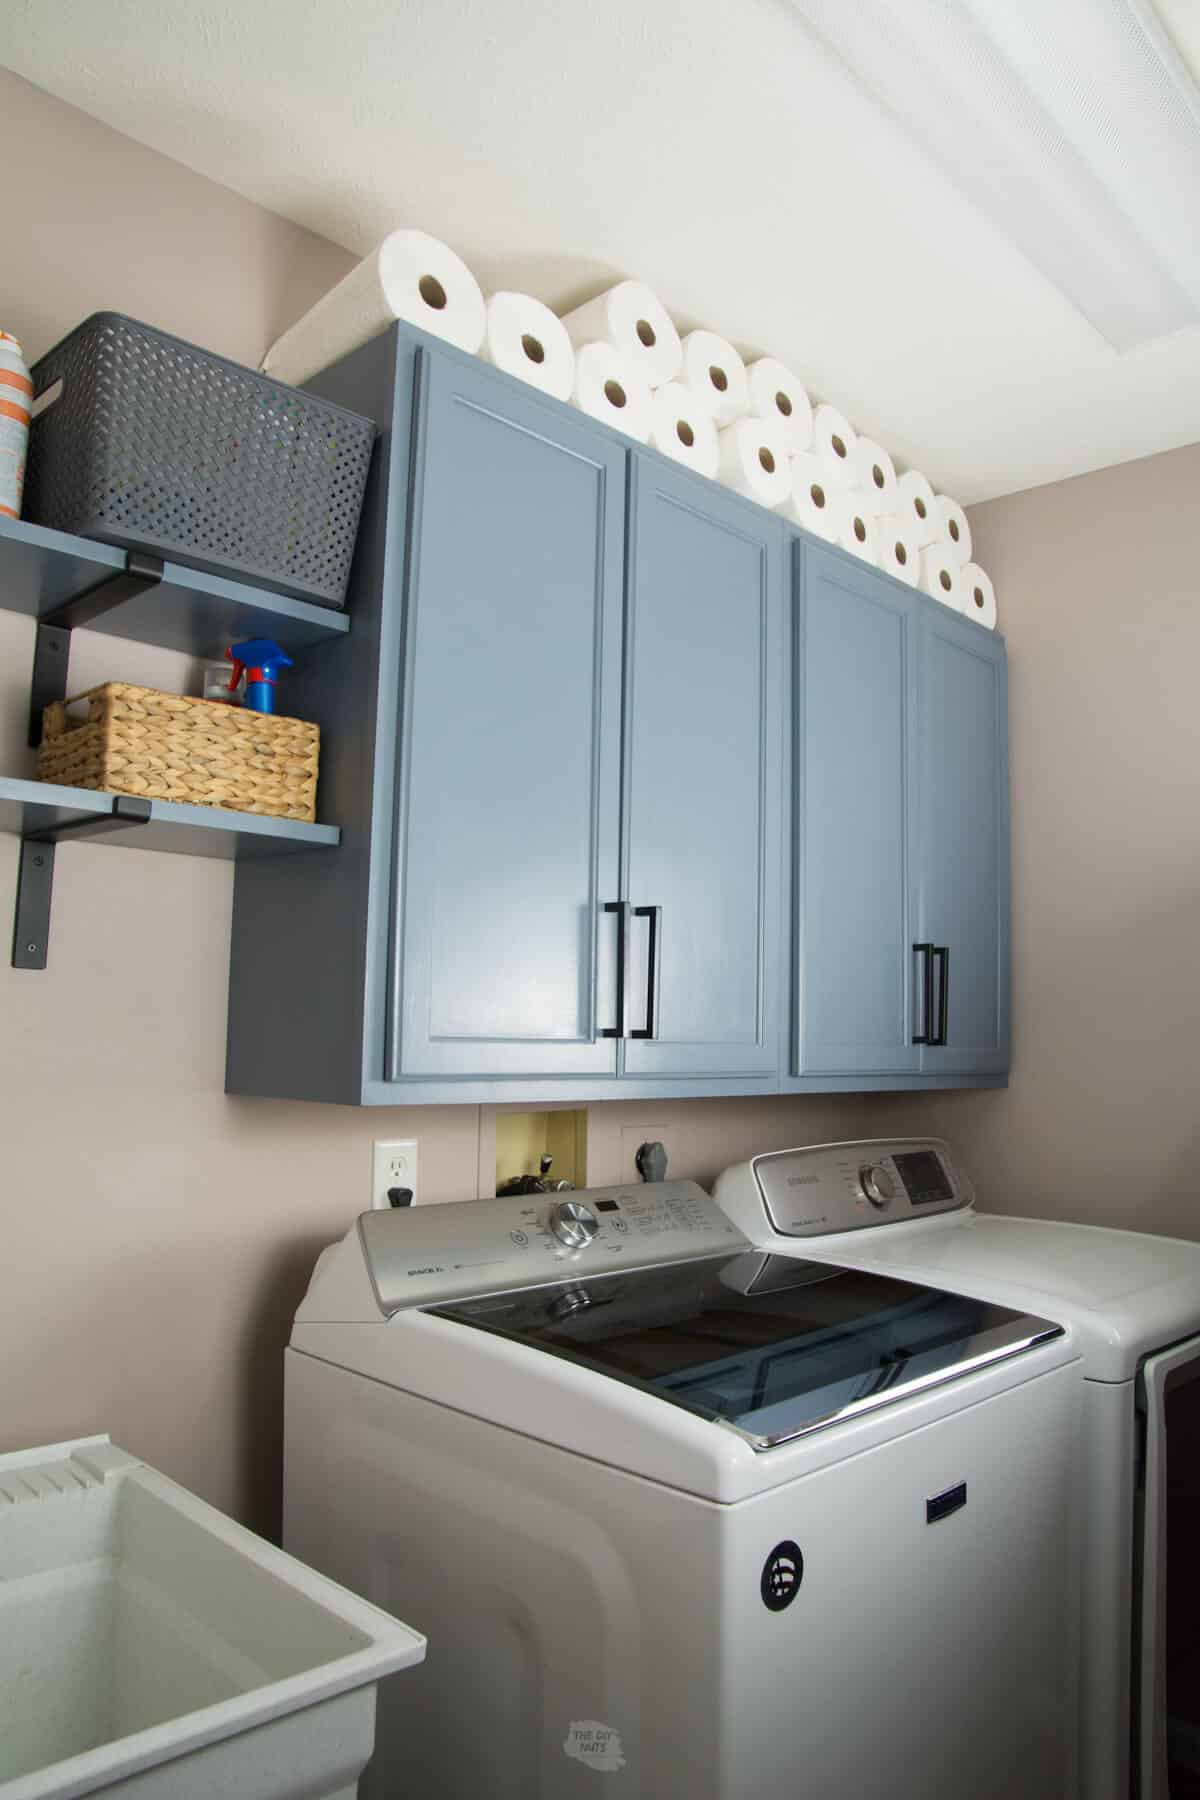
I couldn’t believe how much more storage I had in these DIY laundry room cabinets, and that my shelves were no longer overflowing. Now they also look so much better with matching metals.
How-To FAQs
For reference, our laundry room is approximately 7 ½ ft by 6 ft. We are able to just fit our new washer, dryer, and utility tub on the length of the wall with a little wiggle room in between.
We do have large-capacity appliances, so I am sure we would have more space if we had smaller washer and dryer units.
The main reason I did not want cabinets running the length of the wall was to keep my large laundry soap easy to reach.
Only slightly. We can easily get in and out of our washer with full loads. If you are worried, you could hang your cabinets a little higher or use smaller handles.
From an oak banister to bathroom cabinets, we have used this color throughout our home. You can see the whole list of charcoal blue painting projects.
Try an inexpensive paint sprayer. This one has excellent reviews, and we plan to try ours soon. The biggest con to using a paint sprayer is the setup required for your work area. These cabinets would be perfect to spray because you have not hung them yet.
The bottom shelf is 62″ from the floor, and the next shelf is 10″ above that.
Yes, essentially, base kitchen cabinets are the same for the laundry room. Buy custom cabinets or use stock cabinets on the wall over your washer and dryer.
Wall Mounted Laundry Room Cabinets with Shelving
Equipment
- 2.5″ Angled Paintbrush Use a high-qualtity paintbrush like a Purdy 2 ½” Angular Trim Brush or equivalent from Wooster
- Small High-Density Foam Roller and Handle
- Old Rag
- 220 Sandpaper
- Stud Finder
- 4' Level
- Pencil
- Shims (maybe)
- Cordless Drill
- 3.5” Screws
- Tape Measurer
Supplies
- Enamel Paint in Semi-Gloss
- Latex Primer
- Hardware Pulls or Knobs
- Shelf brackets These come in a variety of sizes. Use 9.25” width so you can cut 1 x 10” to our desired distance.
- 1 x 10" pine board cut to desired length we had two boards that were 30″ long
Instructions
Paint Laundry Cabinets
- Lightly sand the cabinets with extra-fine paper (220) for any rough spots you see. The doors had some wood shavings or extra particles on them.
- Wipe down the cabinets before priming with a damp rag.
- Use a primer (we love SW latex primer) with a brush and foam roller to completely cover the areas you need.
- Once dry, start painting the first coat of enamel paint. Use a brush and a small roller and at least 2 coats. Propping doors on 2 x 4s will make this easier for you.
Hang Cabinets
- Decide on design and height you would like cabinets and shelves.
- Remove old items, cabinets and prep the walls as need.
- Find studs using a stud finder.
- Use 4’ level to mark the line where the bottom of the cabinets will go. This will determine the hanging height of the cabinets and how much extra room there will be on the top of the cabinets.
- Put up and hold up cabinets while a second person puts a 4’ level on the face of cabinets vertically to see if they will be plumb.
- Use a cordless drill and 3.5” screws to anchor cabinets to studs. Each cabinet ideally would be anchored to two (2) separate studs that are typically located 16”s apart.
- Once cabinets are hung drill and add a screw horizontally behind the doors to attach them to each other.
- Put the doors back on the cabinets. You can also try to put the painted doors back before hanging, but we just thought this way was easier.
Make and Attach Laundry Shelves
- Cut 2 boards to size. Our shelves are 30" wide.
- Prime wood with a latex primer.
- Let dry.
- Paint 2 coats of a latex enamel or cabinet paint on yoru wood.
- Find studs.
- Attach shelf brackets to studs using anchors and hardware provided.
- Place wood on the shelf brackets
- Screw in from the bottom of the shelf in the space provided in the bracket.
Notes
- If your cabinets are not plumb, use wood shims to plumb (you might have to do this if the wall is in/out).
- When attaching the cabinets to studs, the big trick is to use a tape measurer and your brain to transfer the stud location from the wall to the inside of the cabinet. You have to subtract the thickness of the cabinet’s sidewall.
- You can add hardware to stock cabinets or even spray paint old hardware for a new look.
I love how detailed you are with explaining. Turned out great.
Hi Tammy. Thank you for your kind words. We really do love this extra storage in our laundry room.
Do you have any issues opening the lid of your top loading washing machine? Does it hit the cabinets?
Hi Elena. Due to my hardware being large, the top does lightly rest on the handles, however, it is not an issue at all when loading. I just can’t fling the lid open. If that would really bother you, then you could always hang the cabinets a little higher and even keep a little step stool in your laundry room. Due to my height, I didn’t want to not be able to reach the upper shelf in the laundry room cabinets. Good luck with your laundry room.
Hello! Came across this while searching for how to hang cabinets over the washer and dryer. I love the idea of the shelves over the sink- can you tell me how far up from the bottom of the cabinet you put the first shelf, and how far apart they are? It’s a great look and I want to reproduce it! I’m so glad you link to everything you use – I’ll probably use smaller handles but I love those heavy duty brackets on the shelves!
Thank you!
Kim
Hi Kim. I am glad you like our simple DIY laundry room makeover. The bottom shelf is 62″ off the floor and the next shelf is 10″ above that. The bottom shelf is also 12″ above the bottom of the cabinet. I am shorter so that is why we chose to make our laundry shelves that height. We did 10″ in-between as we knew we could fit smaller items like Clorox wipes, etc. You may want to look at some of the products you may put on the shelf and make sure they will fit how you want. I hope that helps! We love the farmhouse brackets that we even used the same ones and paint colors when redid a basement closet.