DIY Outdoor Table: What to do with Leftover Composite Decking?

Did you recently build a composite deck? Use your leftover Trex decking boards to build a large DIY outdoor patio dining table. The best part about this DIY project was that it used some materials we already had.
*Disclosure: I only recommend products I would use myself and all opinions expressed here are our own. This post may contain affiliate links that at no additional cost to you, I may earn a small commission. Read our full privacy policy.
We recently added a brand new screened-in porch and deck to our house. We are all about DIY projects, but we have this big deck and porch for professionals. They left us with a bunch of leftover composite decking, and we knew we had to use it.
We absolutely LOVE this outdoor space, but we needed ideas for what to build with our leftover composite decking. Here is our step-by-step DIY outdoor table tutorial.
Reasons To Use Composite Decking Material
- More rot resistant than wood
- Is more bug-resistant
- Less maintenance
- No need to buy gallons and gallons of stains and sealers like wood decking
- Some companies use recycled materials to create composite decking
- Nails are not as visible (decking technology is always improving)
If you are building a deck that you want to last composite decking is the way to go. While the price is more expensive at the beginning you will have less maintenance (like our DIY composite deck cleaner) and it will last for at least 25 years or more as it says in this HGTV article.
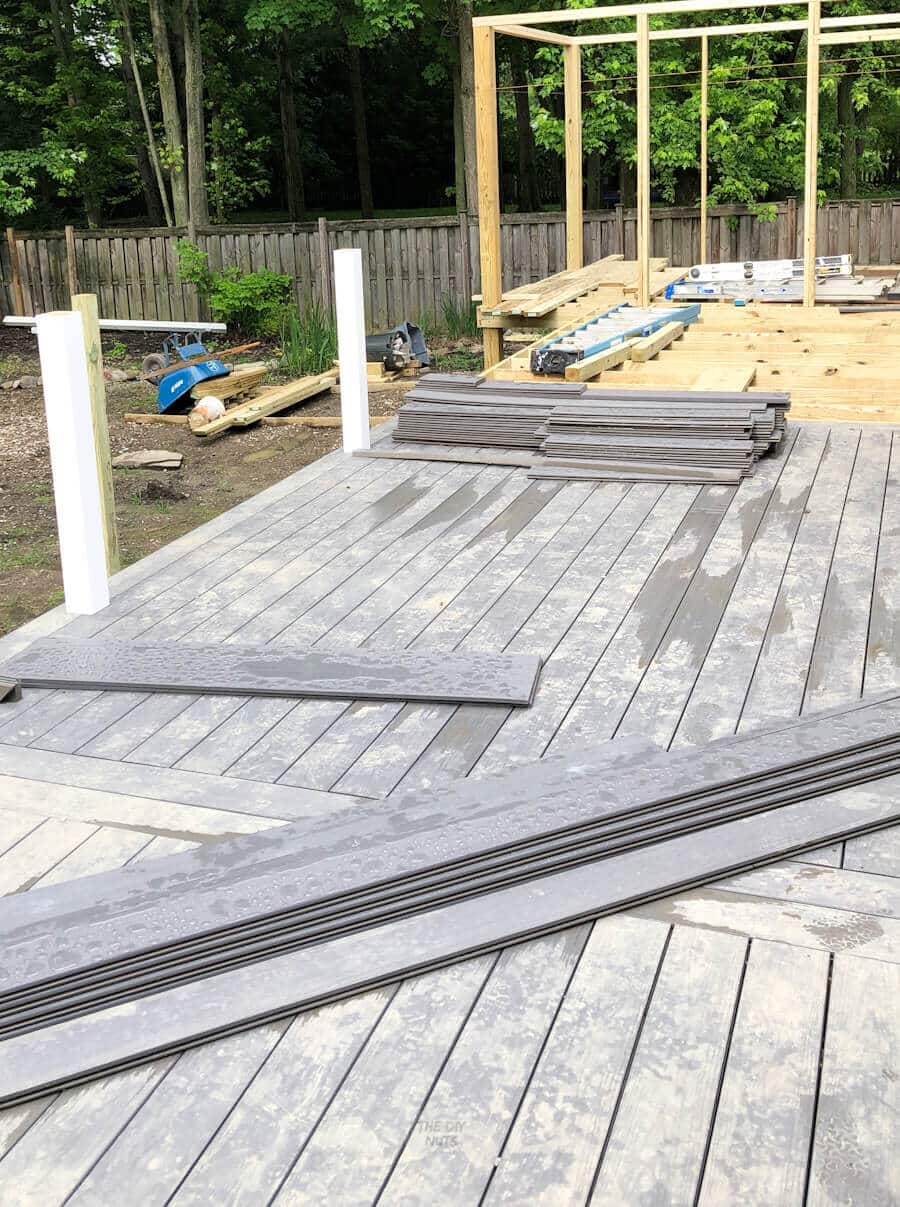
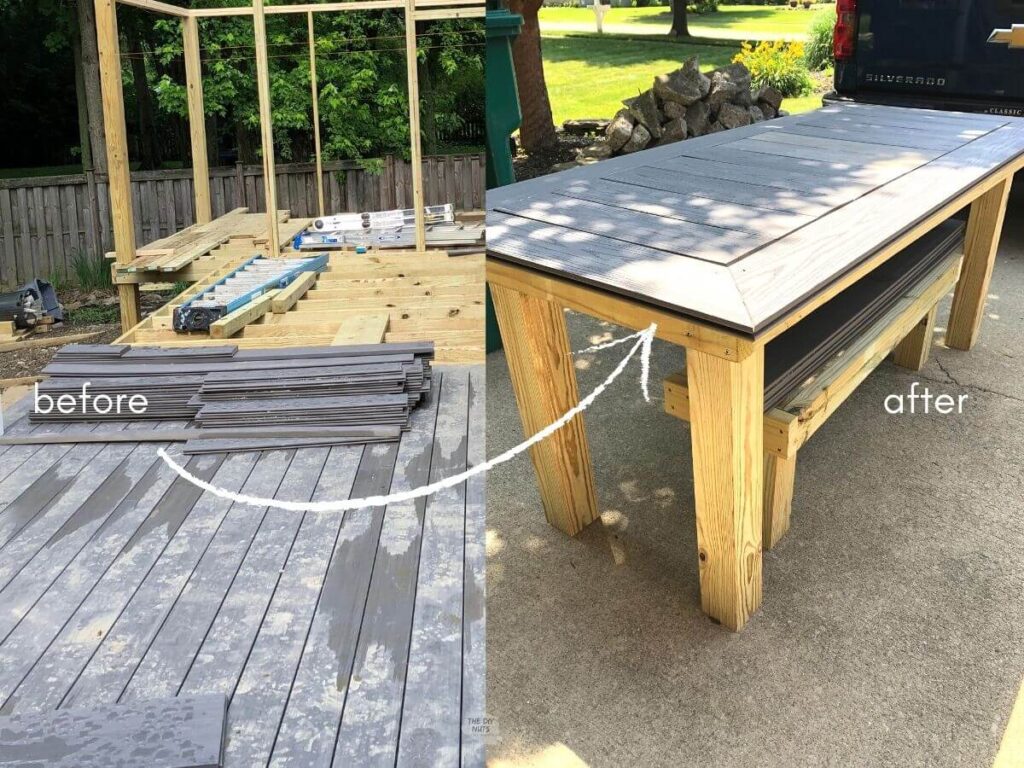
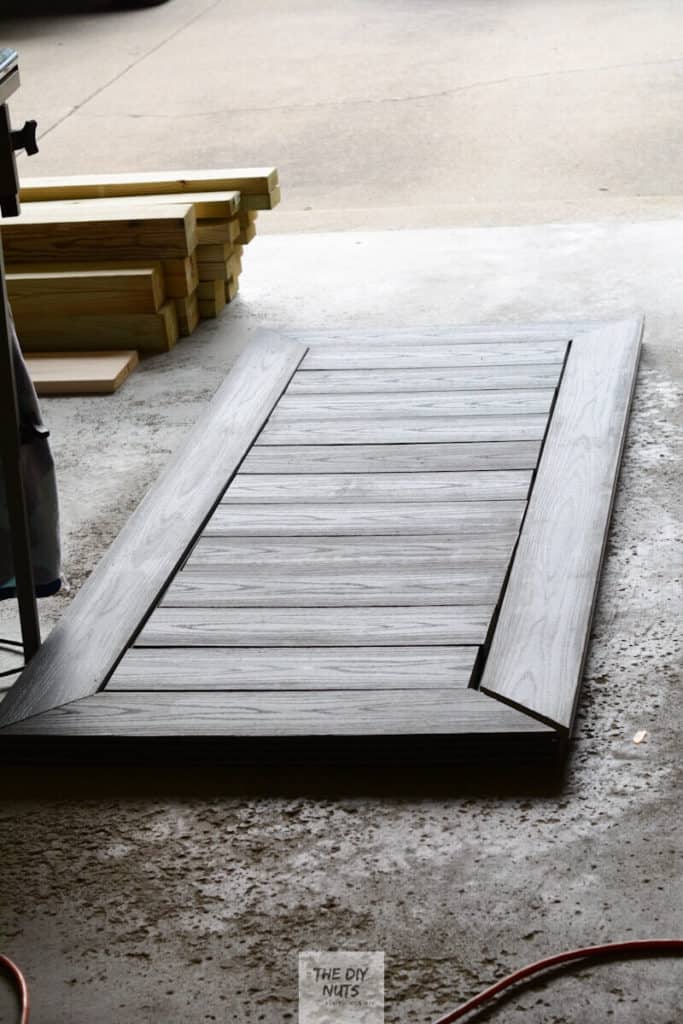
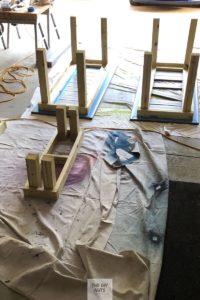
The image above shows the in-progress composite deck being built. Since we bought it by the board, we had many leftover pieces of composite decking.
Other Things To Build From Deck Boards
- Composite decking benches
- Flower boxes made out of Trex
- Outdoor bar
- Outdoor side or coffee table
- Adirondack chair
- Raised garden bed (you can see our cedar raised garden boxes here)
- Outdoor playset or platform for a playhouse
To buy or not to buy an outdoor table?
Poly lumber outdoor tables can be quite pricey. We loved that we could reuse a material we already had for an outdoor table. Not only was it saving leftovers from the dumpster, but it was a more budget-friendly solution.
Decking Table Design Considerations
- A LOT OF SEATING – We needed it to seat more than 10 people.
- WEIGHT– We decided to make two smaller and skinnier composite decking outdoor tables instead of one large one.
- FLEXBILITY – Two outdoor tables allowed for flexibility in seating options and were not too heavy to move around.
- NORMAL HEIGHT—If you already have chairs, make sure that you build the height of the table to accommodate them (like ours) or any standard outdoor chair or stool.
- BENCHES – You can also make composite decking benches that you can see at the end of the post.
If you are looking for another DIY table, we also recently made our own out of plywood. This DIY folding table will be used in our basement for my husband’s poker and game nights. If we need to seat more people outside, we plan on using these as well!
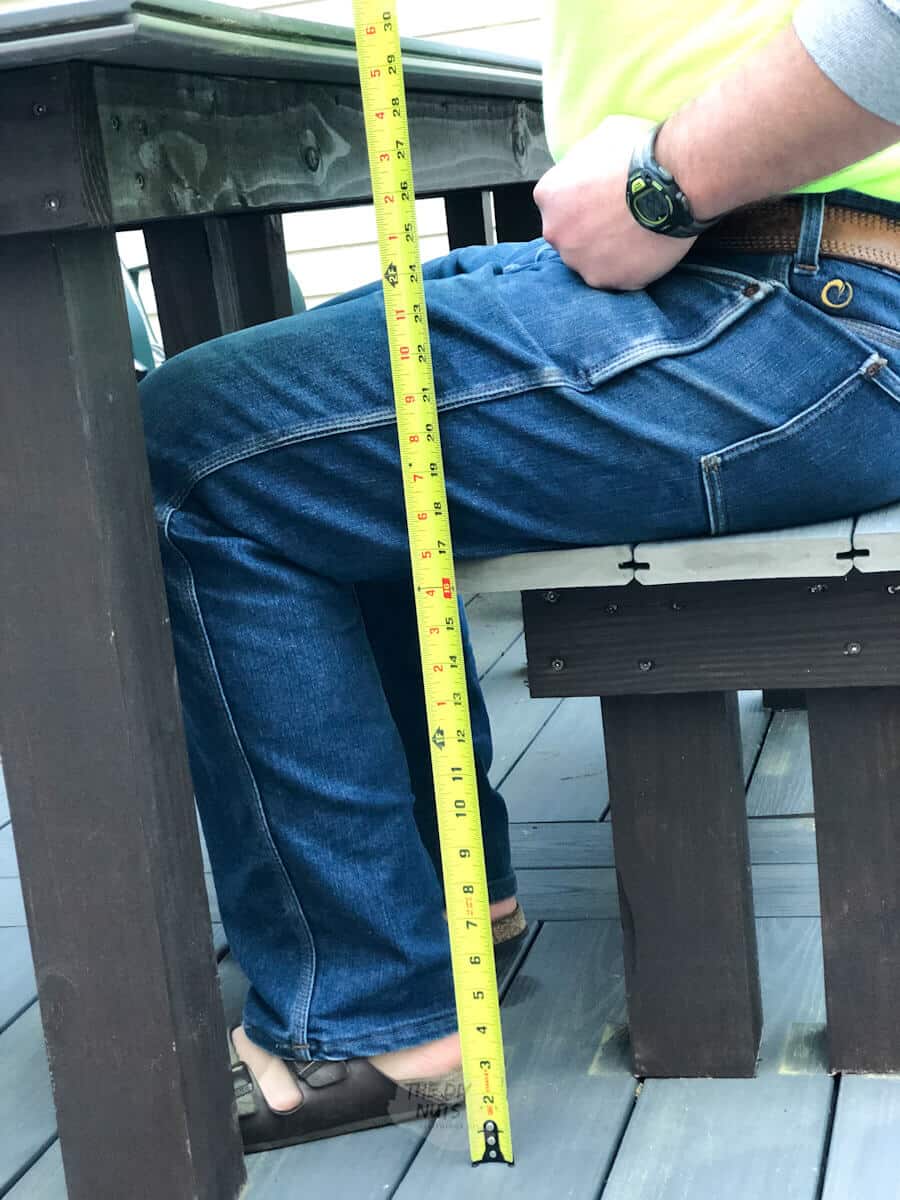
Here you can see the end height of our table and my husband sitting at our DIY bench. This may help you see the leg clearance and if you need to adjust the original height of the table due to your seating choice.
What is the normal average height of a table?
An average table is normally 28-30″, with chairs ranging in height in the 18″ range. Our bench is actually 17″ tall, and our table is 30 1/2″, which fits my husband well. However, I would have liked the table to be maybe a half inch shorter because I am shorter.
Recommended Supplies
- Composite Decking: We love the color of the boards
- Pressure-Treated 2″ x 4″ x 16′ (quantity needed 3)
- Pressure-Treated Posts 4″ x 4″ x 16′ (quantity needed 2)
- Construction Adhesive
- 3″ Screws: Use this type of screw for outdoor projects and pressure-treated wood.
- Miter Saw
- Painter’s Tape
- Exterior Stain
Outdoor Table Tutorial
Step 1: Design Your Table
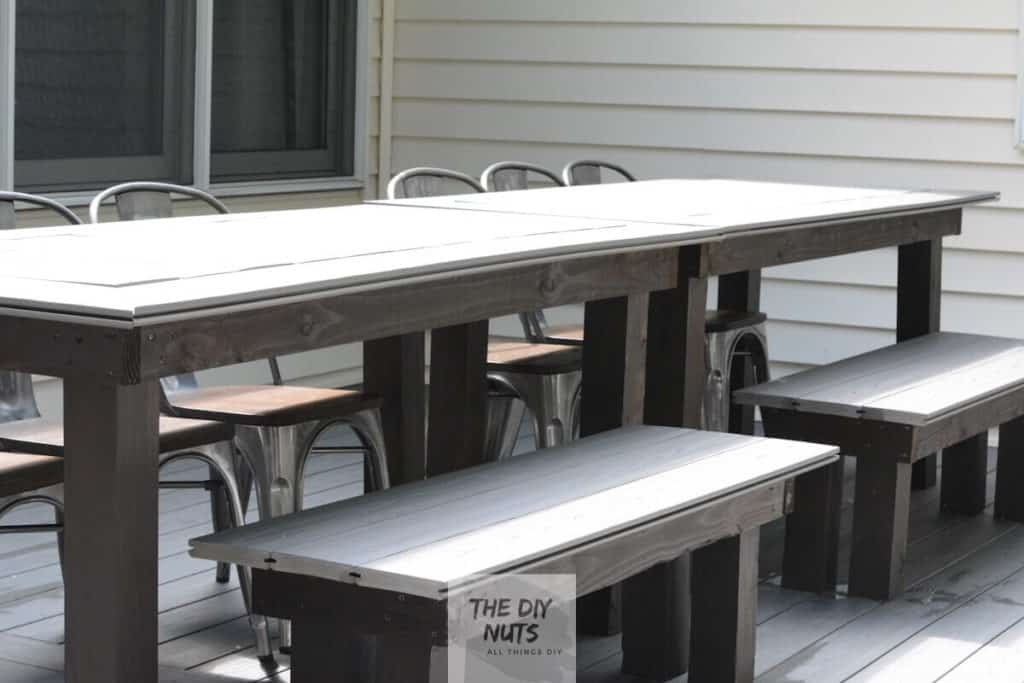
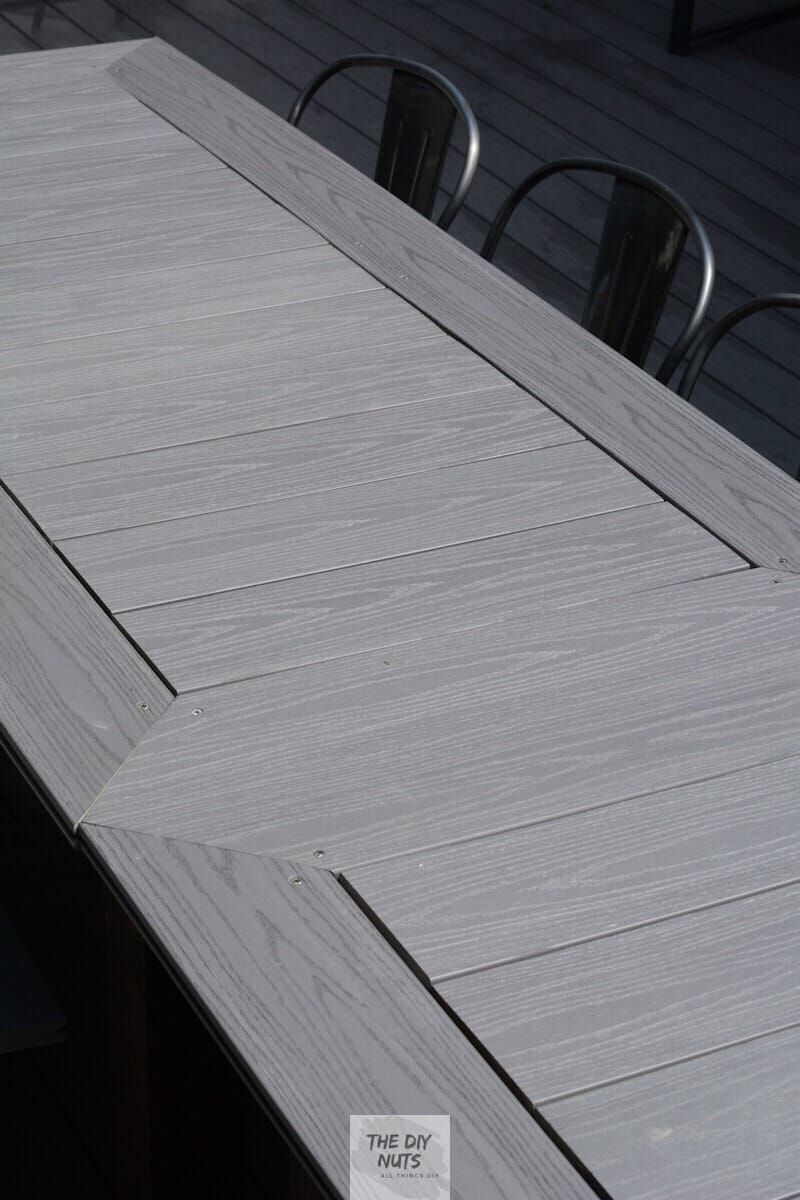
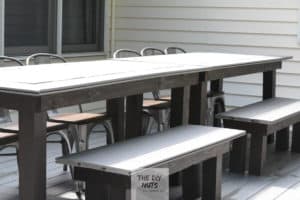
Figure out the dimensions you want to have for your outdoor dining table. Each outdoor table is 70 1/2 ” long x 32 1/4″ wide x 29 1/2″ tall.
Here is an article about how to help determine the right size table for your indoor or outdoor space.
We made two of these tables so that we could put them together and really fit our extended family!
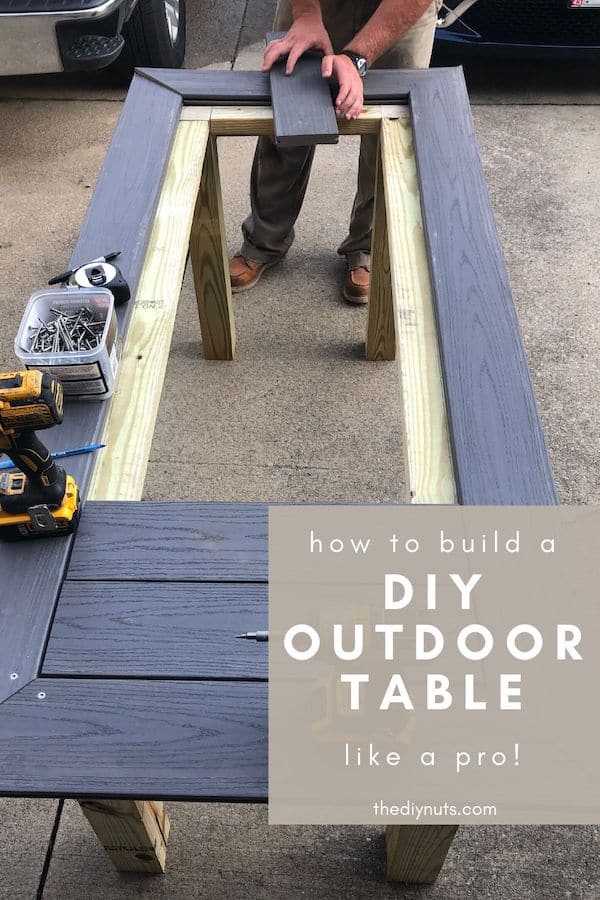
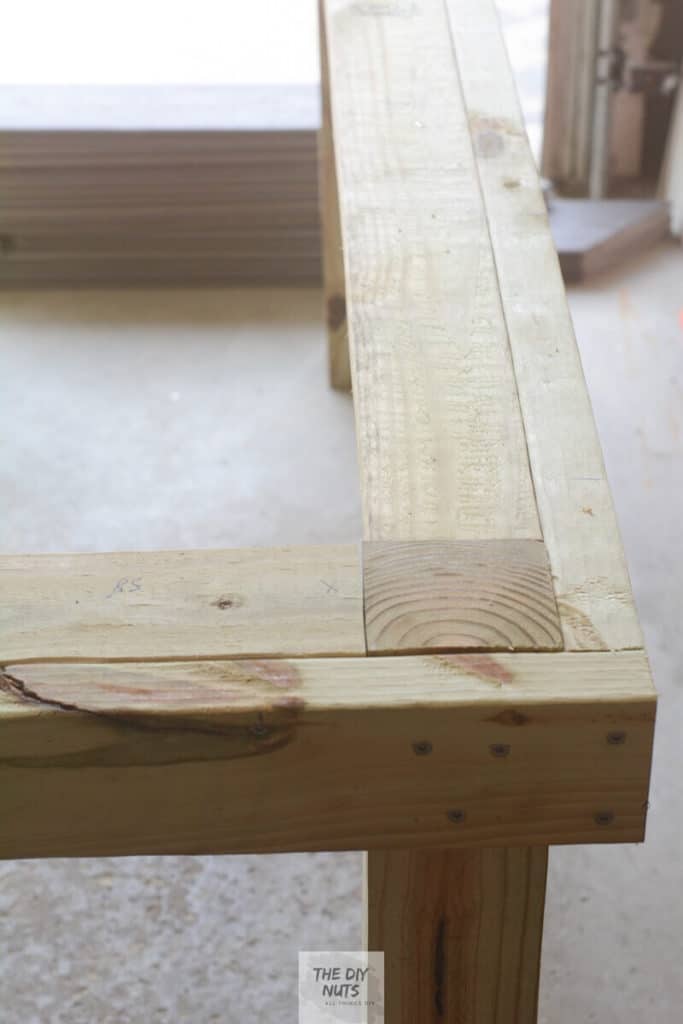
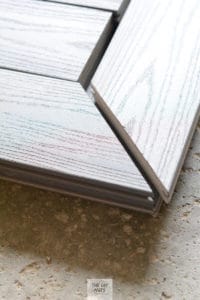
Step 2: Miter Cut Outside Composite Decking Boards
Miter outside composite decking edges of the outdoor table. We decided to create a picture frame on the outside and fill it in with the other pieces.

You will have to do some math to decide the length of your table and how many full pieces of composite decking you will fit in the inside frame.
Step 3: Cut composite decking to fill the inside.
We cut our small pieces to 21 1/4″. It took 11 pieces to fill our “picture frame”. We put our inside table pieces going horizontal to use the smaller leftover pieces of composite decking.
Learn From Design Our Mistake: I wish we had changed this design and made the inside slates vertical. It was very difficult to have all the composite decking lay flat, and we have some spots that stick up a little.
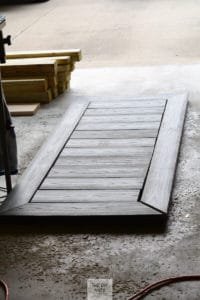
Step 4: Dry Fit Pieces Of Tabletop Together
Layout all the pieces of your outdoor tabletop to see how they fit together. We made each table 71 1/2″ long and 32″ wide. We wanted a longer and skinnier table for our space.
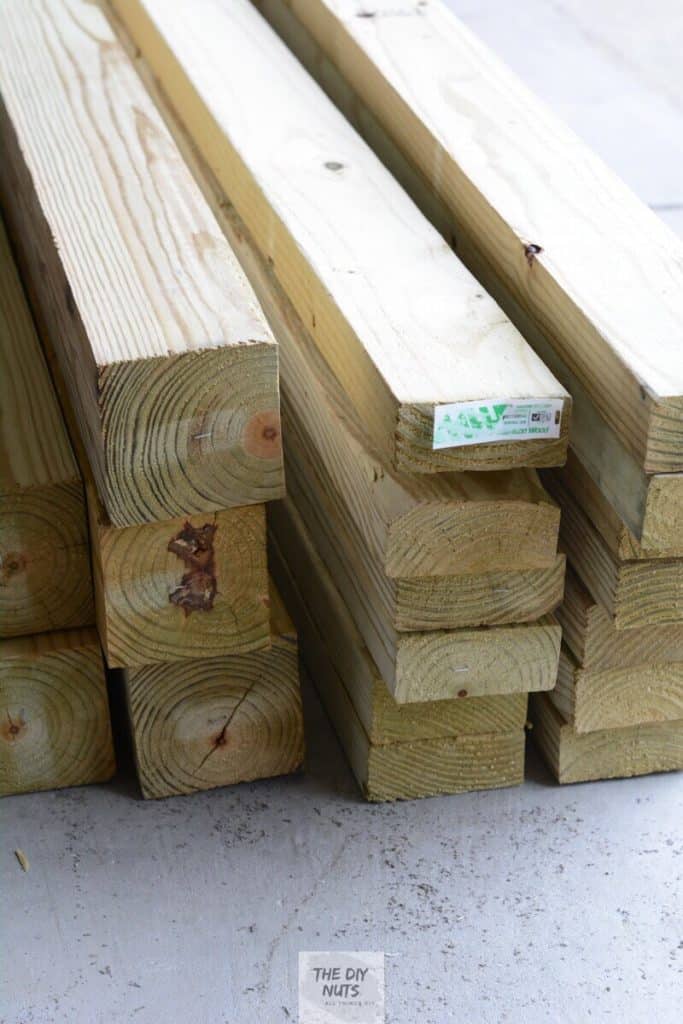
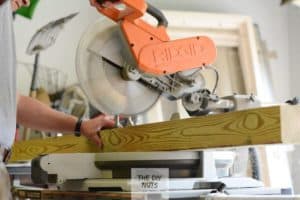
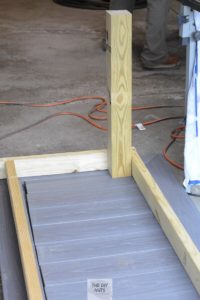
Step 5: Start To Build Base Out Of Pressure Treated Wood
Gather pressure-treated posts. We used sturdy posts because my husband liked the look of a thicker base. I am pretty sure this table could have been built with cheaper pressure-treated 2 x 4s.
Step 6: Cut Posts To Height
Use the a saw to cut the posts. We cut our posts to 29 1/2″ tall.

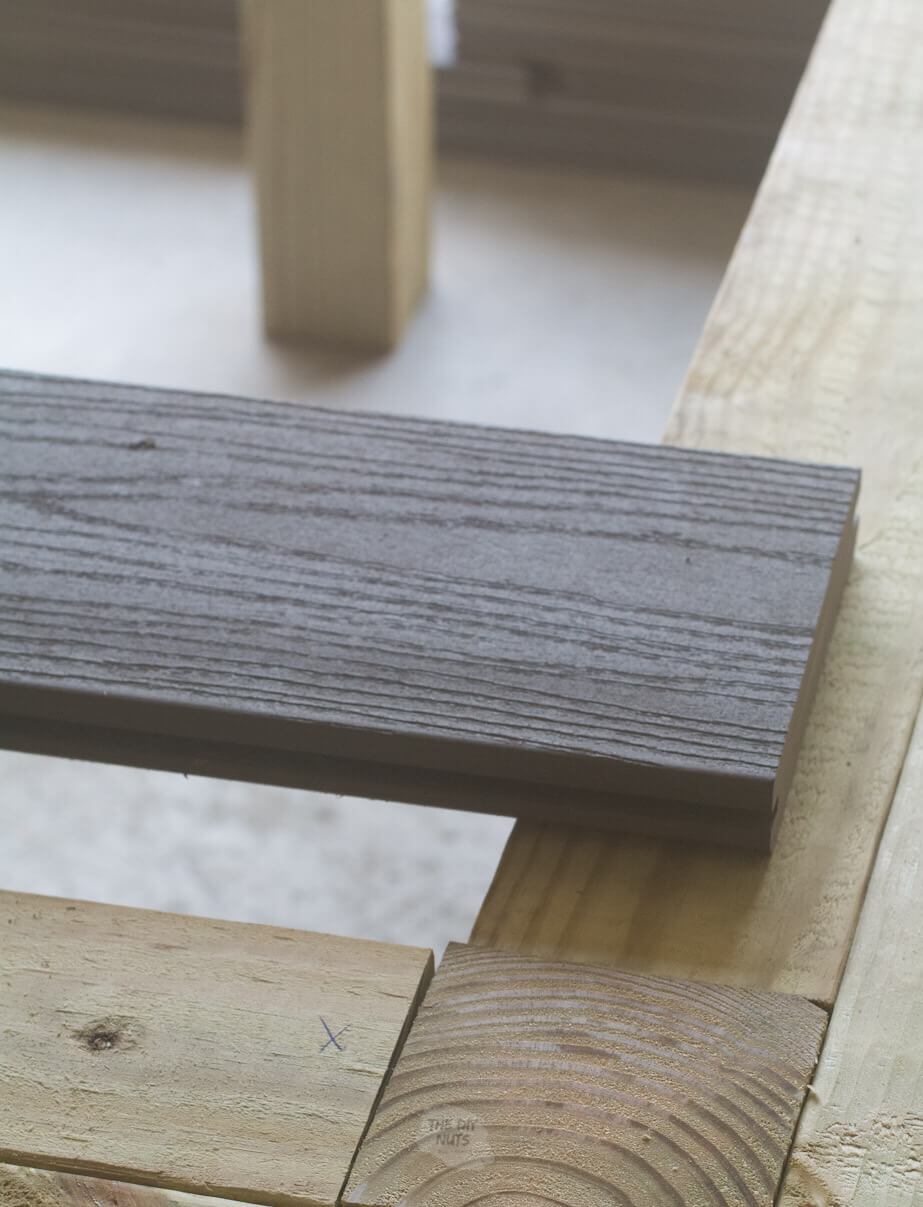
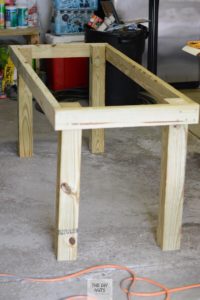
Step 7: Build Frame For Composite To Rest On
Build the frame that supports your DIY outdoor tabletop. We used pressure-treated 2 x 4s to create a rectangular base at the size of 27″ x 66 3/4″.

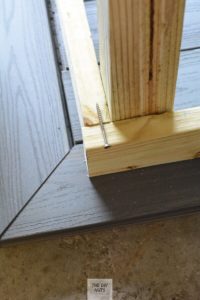
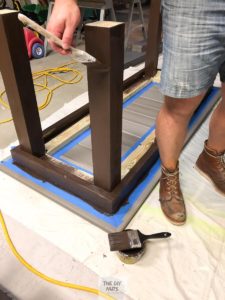
Step 8: Attach Frame To Table Legs
Drill pilot holes and 3″ screws to attach the frame together and then attach posts. Make sure you do not use just any steel 3″ screws because the metal will corrode over time.
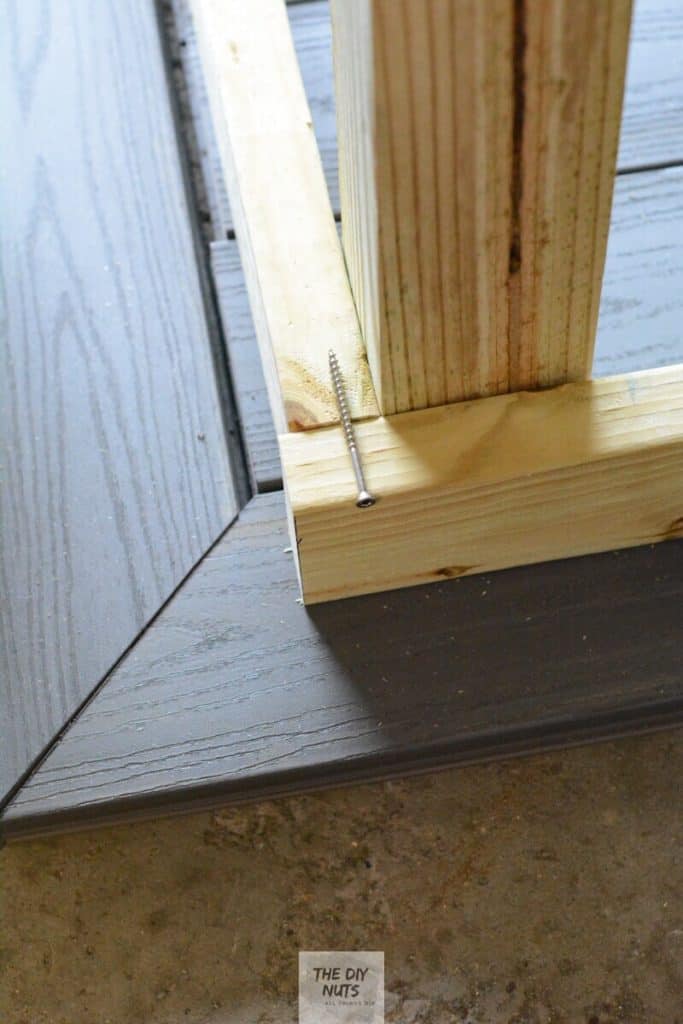
Tip: Use clamps to secure the post to the table frame. (See picture below)

Step 9: Flip Table Frame Over
This is a simple step: Flip the frame over (don’t mind our trash can overflowing).

Step 10: Add Extra Wood Supports
Add 2x4s inside the table frame so that the composite tabletop can be attached there. Our 2x4s were 7″ less than the frame. Ours were cut to 20 1/2″ x 59 3/4″.
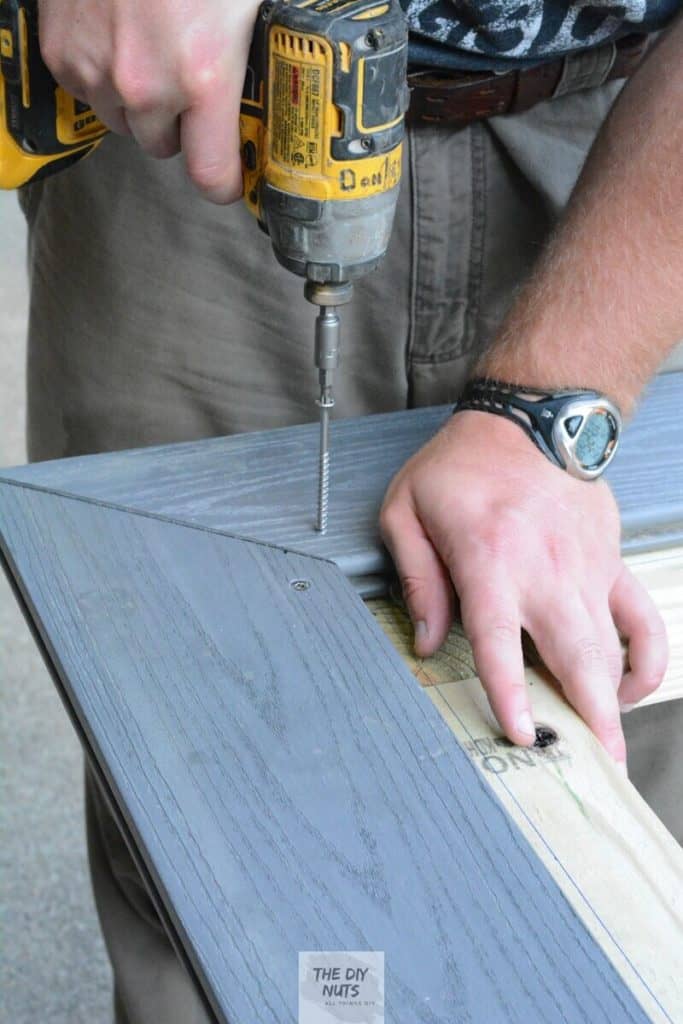
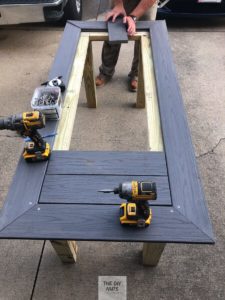
Step 11: Attach Composite Deck Boards To Frame
Use the drill and screws to attach the composite decking picture frame to the pressure-treated wood frame. You could also attach from the bottom if you do not want to see the screws.
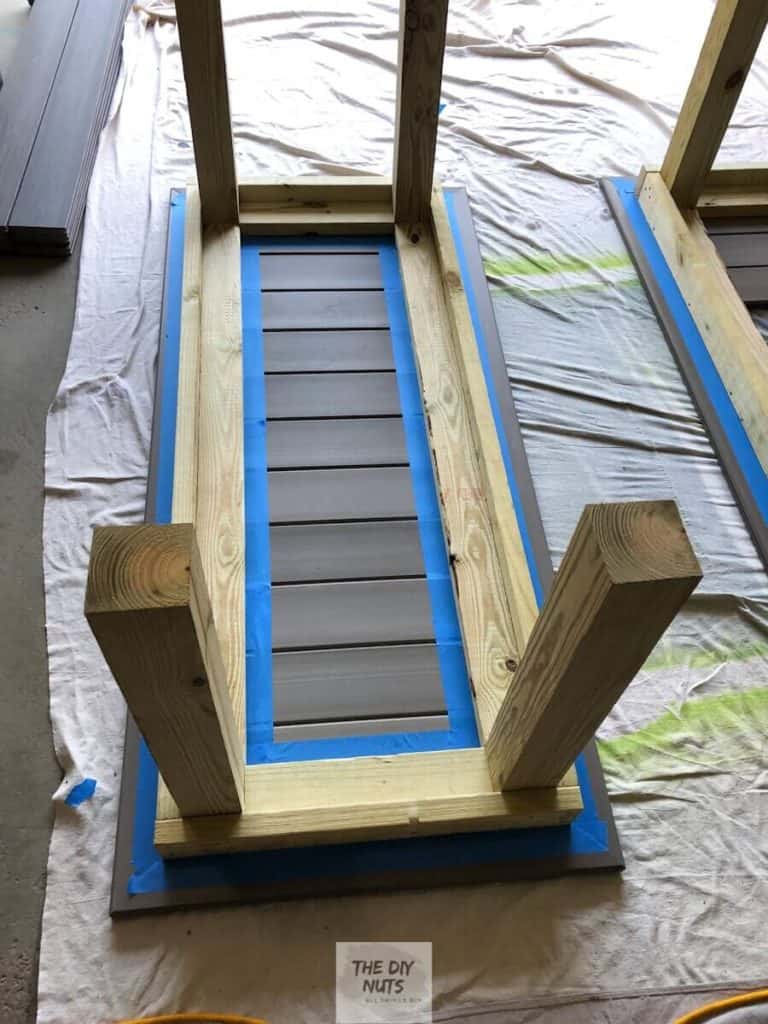
Step 12: Attach Horizontal Boards
Use construction adhesive to attach the inside pieces of composite decking.

Step 13: Prep For Exterior Stain
Flip the outdoor patio table over and use painter’s tape to frame out the composite decking tabletop and pressure-treated wood.
Step 14: Stain Wood Legs & Frame
Use a paintbrush and use an exterior stain in the color of your choice.
We just ended up going with an outdoor stain (one that you would even use on decking).

Step 15: Let Table Dry
Let the DIY outdoor table dry and then flip it over and set it up in your outdoor space. We also made DIY outdoor benches using the same steps listed above but on a smaller scale.
Related Reading>>>Check out 50 More Weekend Home DIY Projects
Composite Decking Outdoor Benches
You can also make composite deck benches following a similar design plan. On top, use 3 pieces of composite decking. Create a base out of matching pressure-treated lumber.
Our benches are 48″ long and 16 1/2″ tall.
How-To FAQs
Yes, for some reason my husband said he liked the industrial look of seeing the screws on the tabletop.
Composite decking becomes flexible. We have had a few boards that we have had to reglue with construction adhesive. However, since they rest on the wood frame this isn’t that big of a problem.
They are pretty heavy due to the posts being used. You probably could use 2x4s for the legs instead of the posts. For the size of our table, it takes two people to lift and move around.
I did a lot of research to see if I could use interior stain because I LOVE the look of this color (we have used it on numerous projects in our house).
However, you would need to apply another coat of special polyurethane. We decided to paint the exterior stain on the outdoor table post only once and wanted as much protection as possible with the least amount of maintenance.


More Outdoor DIYs
- FOR THE KIDS: How To Build An Outdoor Playset
- BUDGET DECOR IDEAS: 31+ Fun Painted Flower Pot Designs
- OUR FAV OUTDOOR SPACE: Tips For Decorating Your Screened-in Porch
Our two DIY outdoor dining tables were great to use the other night! We were able to sit with our whole immediate family and friends. The kids loved the benches and eating outdoors.
Follow us on Pinterest, YouTube or Facebook for more DIY inspiration!

We absolutely love our DIY outdoor dining space and hope we inspired you in your next DIY project!
If you like this tutorial, please give it 5 stars below 🤩🤩🤩🤩🤩. Your support helps us continue to provide unique and budget-friendly DIYs.
DIY Outdoor Composite Decking Table

Equipment
- Miter saw
- Cordless Drill
Supplies
- 3 2" x 4" x 16' Pressure Treated Boards
- 2 4" x 4" x 16' Pressure Treated Posts
- 3" Deck Screws
- Painter's Tape
- Exterior Stain
- Paint Brush
- Leftover Composite Decking
- Construction Adhesive
Instructions
- Design table. Each outdoor table is 70 1/2 ” long x 32 1/4″ wide x 29 1/2″ tall.
- Miter outside composite decking edges of the outdoor table to create a picture frame look.

- Cut your small pieces of composite decking to 21 1/4″. It took 11 pieces to fill our “picture frame”. We put our inside table pieces going horizontal to use the smaller leftover pieces of composite decking.
- Dry fit table together.
- Start to build base. Cut pressure treated posts to 29 1/2".

- Build frame out of 2 x 4s.
- Attach frame to the legs using 3" deck screws.
- Flip table frame over.
- Add extra 2 x 4 supports inside frame.
- Attach the ouside composite decking boards to the frame. You can screw in the top of from the bottom.
- Attach horizontal decking boards with construction adhesive.

- Flip over and prep for exterior stain.
- Use a brush to apply exterior stain to pressure-treated wood.
- Let dry and enjoy your new outdoor table.


This look so durable. What a great idea to make with decking.
Hi Trina! Theses outdoor tables are very durable. We love having an outdoor table that will last!
Wow. That is absolutely beautiful. What an excellent idea to use the scraps of decking.
Hi Ashley! Thanks for the kind words. We loved using the extra composite decking to create our own DIY outdoor table!
That came out just as nice as any store bought table and for a fraction of the cost. And it will match your deck and age with it. Really nice work.
Hi Laura! We loved that we were able to only buy pressure treated wood and could use material we already had for our DIY outdoor dining table! Thanks for the nice comment.
This is amazing, you make it look so easy! I really wish I was skilled like you. It’s a fab idea for leftover materials.
Thanks! This DIY outdoor table was really a good project for my husband! He loves building things with leftover material!
This is lovely! My husband is in construction and often works with composite decking. I showed this to him.
Thanks Chris! I hope he liked the idea of using the extra and expensive composite decking to create your own DIY outdoor table!
In 2012 I built a 96 inch long 40 inch wide patio table with Trex decking. The base is a trestle style made of cedar. I’ve had a outside year around for 8 years and it still looks as good as the day I built it. The combination of cedar and composite make it virtually maintenance free. I highly recommend composite but would recommend cedar (even though it’s more expensive) over pressure treated pine.
Hi Matt. Thank you for the advice. We were trying to keep this project a little more budget-friendly as we weren’t sure how long we would actually use the tables. We are currently building raised planter beds out of cedar and know that they will hopefully last a very long time! Thanks for visiting our site.
Just completed construction of ab out 200 square feet of outdoor raised planting beds, (4 boards x 5 1/2 inches vertical)
Highly recommend that you use TREX or another composition for the sidewalls. They will NEVER rot away. I used 4 x 4 ground contact pressure treat for the corners, and am starting to think that I should have invested in stainless steel angles, which also will NEVER rot away,
It does take a stiffener about every 4 lineal feet because the compost is so bendy it will look like a pumpkin if not reinforced laterally.
Greta tutorial! But, in Step 10, how do you attach those other 2x4s to the inside of the frame?
Hi Youg! Thanks for the kind words. We attached those inside 2 x 4s from the outside 2 x4s using 3″ screws. We hope that helps you in your DIY outdoor dining table design!
Thanks for asking that. I was wondering that myself. I have a lot of leftover composite decking materials and I am a total novice at this DIY stuff.
I think to add a bit for finish to the project, at least on the picture frame, i would have rip sawed the tongues & groves off the edges of the boards. As well as the field boards you used for the infill of the top, square edges would have made it look nicer in my opinion. But that option is limited, without a table saw or a rip fence attachment for a circular saw.
Hi. Thank you for the advice. Yes, we simply were trying to make do with the leftover supplies that we had without having to really purchase anything new. We appreciate you taking the time to give us feedback. Good luck with your DIY projects.
Hi Erin,
My wife has been wanting to replace our older metal-and-glass hexagonal table for 6 with one that would seat 8-10, but everything she found for sale was $800-$1200. She sent me the link to this article and I priced it out around $200 at Lowes. I bought the materials Saturday morning, spent a little over an hour with my buddy’s compound saw, and started assembling Saturday evening. After a little more than $220 and 5-6 hours of build time, we’re both really pleased with our 77″ long x 35″ wide version of your table! I’m not a handy man at all, but following your tutorial, my wife said I made it look really easy.
I did have to scrap the idea of using glue because the composite decking I found locally has a scalloped bottom instead of a solid bottom, so there just isn’t enough area to glue it down. It took me 2 62ct boxes of stainless steel decking screws to put it all together.
I also took Matt’s advice above and went with rough cedar posts and boards instead of pressure treated. The cedar color looks good with the dark grey composite top.
Hey Ted! I am so glad that you were able to use our outdoor table tutorial to build your own! I love that people are posting and sharing their ideas and thoughts. Great job and I am glad that it worked out well for you.
@Ted D., how has the table held up, and any way to send a picture thanks
Hi Richard. The table has held up and we still use it. I would take my suggestion though of putting longer boards in the center and you should screw those together from the bottom with the construction adhesive on the wood frame. We had a few small boards we had to reattach, but it wasn’t a big deal. Even though we know composite decking is a little “bendy” the outside frame of the tabletop has stayed as it was when we built it. I hope that helps!
Erin I love this DIY!! I do woodworking and crafts and I’m always looking for great ideas. Would it be ok to use this plan to make these and sell them?? Don’t want to steal your plan if you wouldn’t be ok with that. I’m in Ohio as well! Thanks!
Hi Loren. Are you saying make these outdoor tables and sell them? I don’t see why not. I just wouldn’t want you to copy the actual plans and sell those. Thanks.
I love this table. It there a reason you did not screw the boards in from the bottom? I have never worked with composite decking and not sure this is feasible but am curious to know if it would work if I built a similar table.
Hi Barb. My husband chose to go for an industrial look with screwing the top that way. I am sure you could totally screw the composite decking from the bottom for a cleaner look. Good luck with building your outdoor dining table.
I just got done building my deck and cross this so I built me a table using this method. I built it a little longer (76”) and wider (36”). I’m waiting for the paint to dry on the frame and then going to attach the deck boards. I did it this way because I wanted the boards underneath to be white instead of the wood color. It looks great so far and it is a little heavy.
Hi Jamie. Great idea to create the look of the outdoor table that you want. Yes, these are heavy, but totally sturdy!
Hi there, I have a question about step 10. How did you attach the 2”x4”s to the inside of the frame?
Hi Mike. We just screwed the inside frame 2″ x 4″s from the outside 2″ x 4″. Once the tabletop is on and you have stained the pressure-treated wood, you don’t even notice the screws.
Hi,
What would you recommend as a replacement for the composite decking?
It does not seem like any of the hardware stores in my area carry composite decking.
Hi Chad. You could always use cedar if you want a nicer or more natural tabletop. However, this would be a more expensive option. Or you could make a pressure-treated wood top table as that is what normal picnic tables are made of.
Thank you for the fast reply.
Can you share with my the dimensions of the composite decking? It seems wider that 2×4″.
My guess is that 2×6″ will the closest to the dimensions of the deck boards.
Hi Chad. Yes, the actual width of the composite decking boards we used is 5 1/2″ which is the width of a 2″ x 6″. Our outdoor table is narrower by design to fit in the space on our deck that we wanted. Good luck building!
I love this, except for those exposed screws on the top of the table. I’ll be making something similar, but will be doing a bit of research to find a method that does not show the screws on top. Way to use up leftovers though!
Hi Billie. Yes for some reason my husband liked the look of the exposed screws. Good luck with your outdoor table!
So if I understand this correctly, the leg post was 29 1/2 inches tall. The composite decking is 1 inch which puts the total height of the table at 30 1/2 inches? That also gives the clearance for chairs under the table for sitting at around 26 inches After you take away the 3 1/2 inches for the 2 x 4 frame and the 1 inch thickness for the composite deck? Did you find any difficulty finding chairs that would allow people to sit at a 30 1/2 inch table? I’m a little nervous at going near 30 inches as most outdoor patio chairs would be too low. But I’m also looking to make the clearance from the floor to the bottom of the actual table top at around 26 inches.
Any advice would be appreciated
Hi Brian. So my first piece of advice would be to find the outdoor chairs you want to add to your set before building. This way you can ensure you are comfortable using your table with the chairs you like. You could easily knock a 1/2 inch off the posts to customize this and make it a little lower, especially if you have 18″ height chairs. The average height of a table is 28-30″ and the average chairs area are normally around 18″ but it can vary.
I will add a picture to the end of the post to show you my husband sitting at the composite bench we made that is 17″ ish high. He is very comfortable and has leg room. You will see you could make a bench or chair have an 18-19″ height and it could still work well. So I guess it just depends on the chairs you want to use, or you could always make a composite decking bench to go with your outdoor patio table. Good luck with your outdoor table project and we would love to see your finished patio table!
@Erin, hello and thank you for the reply! It looks like we are going for a 30 inch high table. I was a little nervous about the 4 1/2 inch barrier from the top of the table but your response about sitting on a 17 inch bench put that at rest. I appreciate the help. My theory is if a standard chair is too low I can always purchase a firm cushion to add height.
Also I looked at the chairs from Amazon you use. They look great for outdoors. 2 questions:
Have you had any rusting from outdoor use? If so I’ll probably need a clear coating spray.
How hot do they get in the summer sun?
Thanks for all the help.
Hey Brian. I am glad you are figuring out your outdoor table. As for the chairs, we actually moved them inside to our regular table as my grandma’s old chairs finally bit the dust. We have older mesh ones out that have worked pretty well now even if they aren’t the prettiest. We love those chairs but mainly have had them indoors since we built that table. I would love to know what chairs you decide to go with and how they hold up.
Hi Erin,
Thinking of doing the same – would you say that table is super heavy or easy for 2 ppl to move around?
Hi David. My husband and I can move the table around, however, it wasn’t easy to get up onto our deck. The weight is mainly due to the chunky legs, so you could always change the frame to make it a little lighter. Good luck with your DIY outdoor table.
@Erin,
Thank you – think I might put the frame together in the shed and then build the rest already on the deck to avoid the hassle of 7 stairs 🙂
I’ve been trying to find pressure treated wood but everywhere I go, the only option is the really ugly brown stuff with incisions along the length. Is there something specific I should be looking for/asking for to find some normal looking boards like you have? Thanks!
For our table, we used #2 grade pressure-treated wood. We always recommend trying your local lumber yard and they will let you pick out your individual boards. Good luck with your outdoor table.
How much composite decking did you use for this project?
Hi Sarah. We used the leftover pieces from when our deck was being built and did not buy new pieces for this table. If you are buying new composite decking for your outdoor table, I would make sure you get the boards meant for the edge of a deck for the edge of your table. Our table has a little groove there because we didn’t buy new. Good luck with your DIY table.
Awesome idea, I used my left over deck board on top of an old picnic table. Now I will build the frame as you did.
Thanks
Hi Joyce. Good luck with your outdoor table!
This is a great tutorial! Thanks for sharing your beautiful project and for such thorough instructions.
Hi Erin. Thanks for the kind words and good luck with your outdoor table.
You can run a middle 2×4 to help even out the decking. The extra 2×4 you added around perimeter and the middle stiffener 2×4 stay much straighter with the 3-1/2 inch upright instead of flat. A 2×4 upright stays straighter whereas a flat layered treated 2×4 can get kinda squirrelly as it dries.
Hi Michael. Great ideas! We appreciate it.
Great idea ! Outdoor tables are to expensive, and they don’t hold up to the weather.
Thank you for sharing your great idea. We found some Deckorators brand composite decking at our local lumber yard. The decking material worked great for the table top and we took you advice to orient the pieces to go longways inside the frame. Deckorators had a 12 inch wide facia product that we used for the benches. My wife found a beautiful umbrella so I cut the hole and added a 2×6 support inside the table frame to keep the umbrella stable when combined with an umbrella stand.
Great ideas!
Just got my deck redone with Trex so this is perfect for the leftover Trex boards! Thanks for the detailed instructions with pictures! Great for visual peeps like me!