How To Easily Paint Stair Railings, Spindles & Banisters

Are you tired of staring at your dull stair railings, spindles, and banisters? It’s time to give them a new look with a fresh coat of paint! Use our detailed tutorial to learn how you can paint your stair railings this weekend.
Painting your stair railing is an inexpensive way to give your entryway or hallway a brand-new feel. Here are the steps we took to easily paint our oak stair railing and banister with a roller and brush.
Key Takeaways
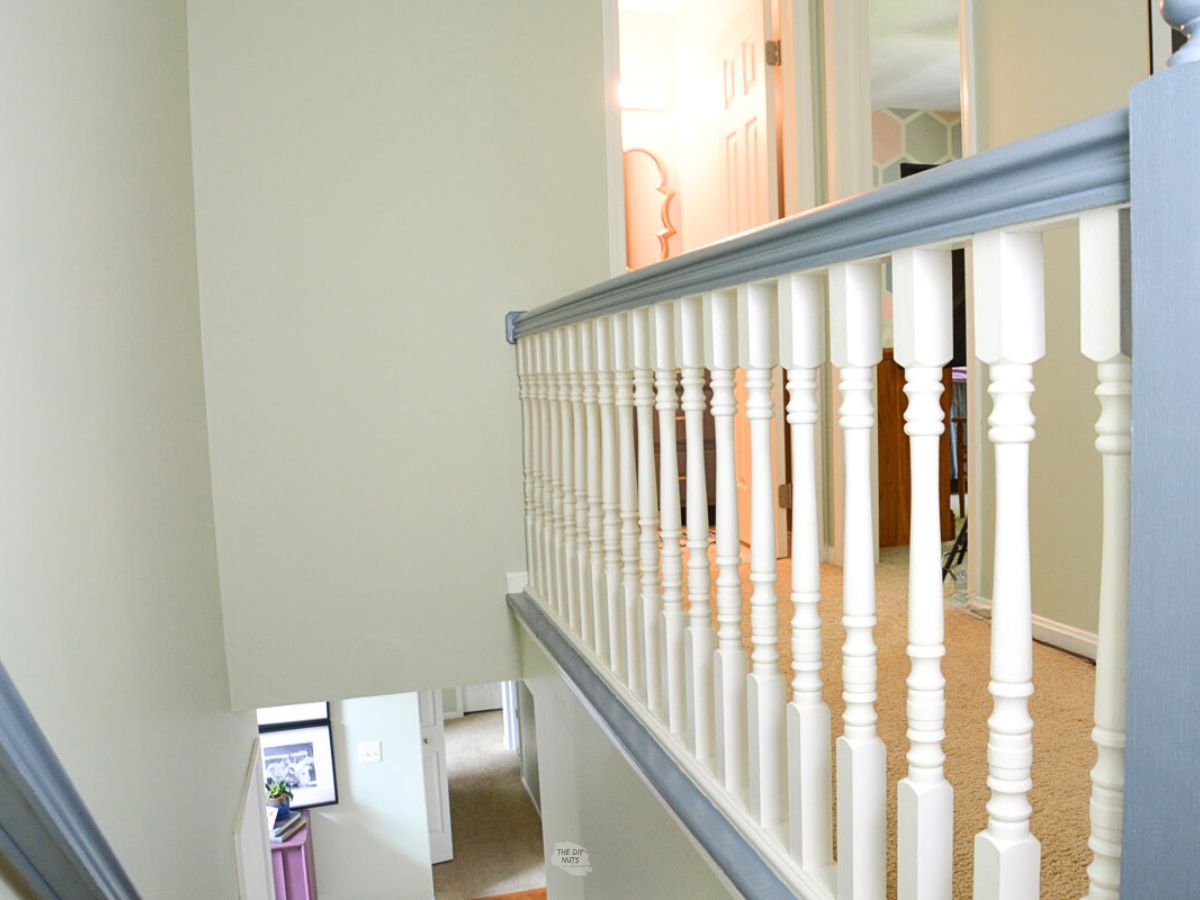
Our Stair Railing and Banister
A theme in our blog and life is that one DIY project always leads to another home improvement project. We were painting the bathroom cabinets and knew we had to update the staircase railing outside the door.
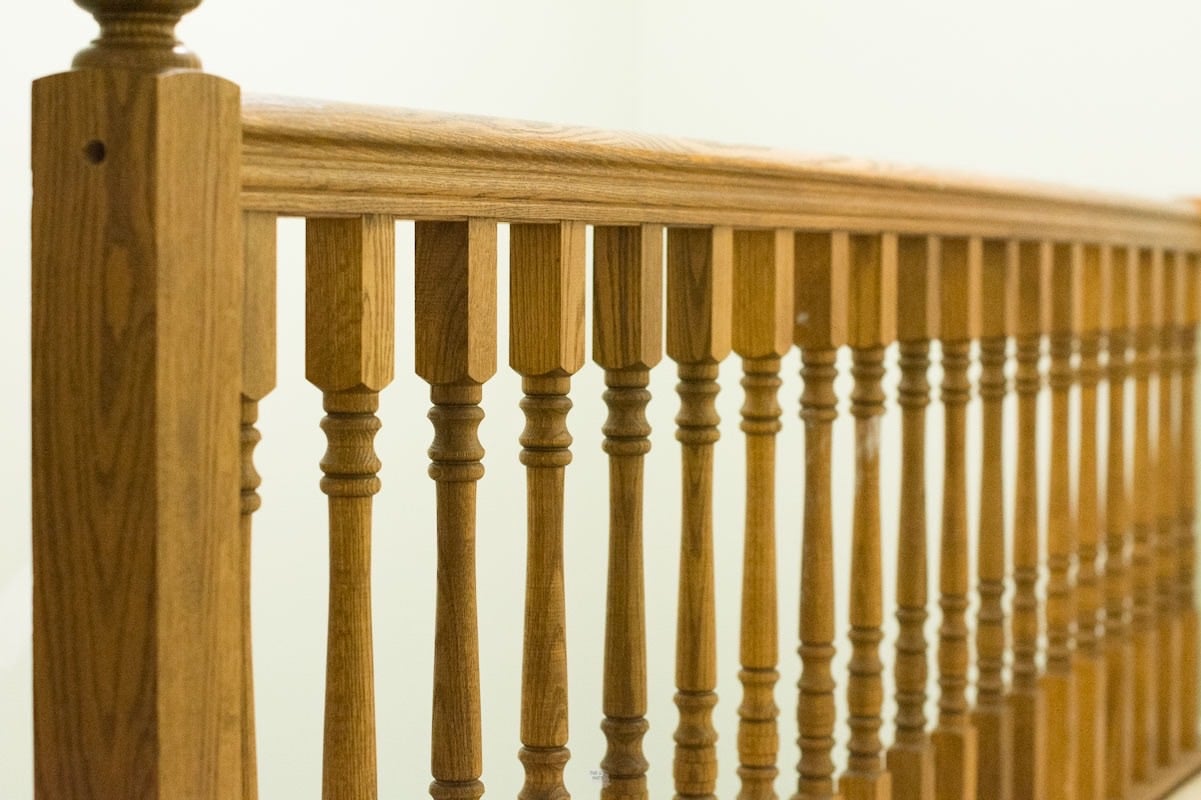
Prepping Before Painting
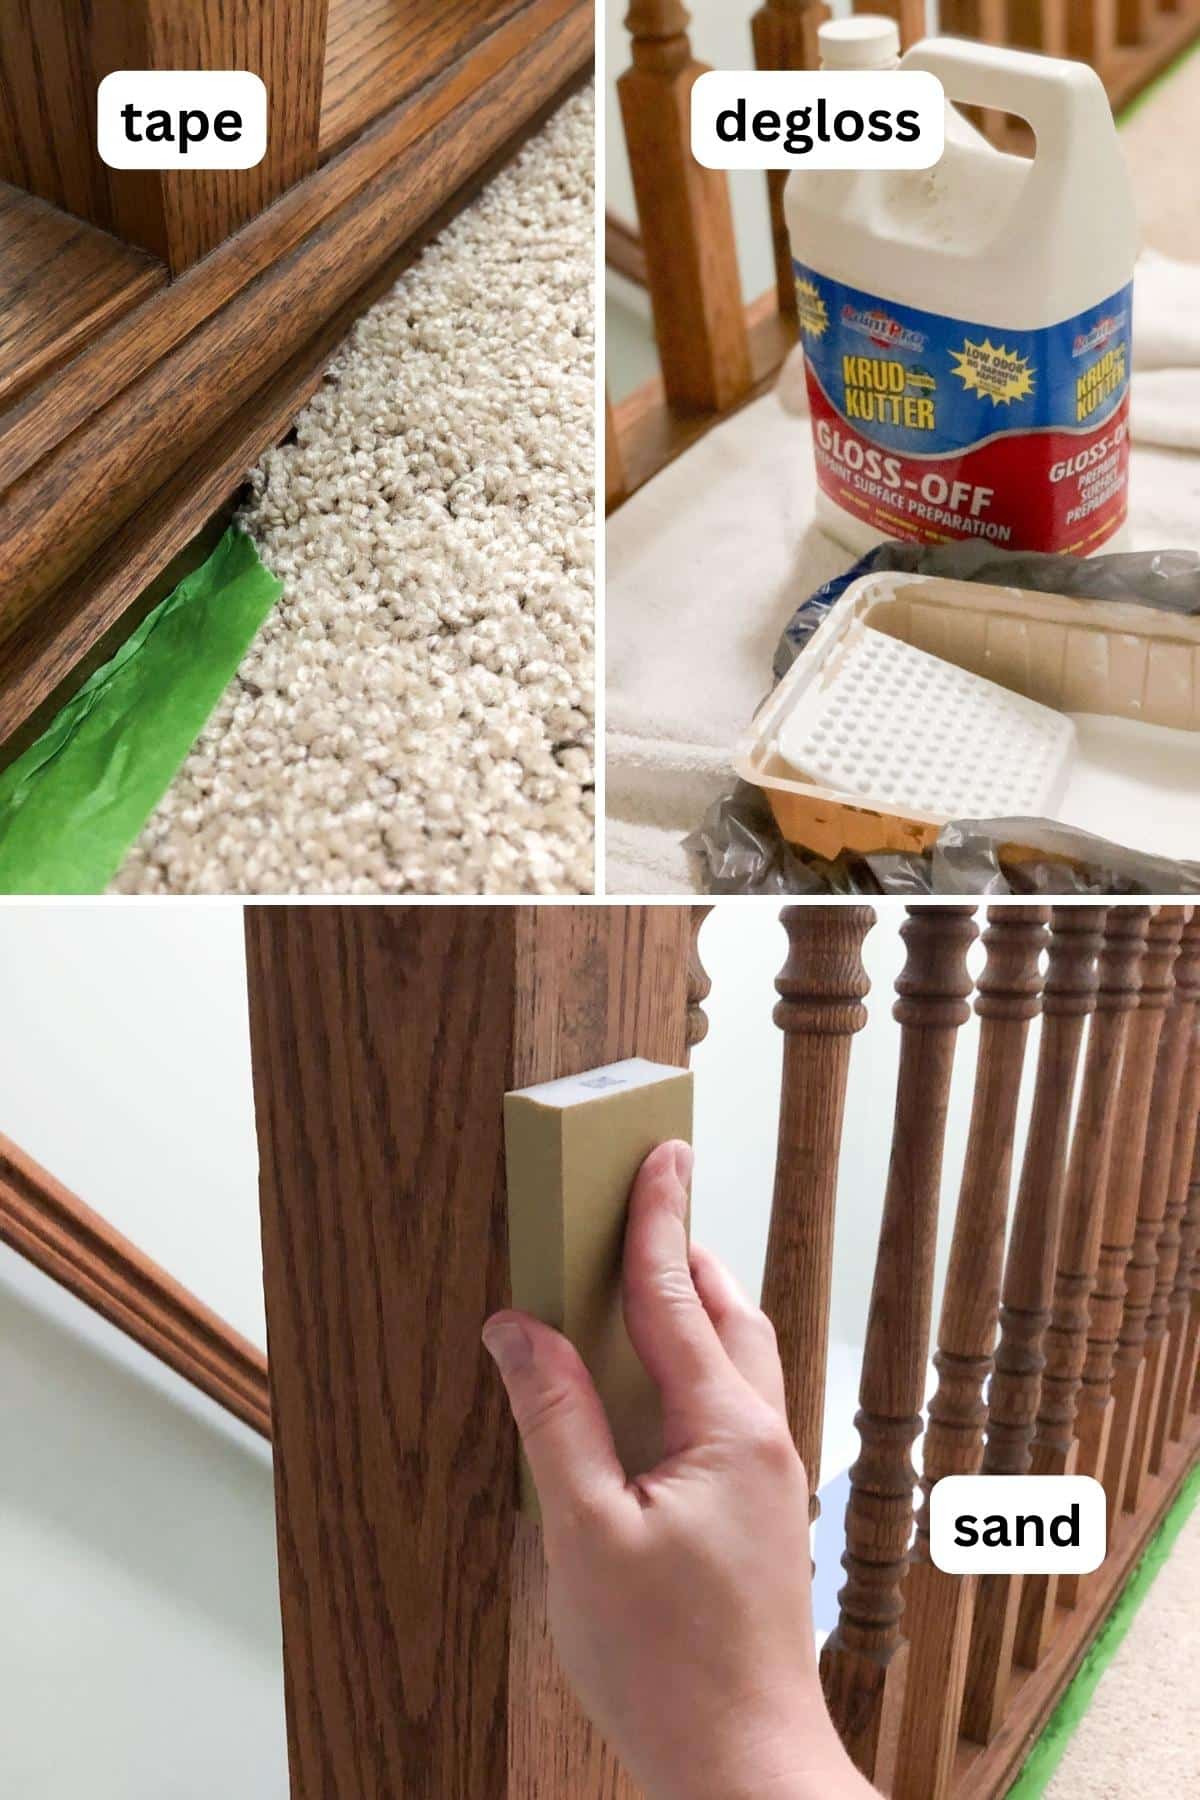
Due to their nature, railings get touched a lot. It is important that you properly prep the railing and banister before painting. The area needs to be cleaned and degreased well. We also like to use 220-grit sandpaper to scuff up the surface to help our primer stick.
Note About Sanding: You could choose to sand down the finish of your oak completely. Most importantly, check that your primer sticks and passes the fingernail test (doesn’t scrape off when dry).
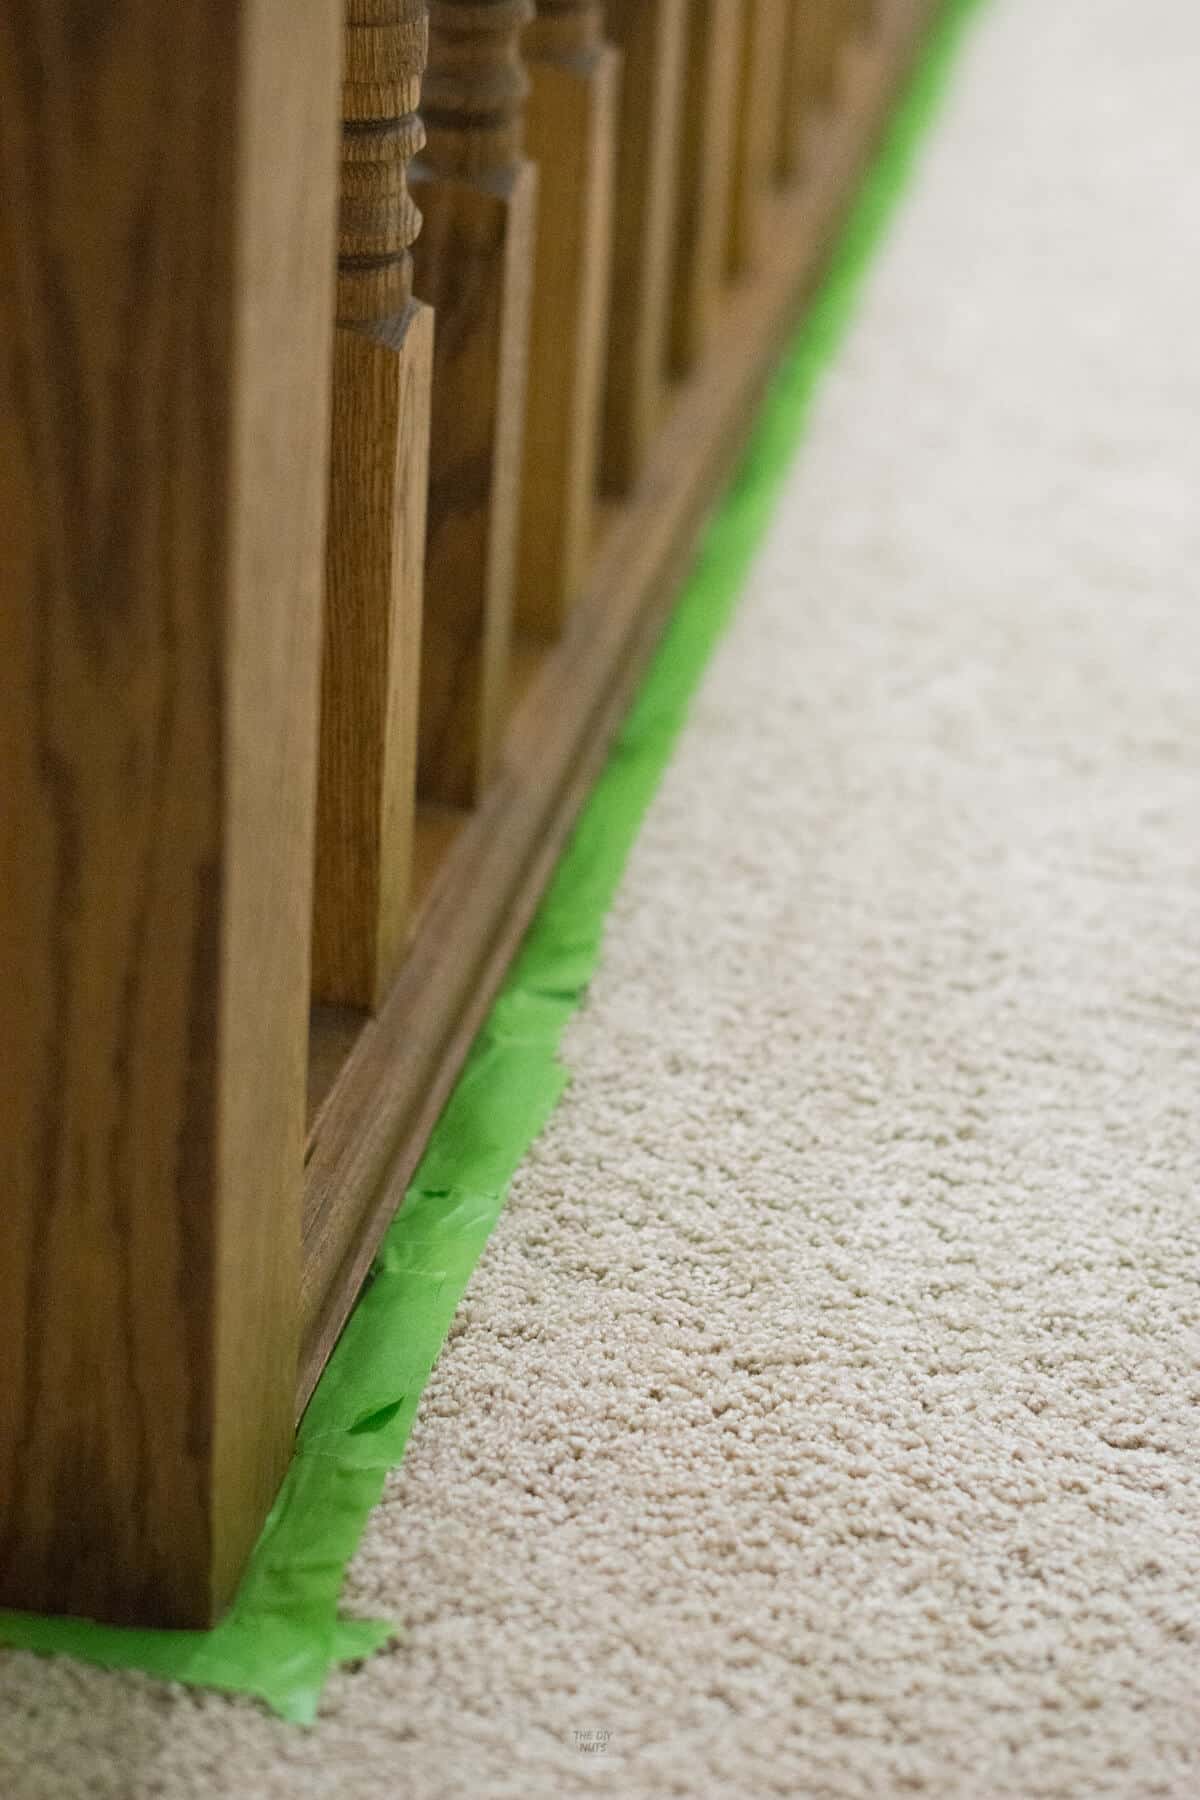
How to paint stair rails on carpet?
Prep the areas by using your fingers or a flat tool to help place the painter’s tape under the trim. When you finish, you remove the tape and fluff your carpet. Just be careful that the paint doesn’t drip on your carpet when you are painting.
Supplies You’ll Need
Over the years, we have developed a failproof way to complete home painting projects. The best part is that you can reuse these materials.
*Disclosure: This post may contain affiliate links that at no additional cost to you, may earn a small commission. Read our full privacy policy.
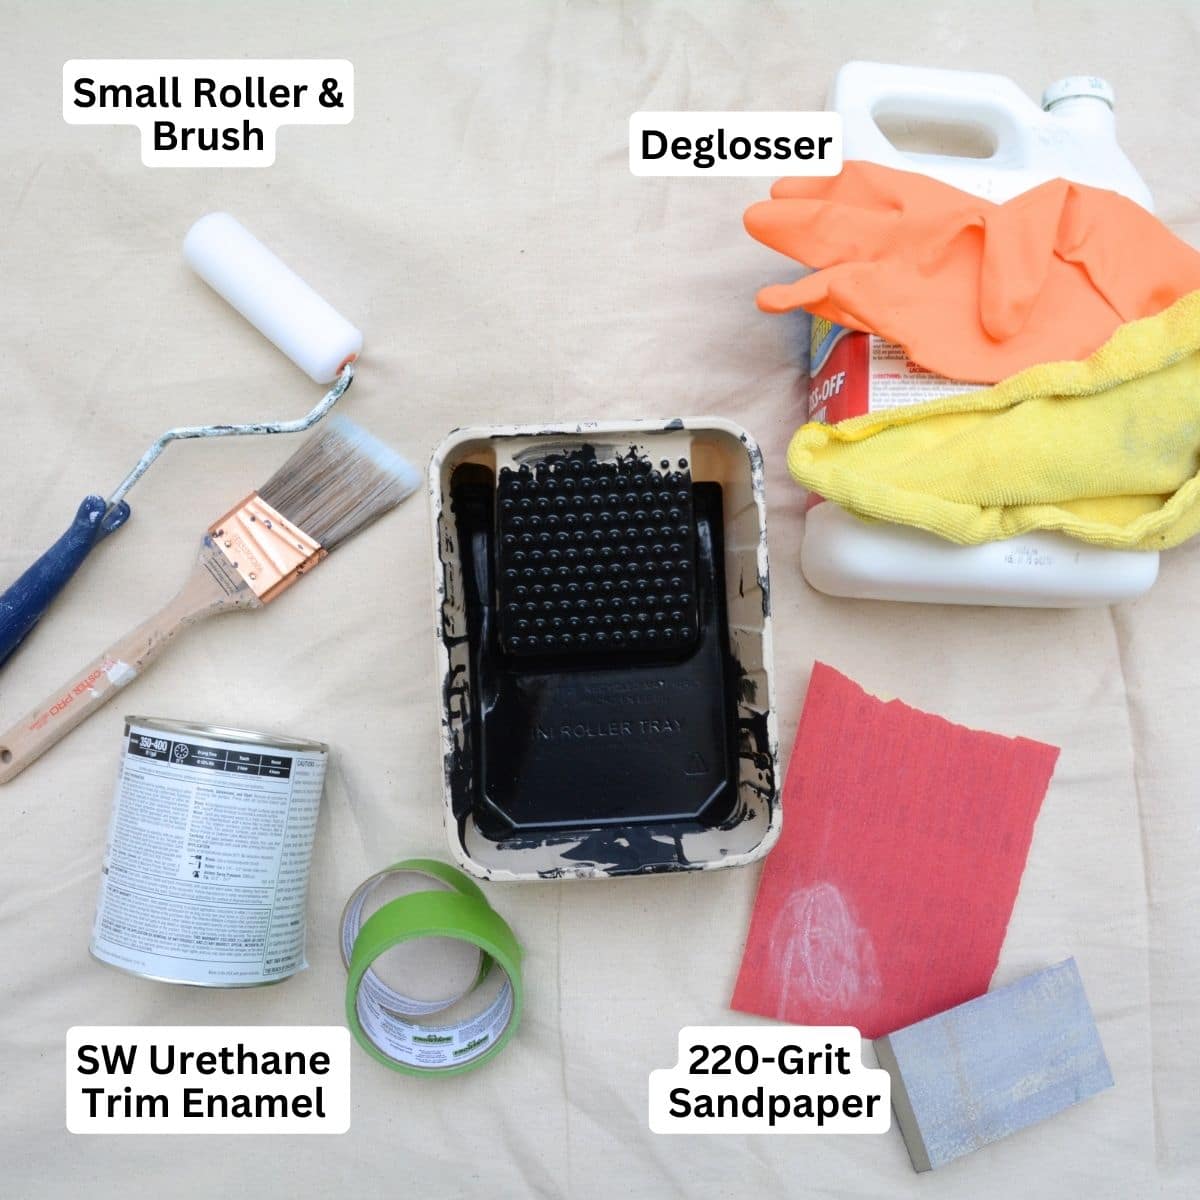
Notes About Primers: Some professional painters will recommend oil-based primers such as this one. However, we have always had great success with Sherwin Williams Latex Primer, this Zinsser water-based one, or Kilz. I love that I don’t have to worry about the smell, especially since I was doing this painting project outside my children’s rooms while they were napping.
Paint Recommendations
The most important thing is choosing a paint for trim work or cabinets. Proper prep work and priming are also super important for your painted stair railing to last.
Here are a few hard enamel paint options:
- Behr Latex Enamel
- Sherwin Williams ProClassic
- Sherwin Williams Emerald Urethane Trim Enamel
- Benjamin Moore Pro Advance
OUR PAINT RECOMMENDATION NOW: If I were painting my oak banister and railing today, I would use the SW Emerald Urethane Trim paint instead of the Proclassic or Behr latex enamel.
At the time of our DIY painting project, we used Behr Latex Enamel and Sherwin Williams ProClassic line.

RELATED DIY – How To Paint Kitchen Cabinets White
How To Paint Oak Stair Banister and Railings
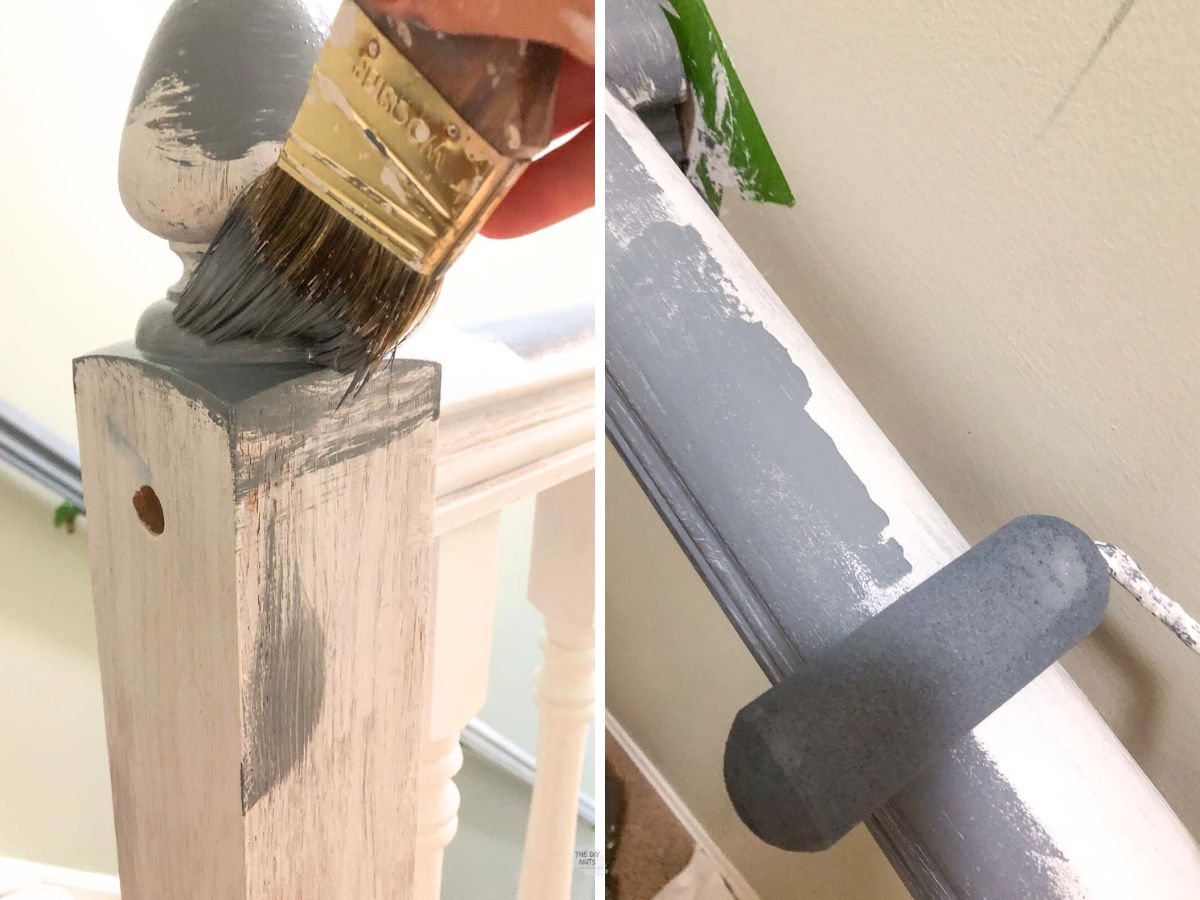
Step 1: Prep Surfaces
- COVER THE SURROUNDING AREAS – Start taping out to help protect your walls and flooring. You can see that I had to push my carpet down and get the painter’s tape under the base of the banister.
- DEGREASE & CLEAN – Use an old rag and wipe down the surface with a deglosser.
- SAND – Lightly sand in the direction of the grain using 220-grit paper. This is to rough it up a little. You really do not need to spend a ton of time on this. Wipe away dust before priming.
Step 2: Prime
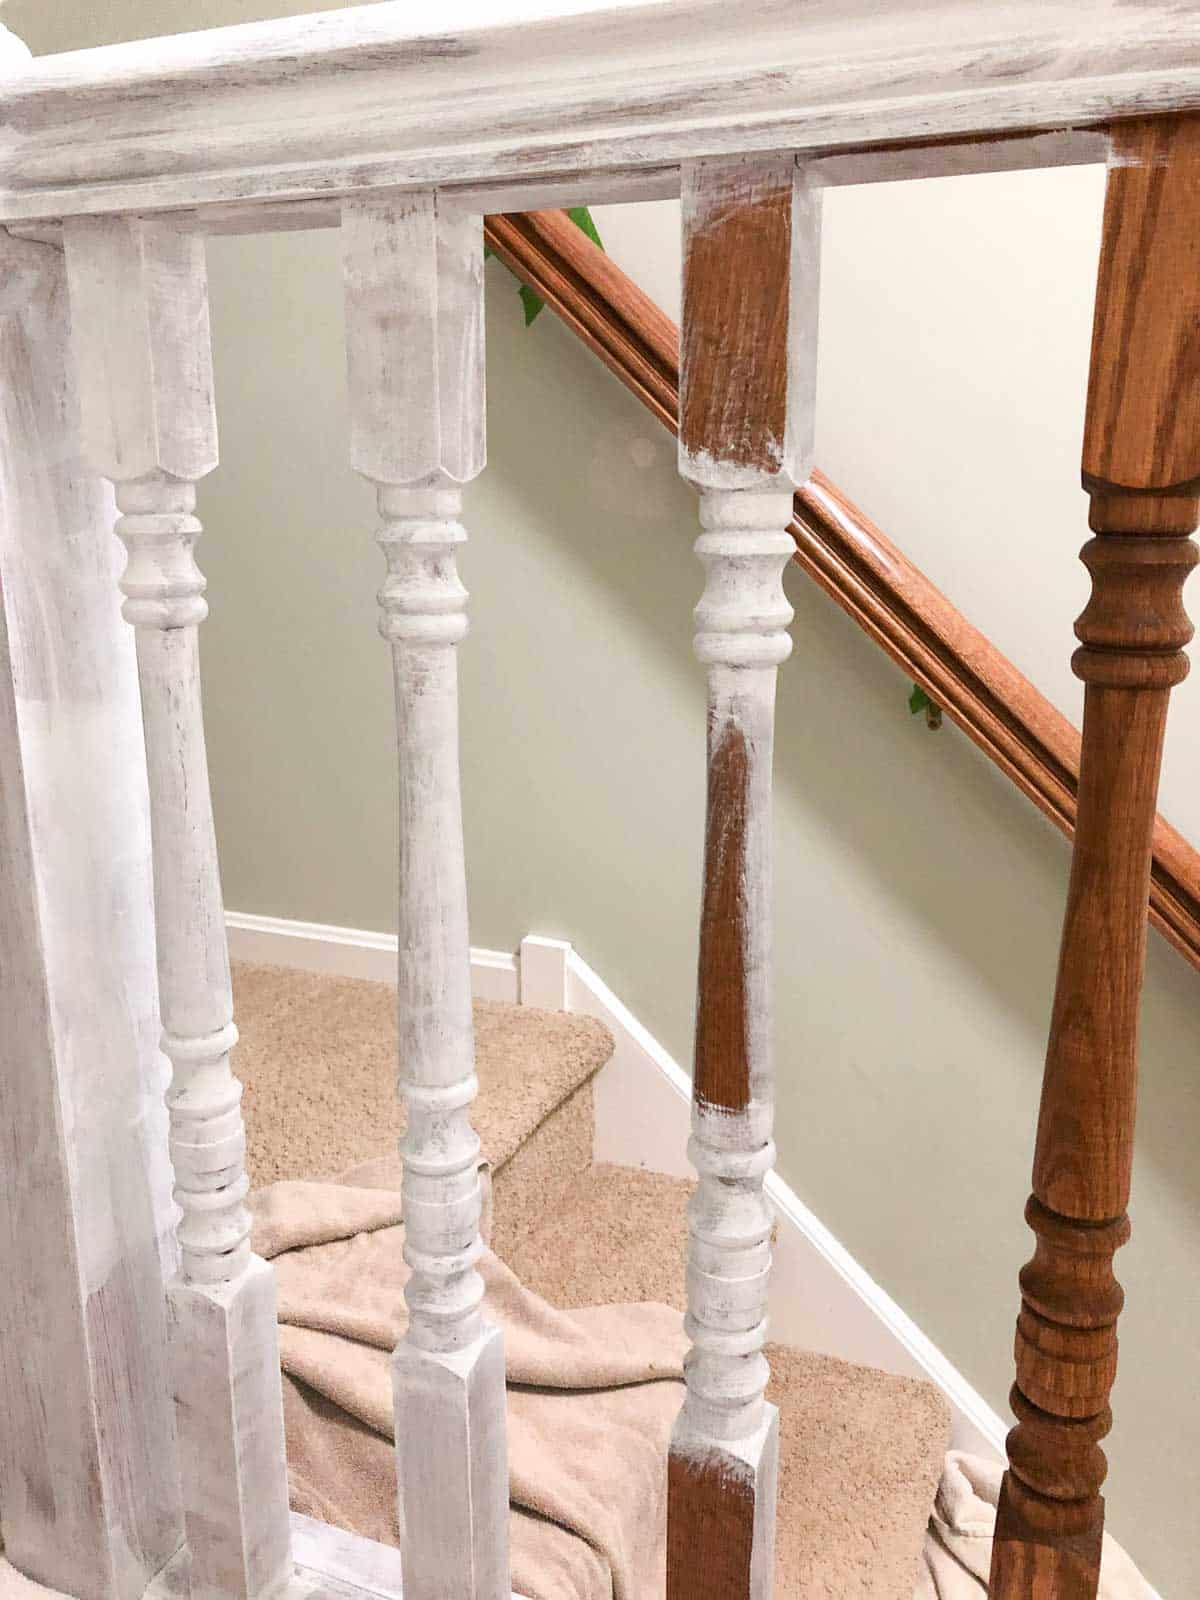
With a brush and a small foam roller, apply one coat of primer to everything. This will take time. Let it dry completely.
The most important part of using any primer is fully covering the surface. The primed bare wood might not look pretty, but all that matters is that you are giving your new paint a surface to stick to.
REPAIR ANY DAMAGE OR FILL LARGE GAPS (OPTIONAL) – Before painting, use paintable white caulk or wood filler to give it a more finished look.
Step 3: Paint Spindles
Using a brush and a small foam roller on the flat parts, begin painting your first coat. Let it fully dry.
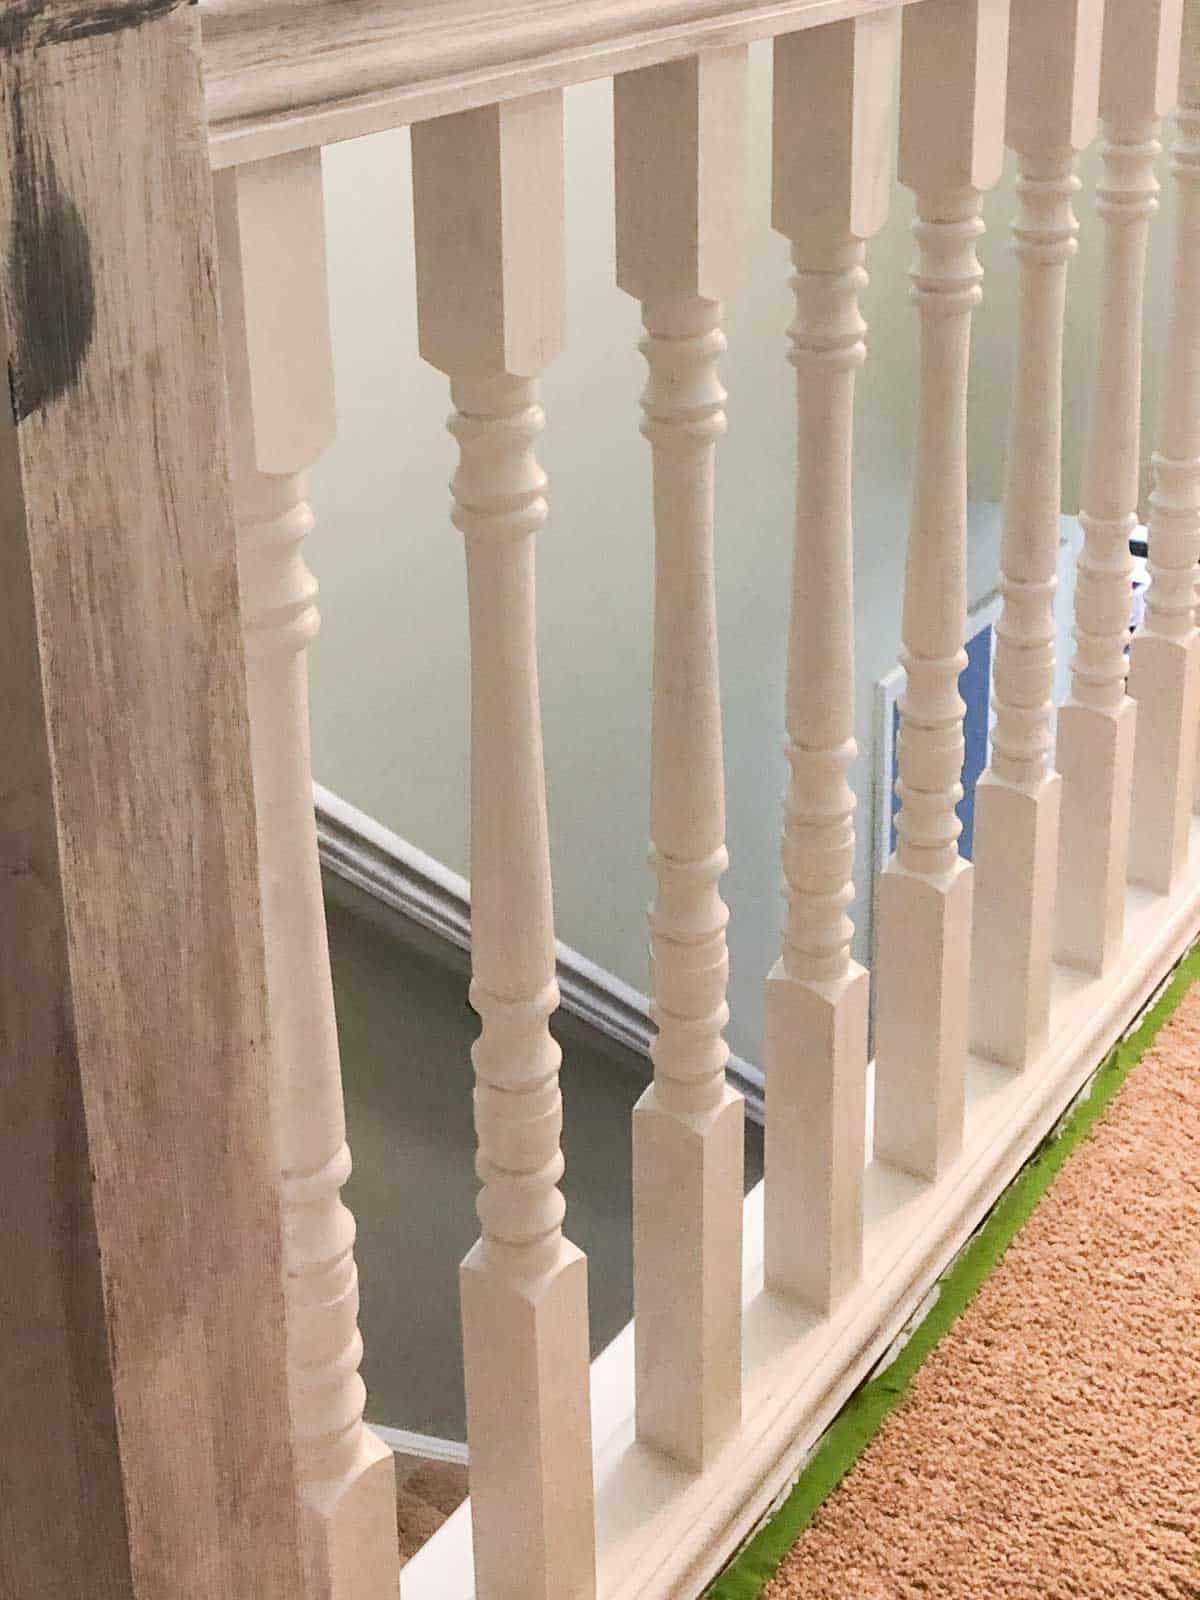
You will need at least 2 coats of white enamel on the railings. I spent a few hours during the week completing this project. You do not want to get lazy and end up with a ton of drips or start spraying paint on your carpet, etc.
Step 4: Tape Your Handrail
Once the white railings are done and dry, begin taping (use this brand) the areas to create a darker exterior.
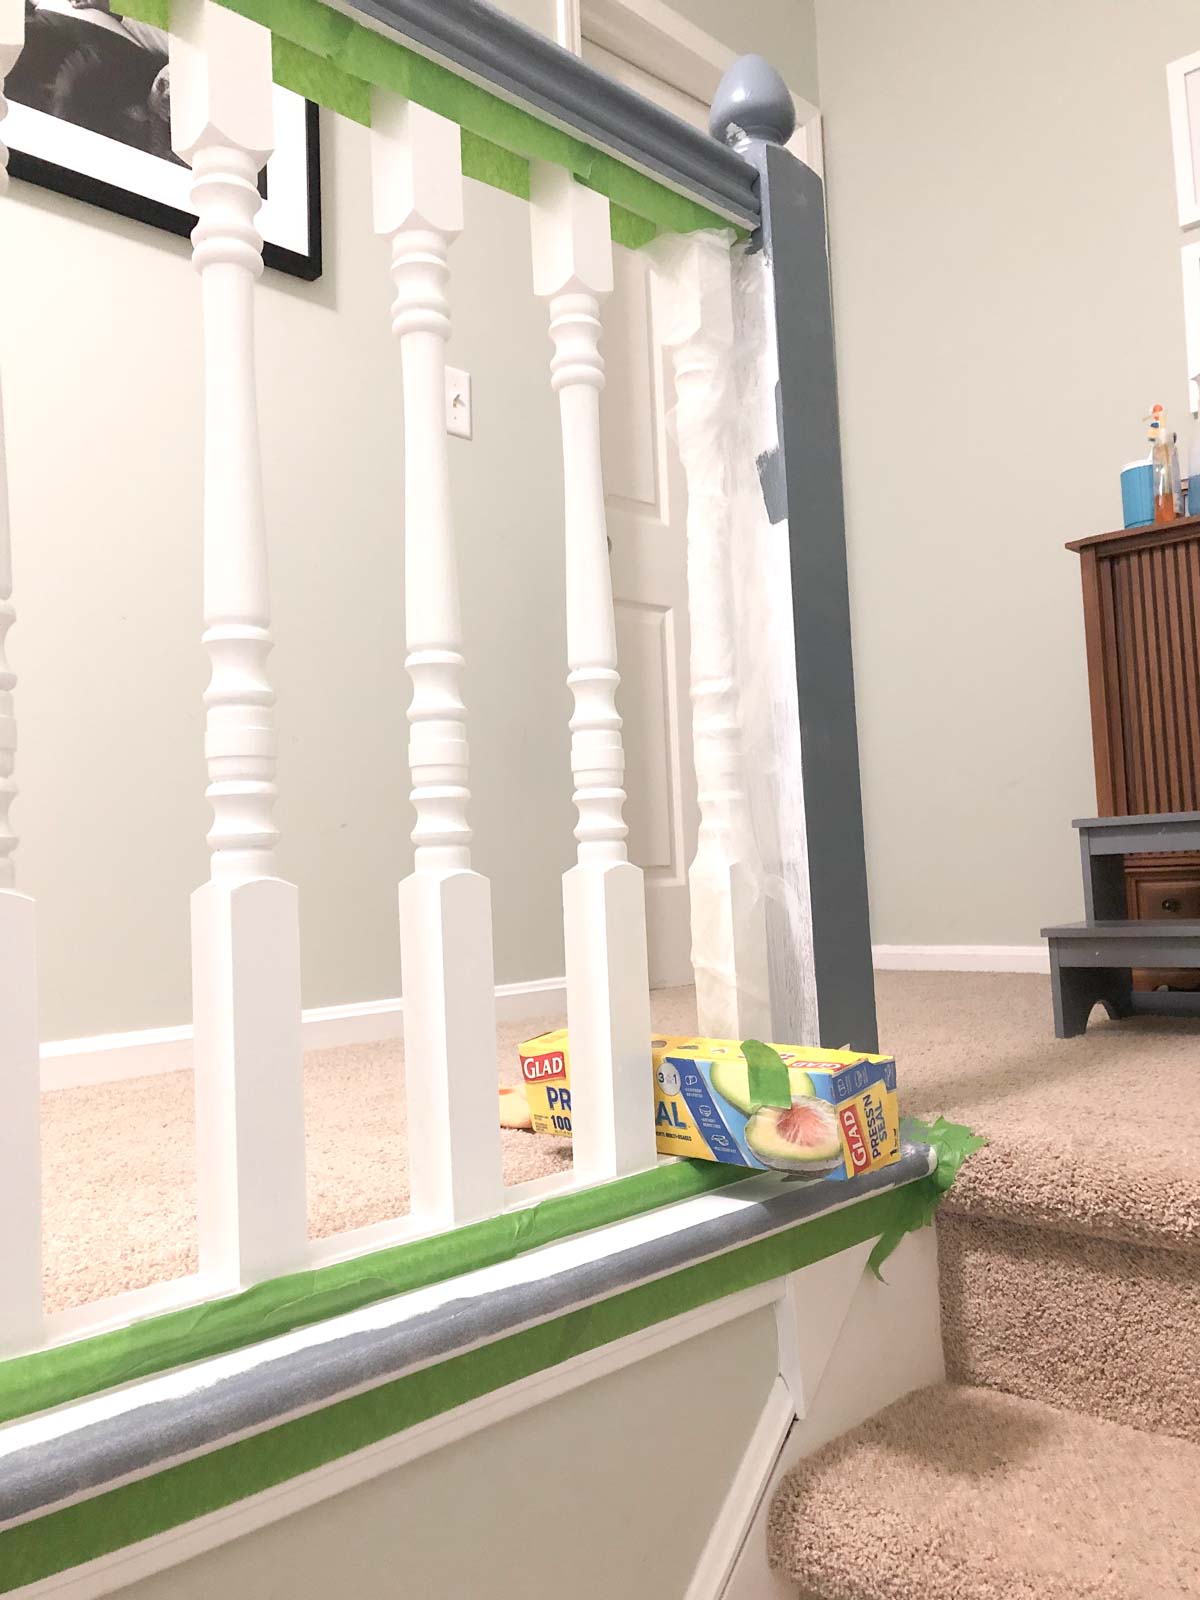
HUGE PAINT PREP TIP ALERT!!!
USE PRESS AND SEAL — Wrap the spindle closest to the end post with plastic before painting. By completely covering the spindles, this simple method protects freshly painted white.
Step 5: Paint Colored Paint
Using a roller and a brush, begin applying your first coat of colored paint to the handrails. You can see how we used Charcoal Blue, but we chose to repaint the handrail black paint later.
You will also need at least two coats of paint. After looking at our second coat of paint, we ended up doing three coats with the colored paint for complete coverage.
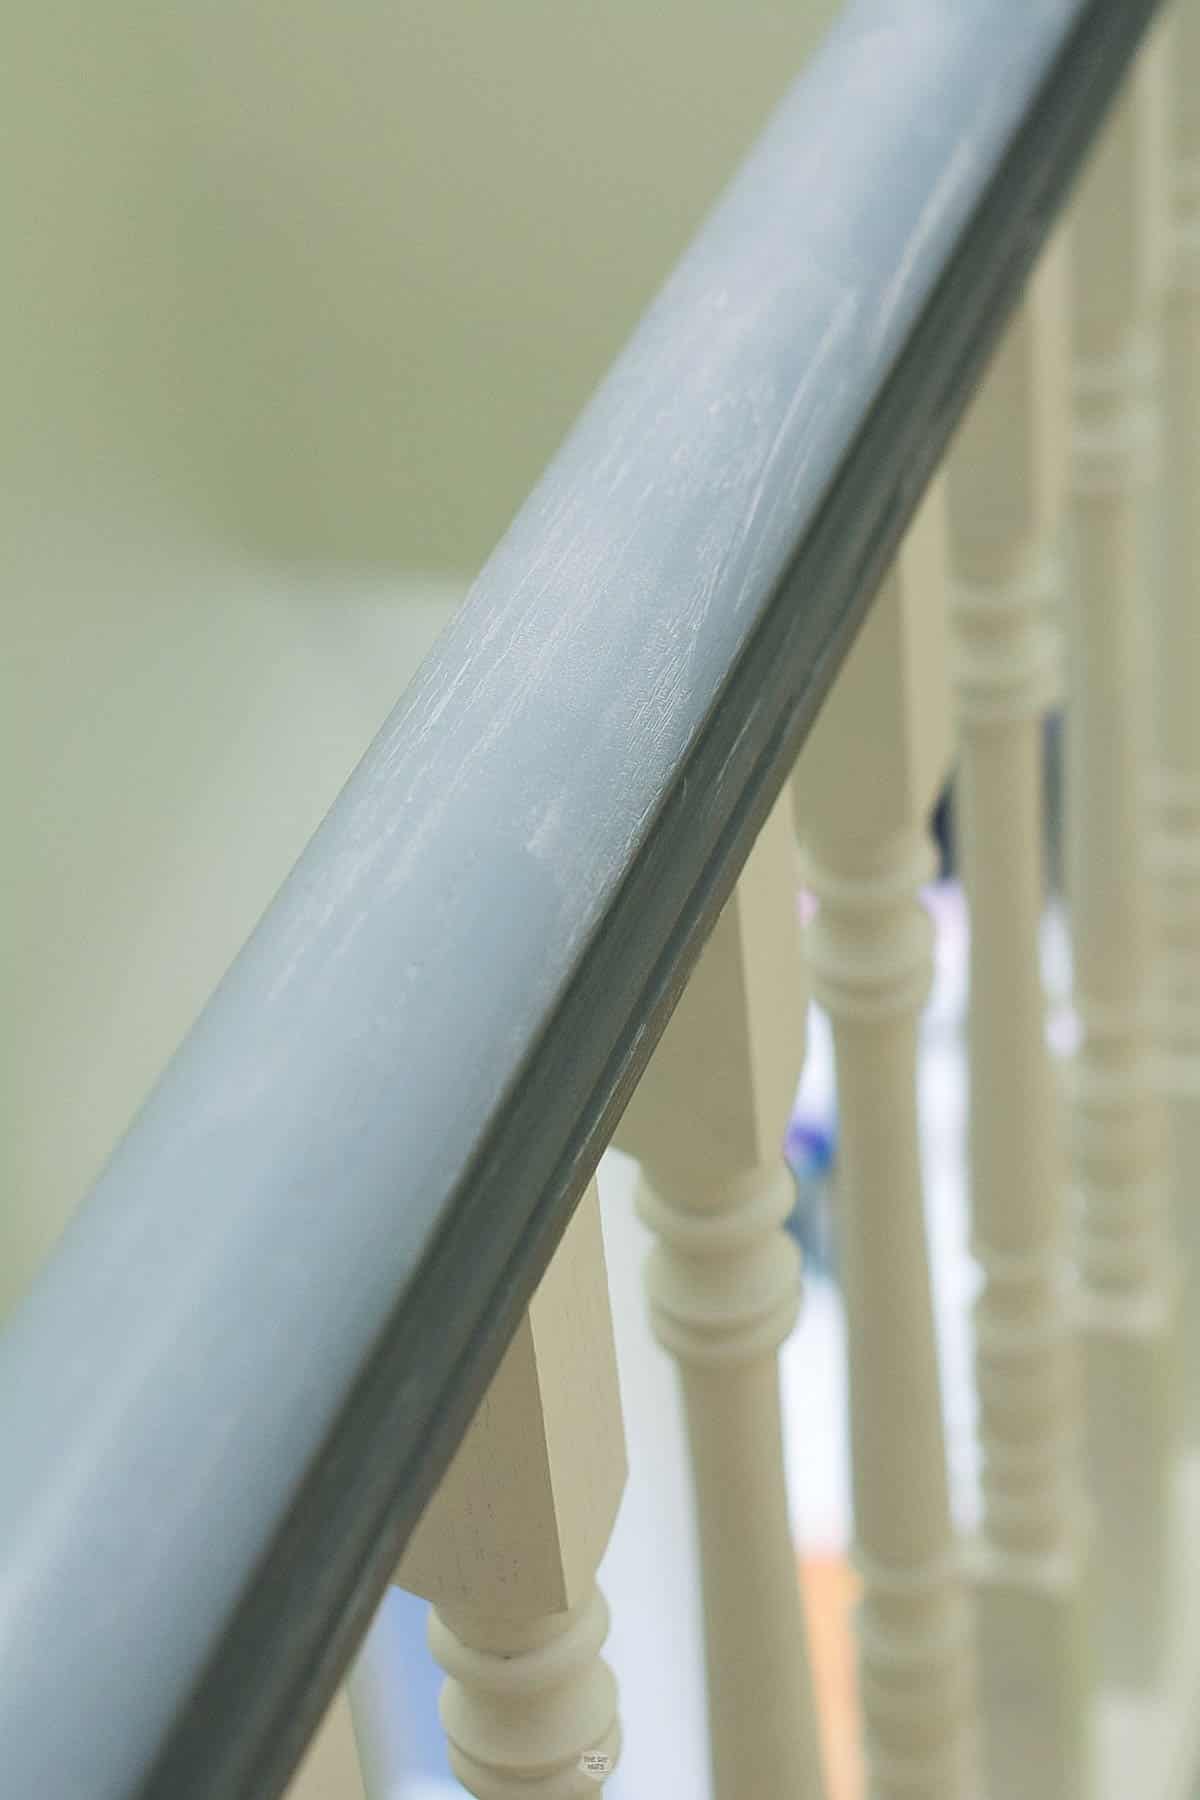
Step 6: Remove Tape Carefully And Touch-Up
You can remove the tape once the paint is dry to the touch. Because the railings have so many little grooves and uneven surfaces, you may need to use a smaller paintbrush to touch up some areas.
Tips For The Best Paint Job
- USE A HIGH-QUALITY BRUSH – A good paint brush will help you easily paint all the grooves in the spindles.
- CHECK REGULARLY WHILE PAINTING – Continue to check periodically to see if there are any drips to wipe away.
- USE A SMALL FOAM ROLLER – Use a small foam roller to do the flat areas. You will be surprised at how much faster you can work and how smooth the finish is.
- CHECK MULTIPLE ANGLES – Look at the railing from multiple angles. The wood surface has many small nooks, so you want to confirm that you are completely covering everything.
- USE SANDPAPER IF NEEDED – If you have a drip, use extra fine sandpaper to fix it before painting your final coat.
- CHANGE COLORS – Painting anything in your home doesn’t have to be intimidating. Go for it!
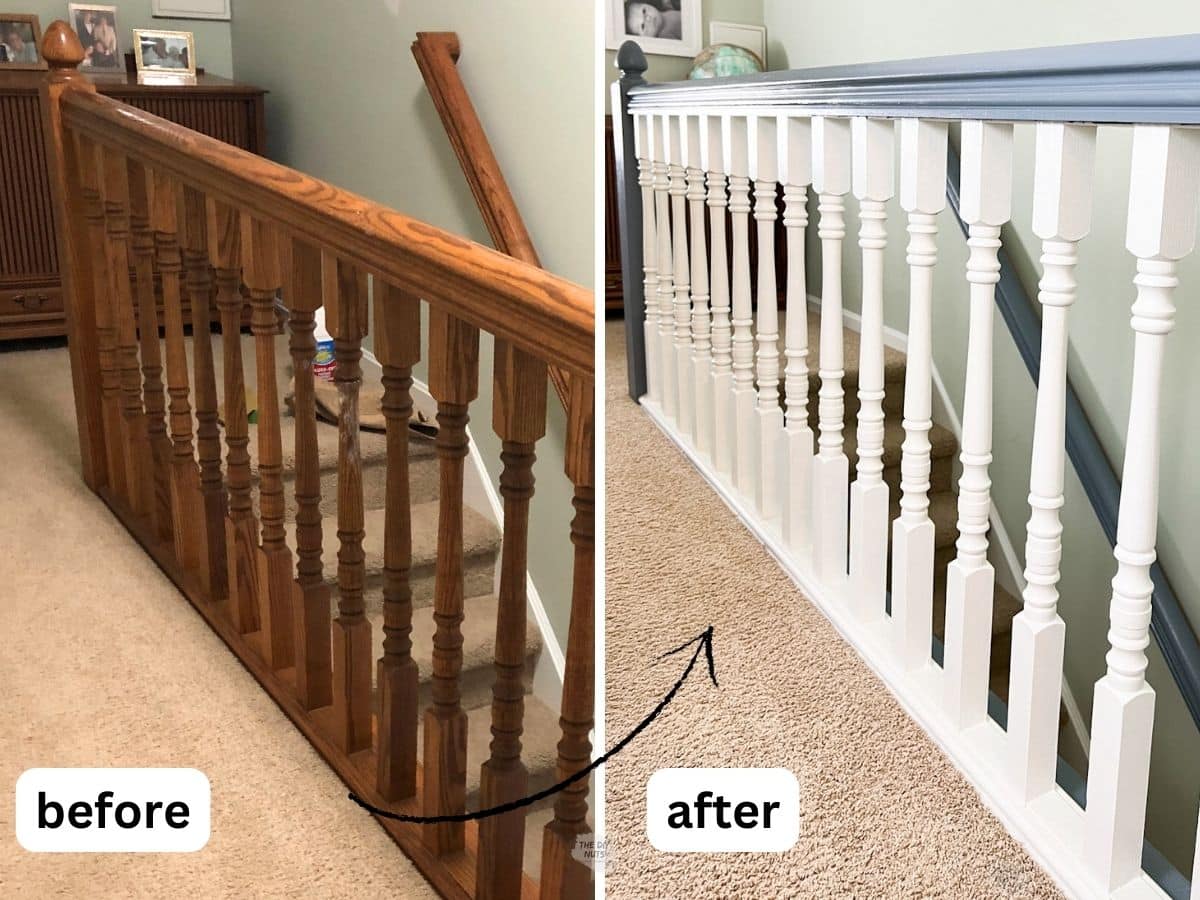
Before and After Railing
While I would not say this was the easiest painting project, it definitely is your best option. If you love this painted makeover, you have to see how our oak kitchen cabinets were redone!
Frequently Asked Questions
It has been over two years since we painted this in our upstairs. The only spot with wear is the cap on the newel post. It is the round part that the kids touch all the time.
We now know we should have used Emerald Urethane Trim Enamel, and this would not have happened.
We did repaint the wood handrail black a few years later for an updated look.
We found that using a brush and a small foam roller gave the smoothest finish. You can even use the small foam roller on the flat areas of the spindles.
Before we discovered SW Emerald paint, SW Proclassic was our favorite white paint for kitchen cabinets and moldings. Due to its self-leveling properties and hardness, we now recommend Emerald Urethane Trim paint.
We did not do this and do not think it would work well. However, we have even seen an HGTV post about using a sock on your hand to help you paint the spindles. If you are considering this, you would want to put on a protective glove before putting the sock over your hand. There are even painting gloves meant for easily painting spindles.
Follow us on Pinterest, YouTube or Facebook for more DIY inspiration!

More Painting DIY Projects
Use some of the same painting supplies to upgrade other spaces in your home.
- HOW TO PAINT LAMINATE COUNTERS – No need for an expensive kit!
- HOW TO REPAINT KITCHEN CABINETS – We love our green lower cabinets.
- OUR BUDGET BLACK AND WHITE BATHROOM MAKEOVER – Mostly done with paint!
- DIY HEXAGON ACCENT WALL – Check out my daughter’s fun room that is right near this banister.
There is no need to tear out your oak banister, stair spindles, and railings when a little paint can modernize your space. It is easier than you think to makeover your staircase. Just be patient and do it a little bit at a time. With some elbow grease and hard work, you can also update your stairway on a budget to fit your style.
Love the banister uplifting you did!!
Thanks Claudia.We are very happy we were able to give our railing and banister a new look!
I love what you did to your bannister and railings. Can you tell me the difference between using a chalk paint and an acrylic? I would also like to paint my kitchen cupboards. Would you recommend chalk paint?
Hi Pauline. I have only used chalk paint for furniture. I have several posts about how I painted trim in our basement, bathroom cabinets and now this railing using pretty much the same technique. We also have painted our kitchen cabinets using a good primer and latex enamel paint. Our kitchen cabinets are approaching 7 years and have only need retouching and that is with three young children.
I think the biggest difference between chalk paint and latex enamel is that chalk paint has a “sort of primer” in it. When using latex enamel, you have to prime first and that is honestly the most important part. Because you are priming first with latex enamel, I honestly feel that the paint adheres better. You also may want to consider the finish you want (matte, satin, semi-gloss). I am not a chalk paint expert, but my guess is semi-gloss is hard to get and something you may want in order to be able to easily wipe your cabinets.
The furniture pieces we have done using chalk paint have held up, but they don’t get nearly the same amount as action as cabinets. I hope this helps and good luck with your project.
This looks nice! Do you still see the wood grain texture through the paint? Does the primer help get rid of that, or how can you get rid of the wood grain texture?
Hi Jyl. Thanks for stopping by our DIY site. Yes, you will see some of the wood grain through the paint on your stair railing. It honestly doesn’t bother me though. You could completely sand down your railing to the texture you like or we know some DIY bloggers that have used a wood filler after priming to help smooth out the surface. However, that process will take a lot of time. You can still use our painting method, but I would look research how to get rid of grain. I would say it also depends on the type of wood and depth of grain. On our fireplace mantel, you honestly can’t see the wood grain using this similar painting method. Good luck with your stair railing project and let us know how yours goes.
Wow! It’s crazy how just a little paint and elbow grease completely transformed your railing! I received a quote from a local refinisher, but after seeing your process it seems like a doable DIY project!
Hi Sarah! Yes, this DIY painting project took a little time, but definitely helped brighten our space where our railing is. Good luck with your project.
Well done. This is the most detailed and comprehensive how to guide I’ve seen on painting railings and banisters down to the supplies. Gets me excited to do my own! We aren’t necessarily going from oak to painted but nevertheless this is helpful. I will need to look for more information on filling in dents and dings. We have a few of those….
Thanks for the kind words. We are happy that you feel comfortable in your painting process after checking out our how to paint your stair railing instructions. If your stair railing is already painted, we have a painted cabinet tutorial that might work for you. Luckily our stair railing was in pretty good shape and we didn’t need to fix any dents. Good luck with your stairway makevoer!
Hi! Love your project!
I’m a total “beginner”. In our home, the previous owners poorly painted the handrail already with some super cheap white paint. I’d like to paint it black. Do I need to remove the white paint completely? (If so, how?) Or can I lightly sand and add a primer and then paint over the white paint? If I do this can I still use the degreaser on the white paint?
Thank you!
Hi Lyndsey. If the paint is chipping away and in bad condition, I would think it would be best to strip it away. You could completely sand the railing or also try a paint stripping product like Citristrip first before priming. Also, I always suggest that you go into a local paint store (like Sherwin Williams) and show them actual pictures of your project. They will have suggestions. Good luck with your railing project.
Thank you Erin for the great inspiration and instructions! We love the new look of our newly painted railings.
Hi Addie. I am glad that you love your new railing!!
We had a professional painter give us a quote of over $3000 to paint our railings and bannisters. I did a little research on the project and came across your site. You made it seem very doable for the average person, so we tackled the project ourselves. We followed your steps. Bought the materials you suggested. The finished project looks fantastic. A professional couldn’t have done any better. Thanks, Erin, for a great site.
Hey Paul! I am so happy that your oak railing turned out so well! Great job and thanks for letting us know. We love when a little paint can really transform a space.
We have a beautiful china dinning set with hutch look like new but I don’t like the oak color, it’s not matching with the new house style I moved in what can I do
Hey Lien. You have a lot of options. You could use a similar paint technique used to paint this railing or look into other decorative furniture paints that are out there like milk paint or chalk paint.
Even though I love painting things, I would also consider stripping the hutch and restaining it to fit your tastes. You could also look into to gel stain to see if that would work. Good luck with your furniture makeover project!
Great tutorials! I have honey oak all over my new house and dislike it very much. What do you think of heritage paint?
Hi Candace. Thanks for the kind words! I haven’t tried heritage paints yet. When I do, I am sure I will use them on a piece of furniture first to test them out. Good luck with your painting projects.