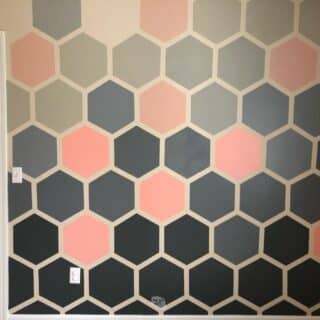
DIY Hexagon Wall Painting (Ombré Accent Wall)
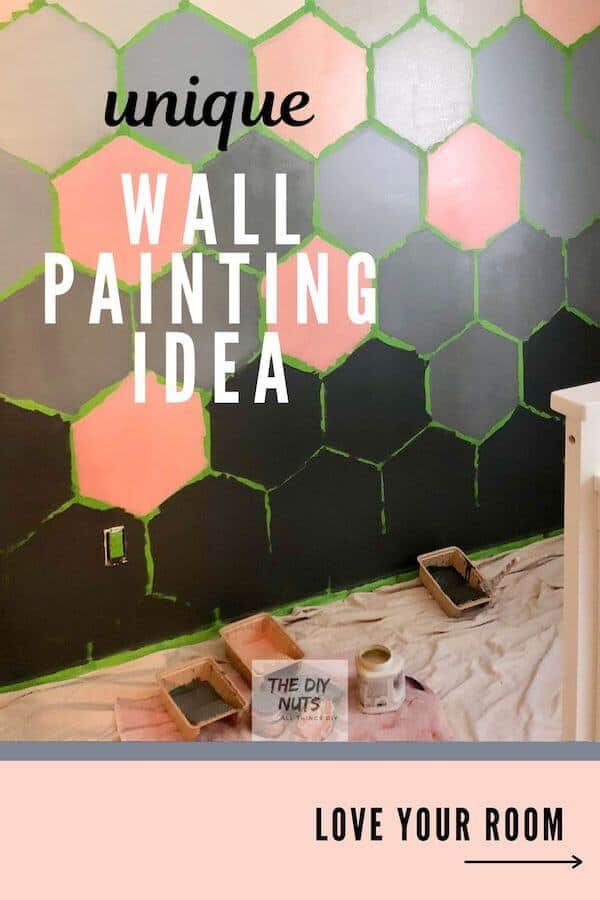
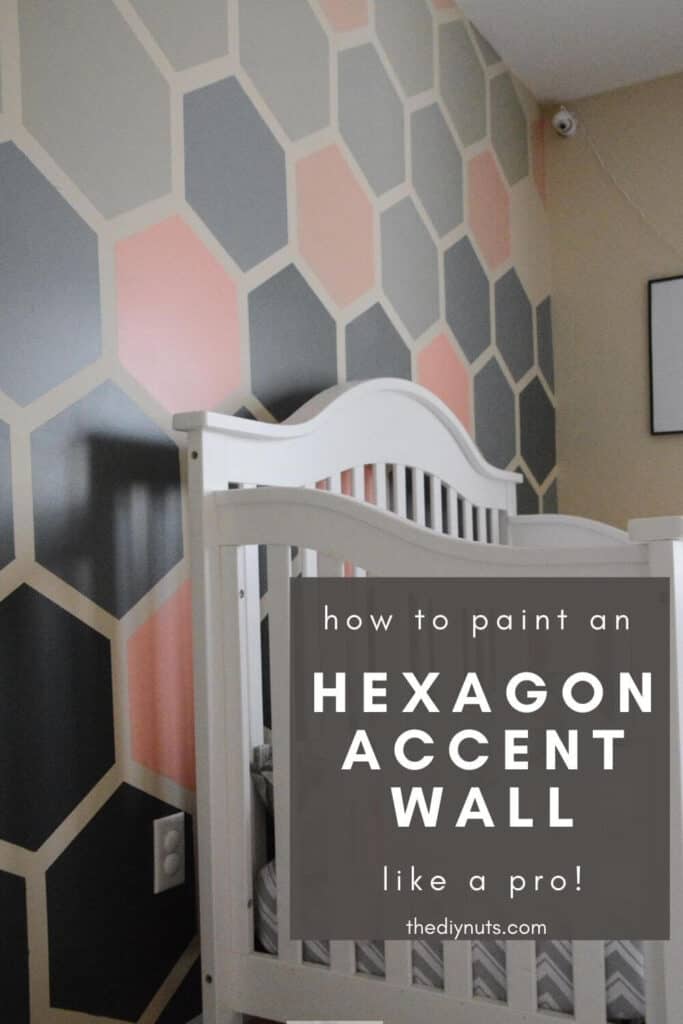
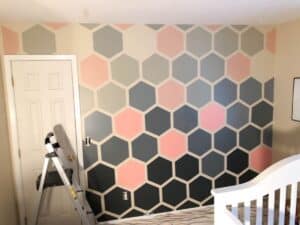
Are you looking for a fun way to add some personality to your space? This wonderful DIY ombre hexagon wall could be the perfect design idea for you. We just love how this wall decor idea for our girl’s nursery came out. Learn how to create this painted pattern design for an accent wall idea.
*Disclosure: I only recommend products I would use myself and all opinions expressed here are our own. This post may contain affiliate links that at no additional cost to you, I may earn a small commission. Read our full privacy policy.
Concerns About Wall Painting Idea
If you are nervous about creating this geometric design, just take it one step at a time. Consider the following tips to help with your wall.
- Sketch out how you want your wall to look.
- Which way will your hexagons go? If they don’t fit evenly across where will the design get cut off
- Measure your wall carefully
- Create a base shape that can easily fit together
Recommended Supplies
- 1″ Frog tape (do not buy a cheaper brand)
- Several Small foam rollers (click here to see the ones I use)
- Several small paint tray liners (These are great because they are sturdier and cheap)
- Paintbrush for trimming
- Paper or cardboard
- Pencil
- Plastic Bags
- Utility Knife
- Paint colors of your choice (around 3-5 from the same paint swatch)
Gray Colors used in Valspar Paints
Pink Valspar Paints Used
- Brushed Rose
- Bisque Salmon
- Snow Pa
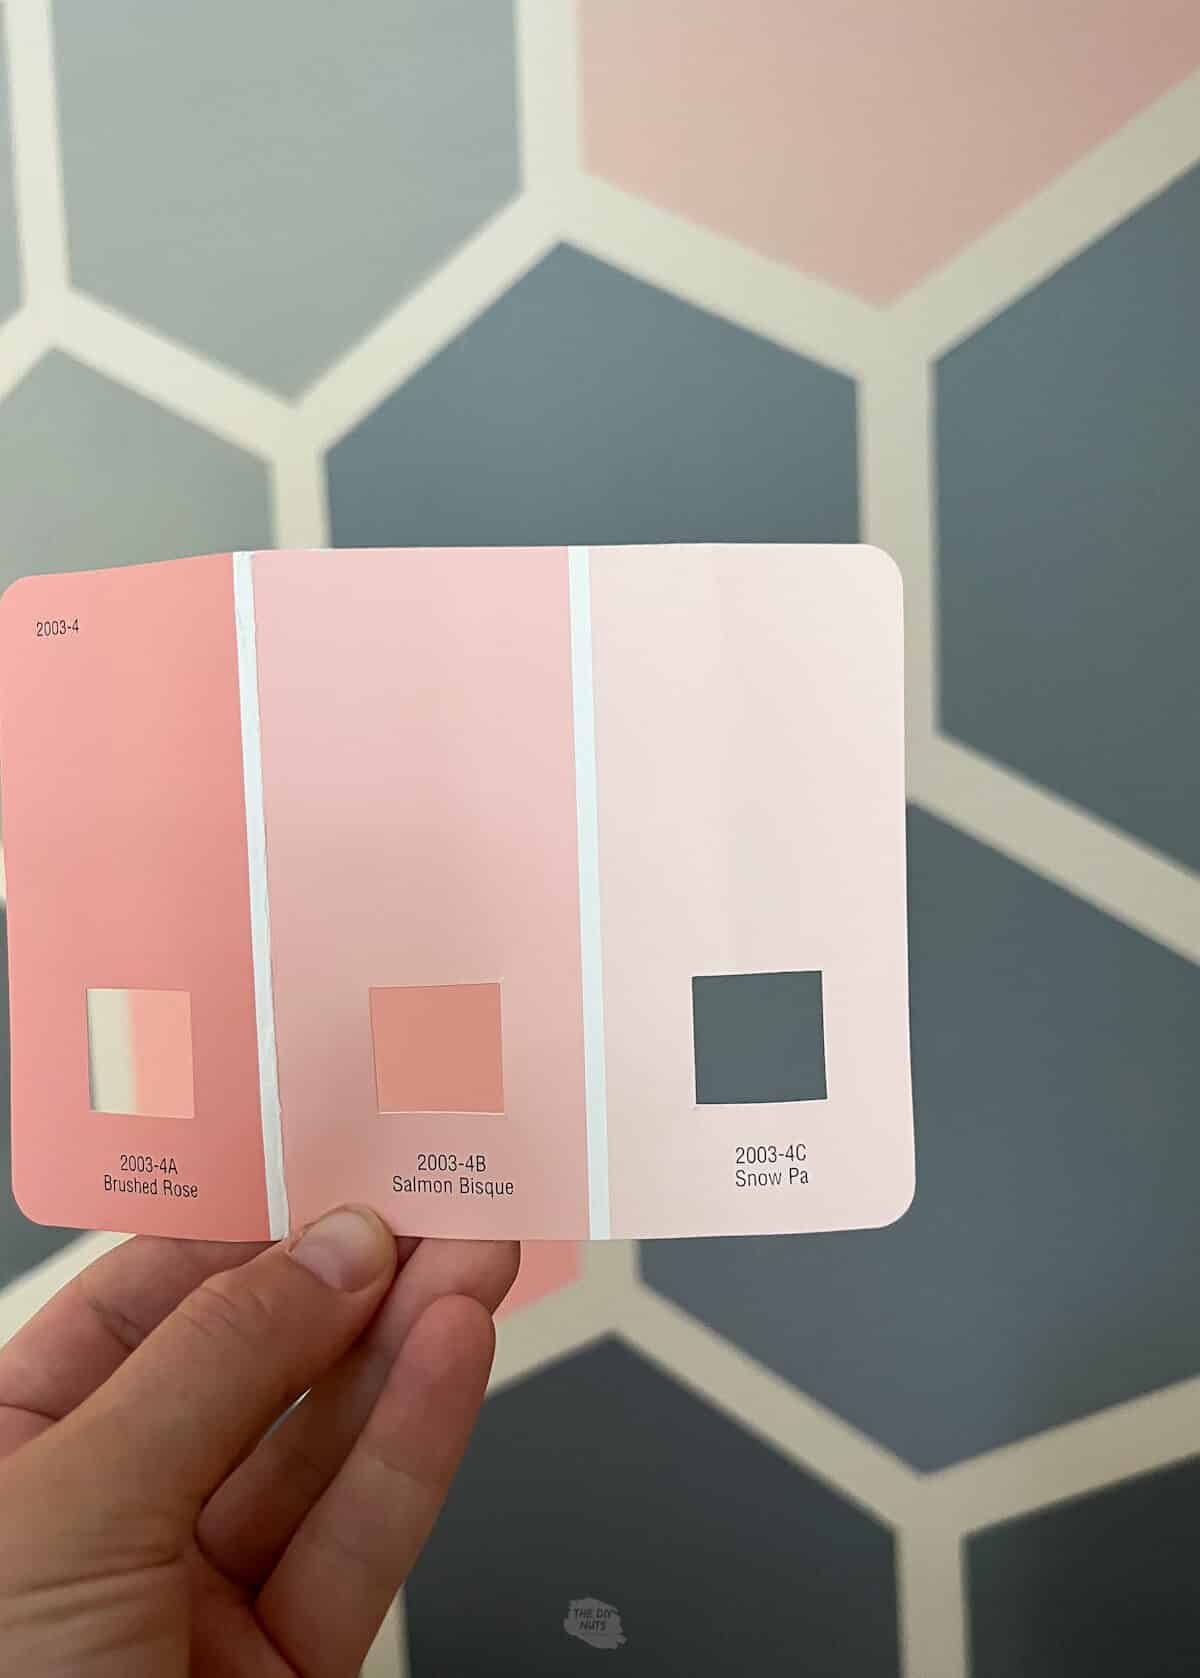
You can also mix your base wall color with your paint samples. Our colors were mixed with SW Softer Tan which was the base coat used in this room. A beige before I knew how much I love grays.
Need Help Picking Paint Colors?
We recently just tried Samplize, which beats having to buy individual paint samples. These 9″ x 14.75″ samples will be shipped directly to you and save the hassle of clean-up (we loved that). See our full review here.
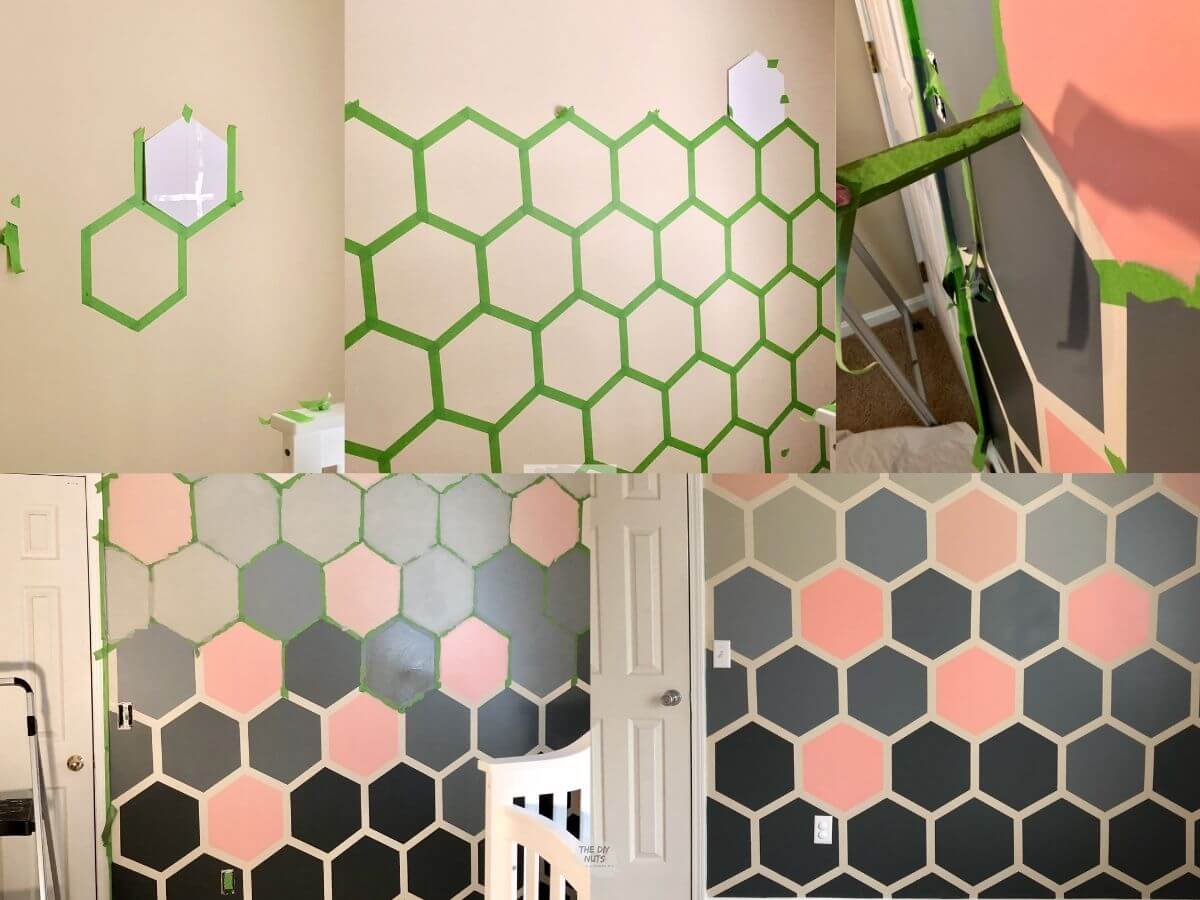
How To Make A Hexagon Wall
Before You Begin
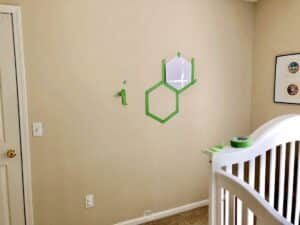
Find the middle of your wall. Make a small pencil mark there. This is where you eventually will want to center your first template for taping around.
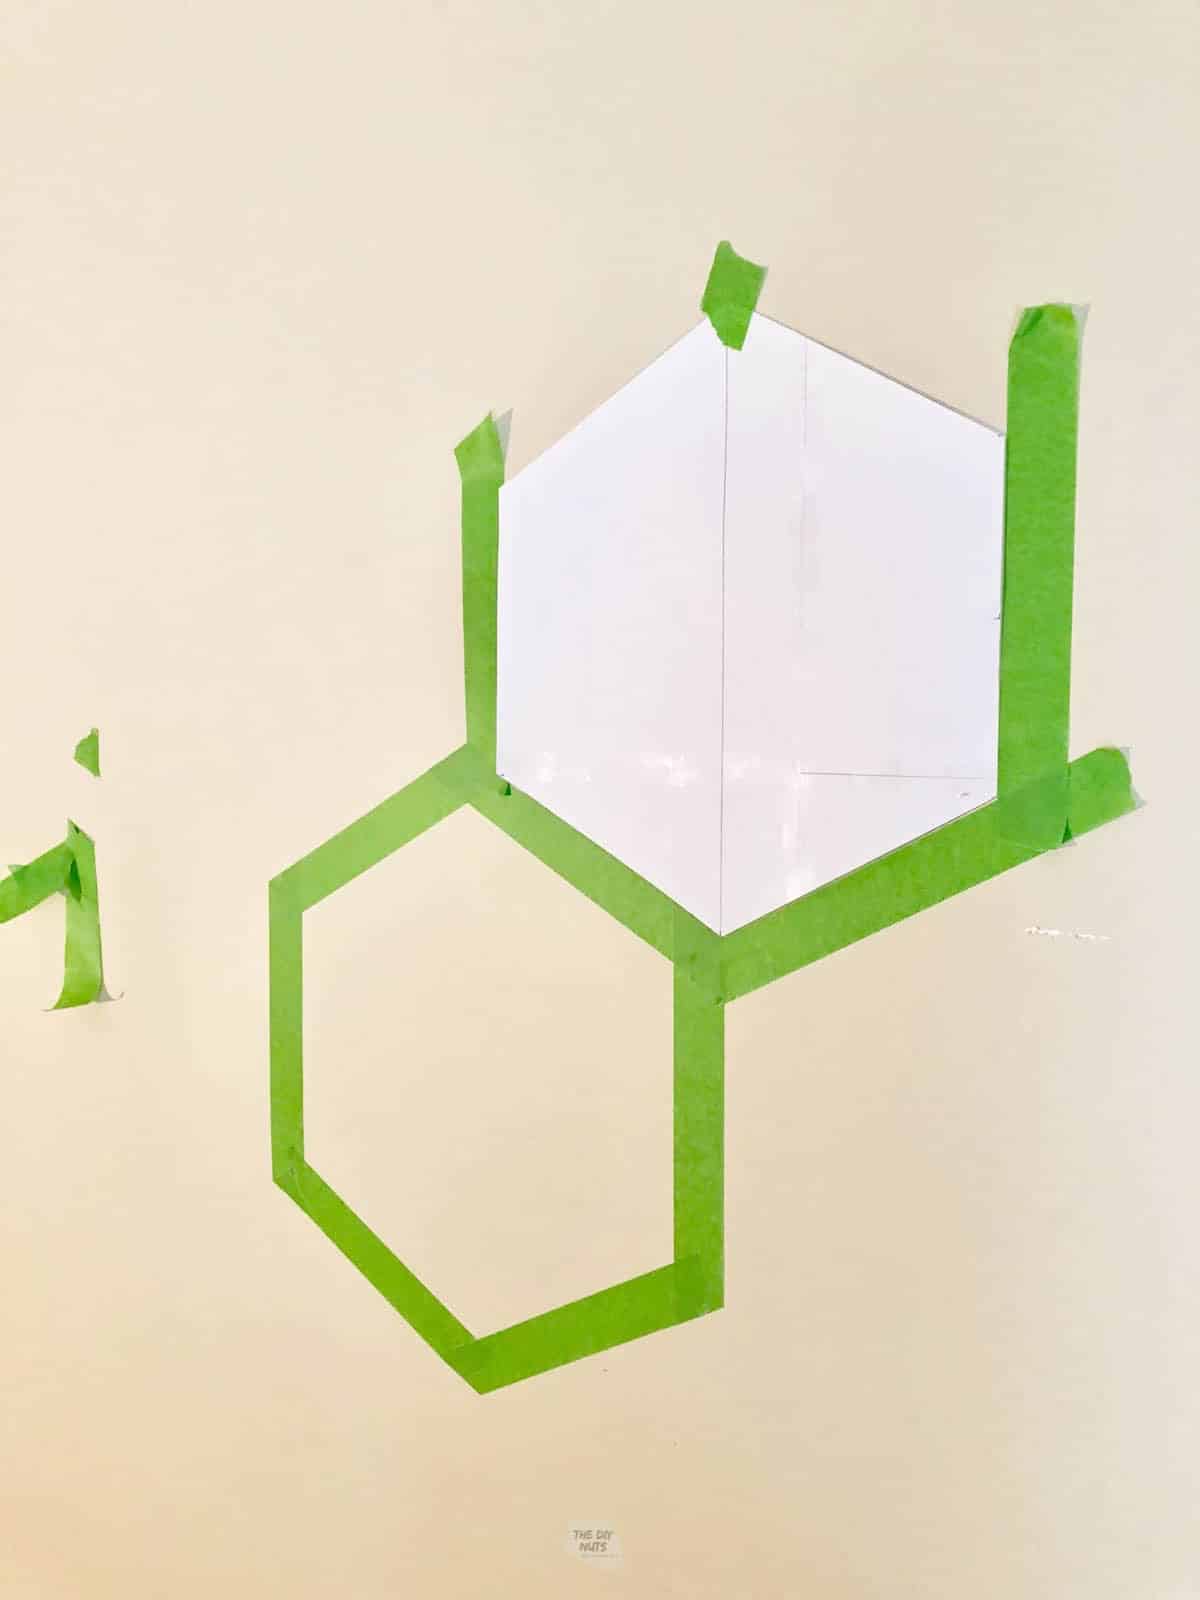
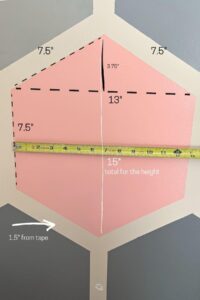
Step 1: Create Your Hexagon Template
Create a hexagon template out of cardboard or paper. I just used paper and mine turned out fine. Now you will have to decide what shape you want your hexagon. Equal or a little skinnier?
Dimensions Of Our Hexagon

Cut two of the same triangles out and add a square or rectangle in the middle. At the end of my tutorial, I will share a related site that goes into more detail in their post about math.
I didn’t overthink it and was able to get a hexagon that would tessellate or go together like a puzzle.
Step 2: Tape Your Hexagon
Line up the middle of your hexagon template on that spot and tape it to the wall.

Step 3: Tape Around The Hexagon
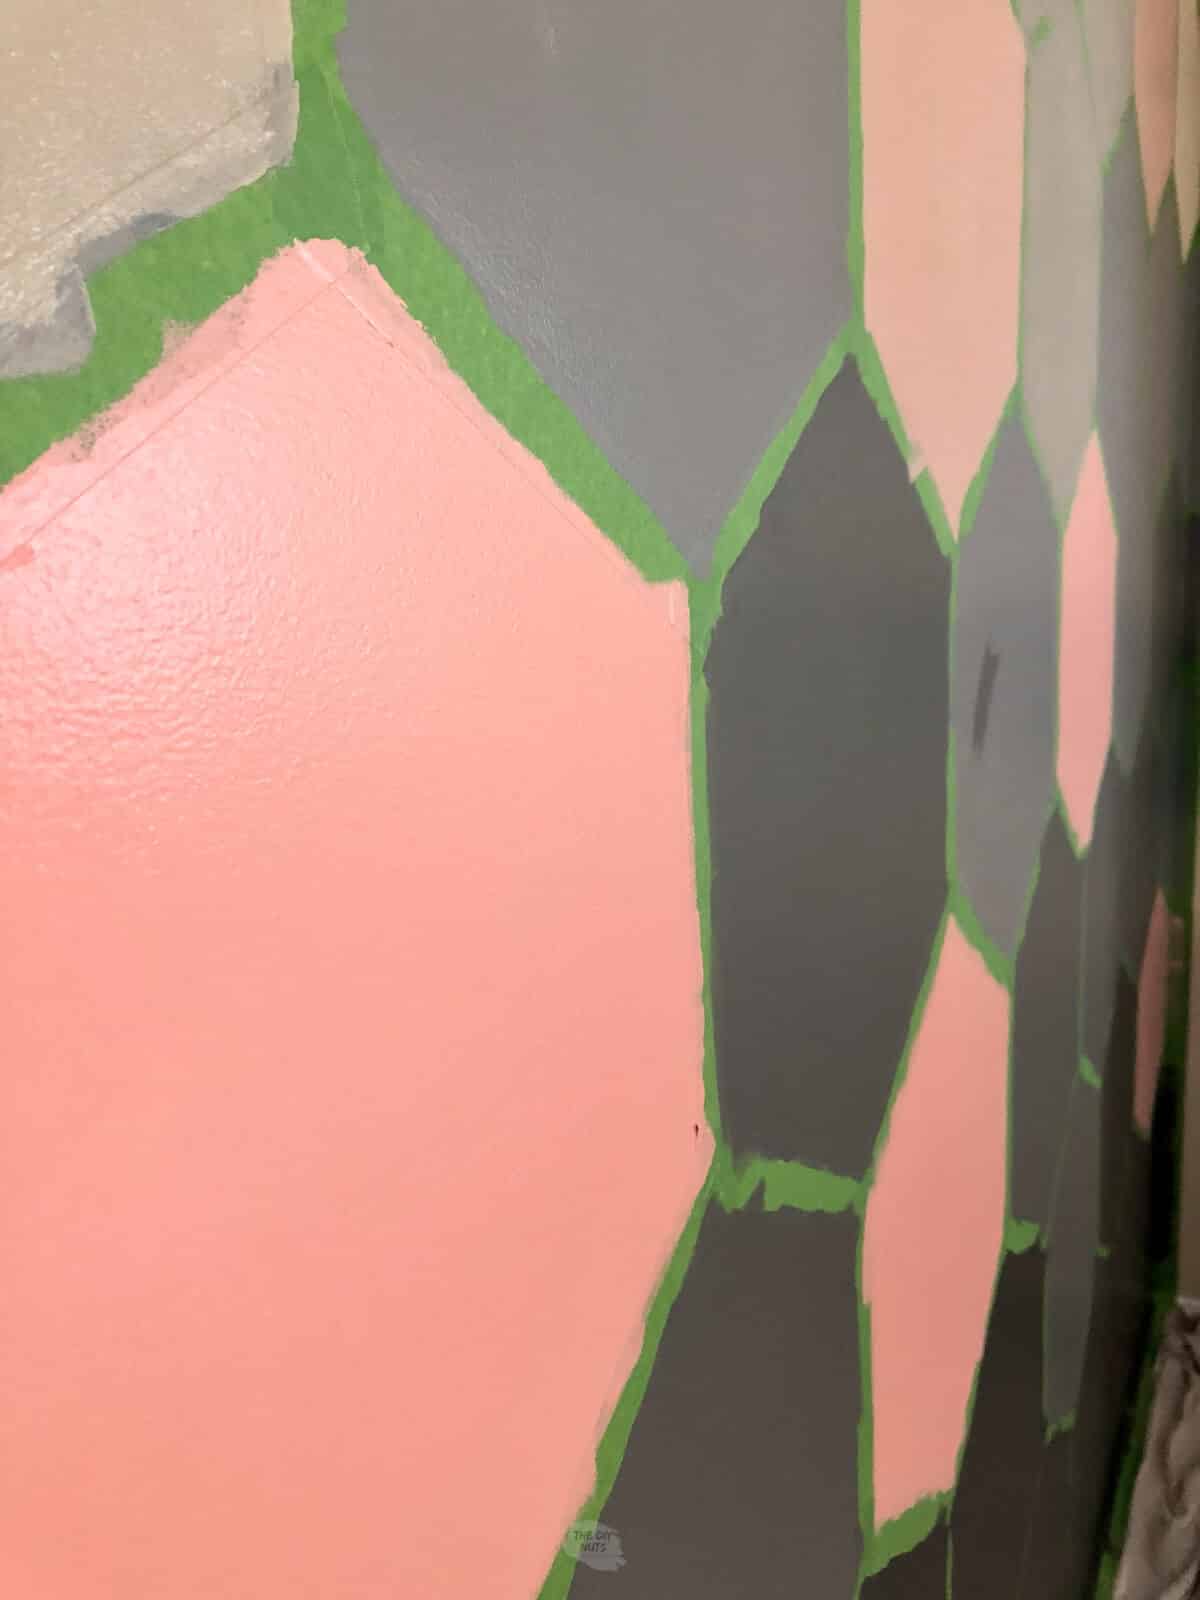
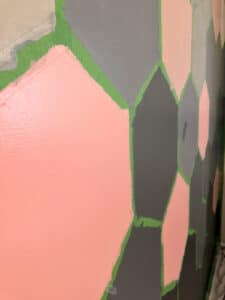
Begin using painter’s tape to tape around the hexagon. We recommend using this type of painter’s tape for clean and crisp lines on accent walls.
You may have to carefully use a utility knife to cut away the extra tape in the corners.
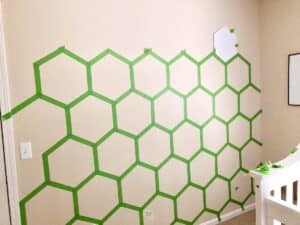
Step 4: Line Up Template And Tape
When taping the hexagon wall, carefully line up the hexagon right on the edge of the other one.
Your middle line should be equally coming out of the tip of the hexagon below. You will immediately notice if you do not do this because your hexagon pattern will start to be a little wonky.
Pro Tip: Use your fingernail, old credit card, or foam roller without paint to really press the tape in before you start painting.
Step 5: Continue Taping Hexagons
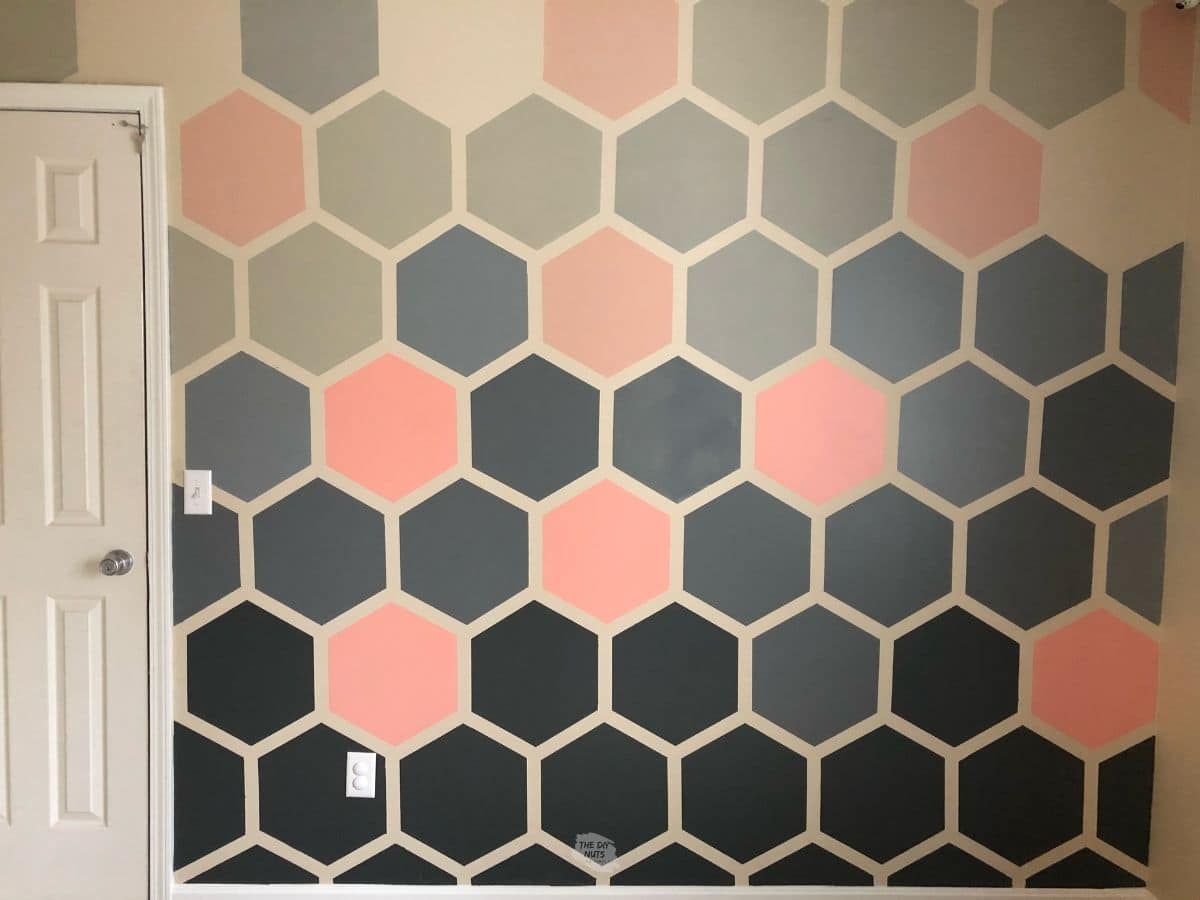
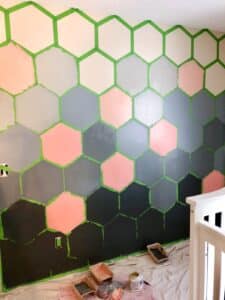
Continue lining up the hexagon template and repeat taping out the accent wall design. If a side is touching another hexagon, you only tape the areas that don’t have tape yet.
For my wall design, I taped 1/2 hexagons when I got to the walls and ceiling. I think it worked out pretty well.
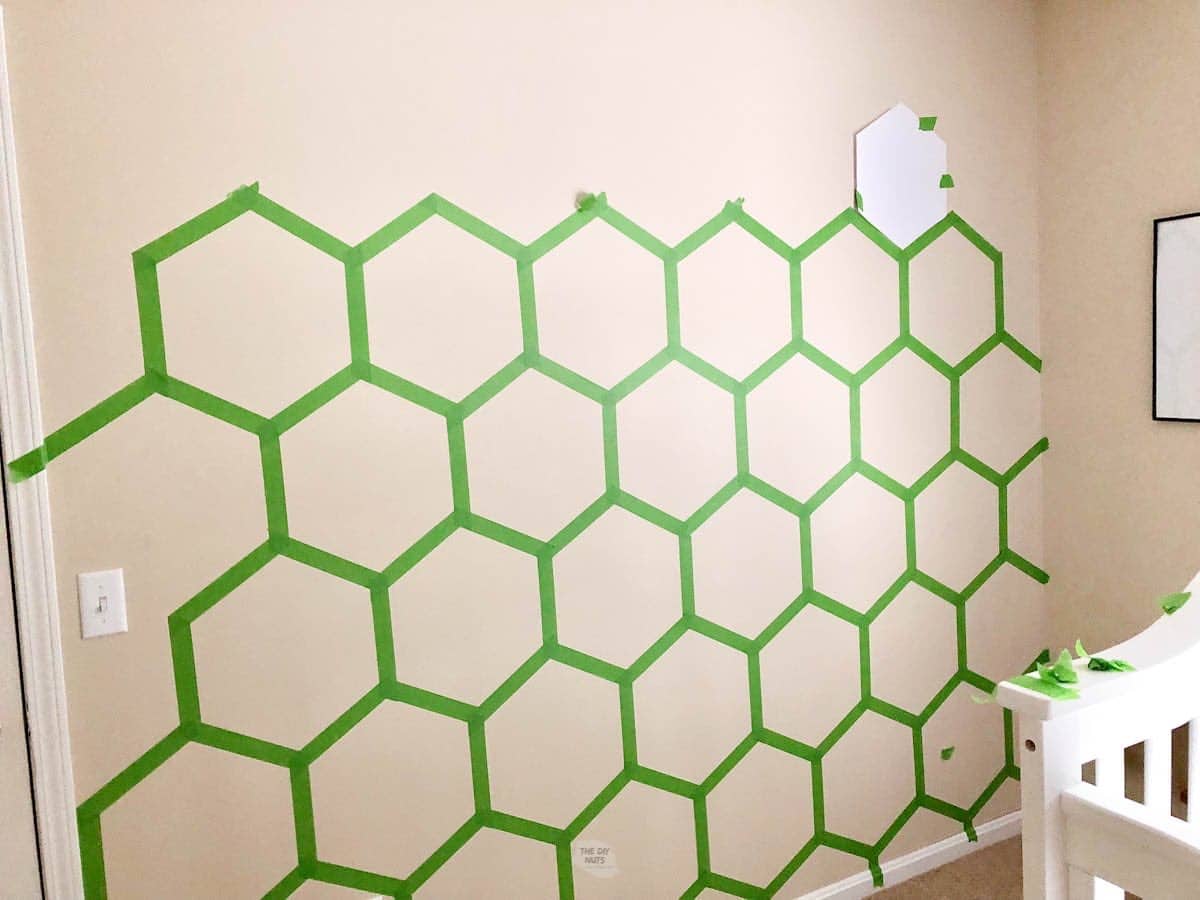
Don’t be shocked if you need to take a break and come back to this. This took me a few hours to complete, but it was totally worth it.
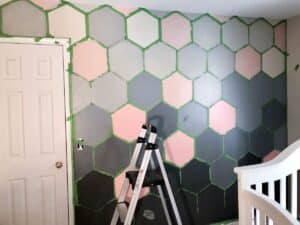
Step 6: Start Painting
Once the taping is all done, you get to start painting your patterned wall.
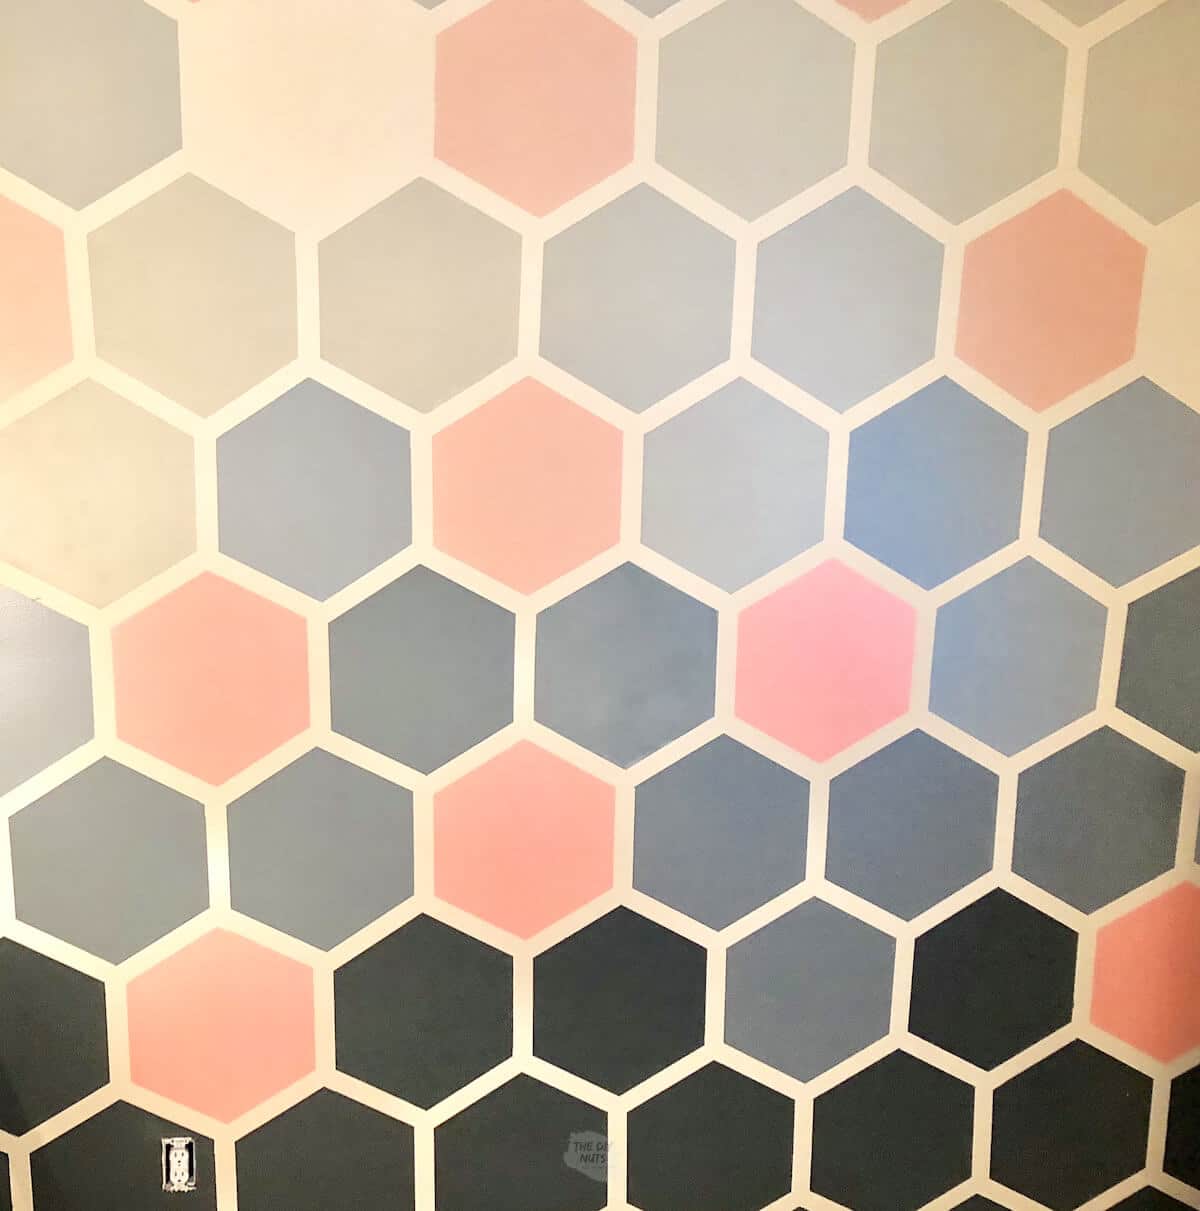
- Use 5 samples of grays from the same paint swatch and 2 samples of a coral pink color or the color of our choice.
- Use a small foam roller to roll on the paint. You can also use small paint tray liners. This will make this DIY project easier.
- You can also store your paintbrushes in gallon-sized plastic bags to keep them fresh, while I went to another color.
You can see our set-up at the bottom of the wall.

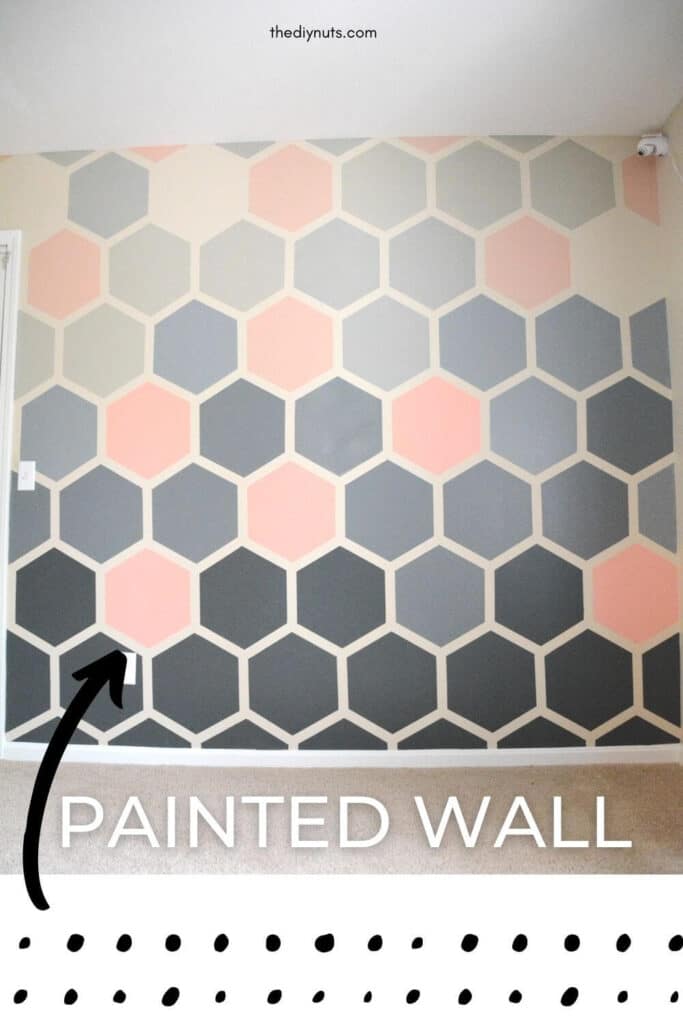
Step 7: Keep Painting Lighter Colors
As you go up the wall, use lighter and lighter colors. You can even leave a few of the spots empty so that the base color of the wall shows through.

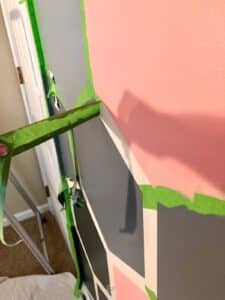
Step 8: Wait For Paint To Dry
This is always the hardest part. I normally only wait until the paint is dry to the touch. You chance having a harder time getting clean lines if you want too long.
Step 9: Carefully Pull The Tape Off
Carefully take off painter’s tape. Use a utility knife near the molding and pull the tape straight out.

Step 10: Remove All Tape and Clean-Up
Continue taking off all the painter’s tape. If there are a few spots that need to be touched up, carefully use a small brush to hide the blemishes you may have.
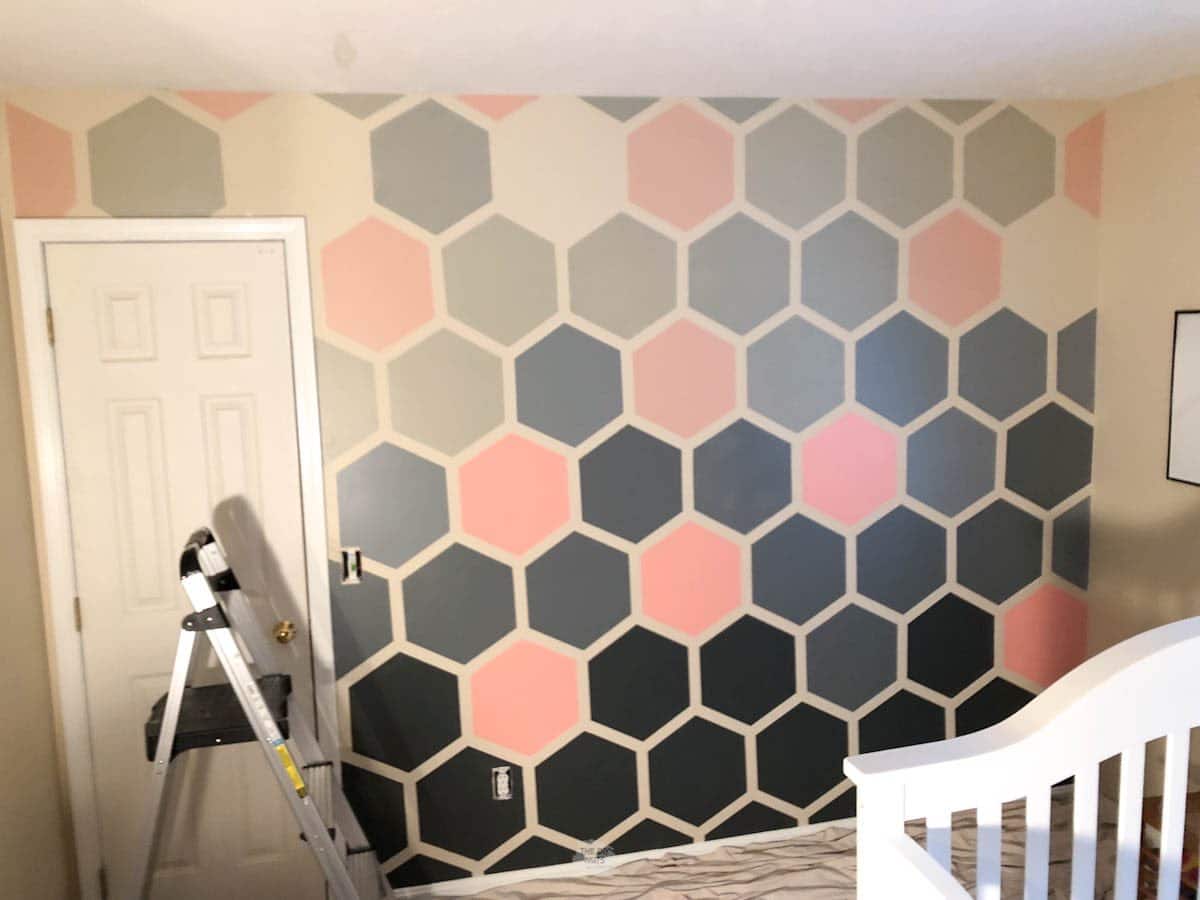
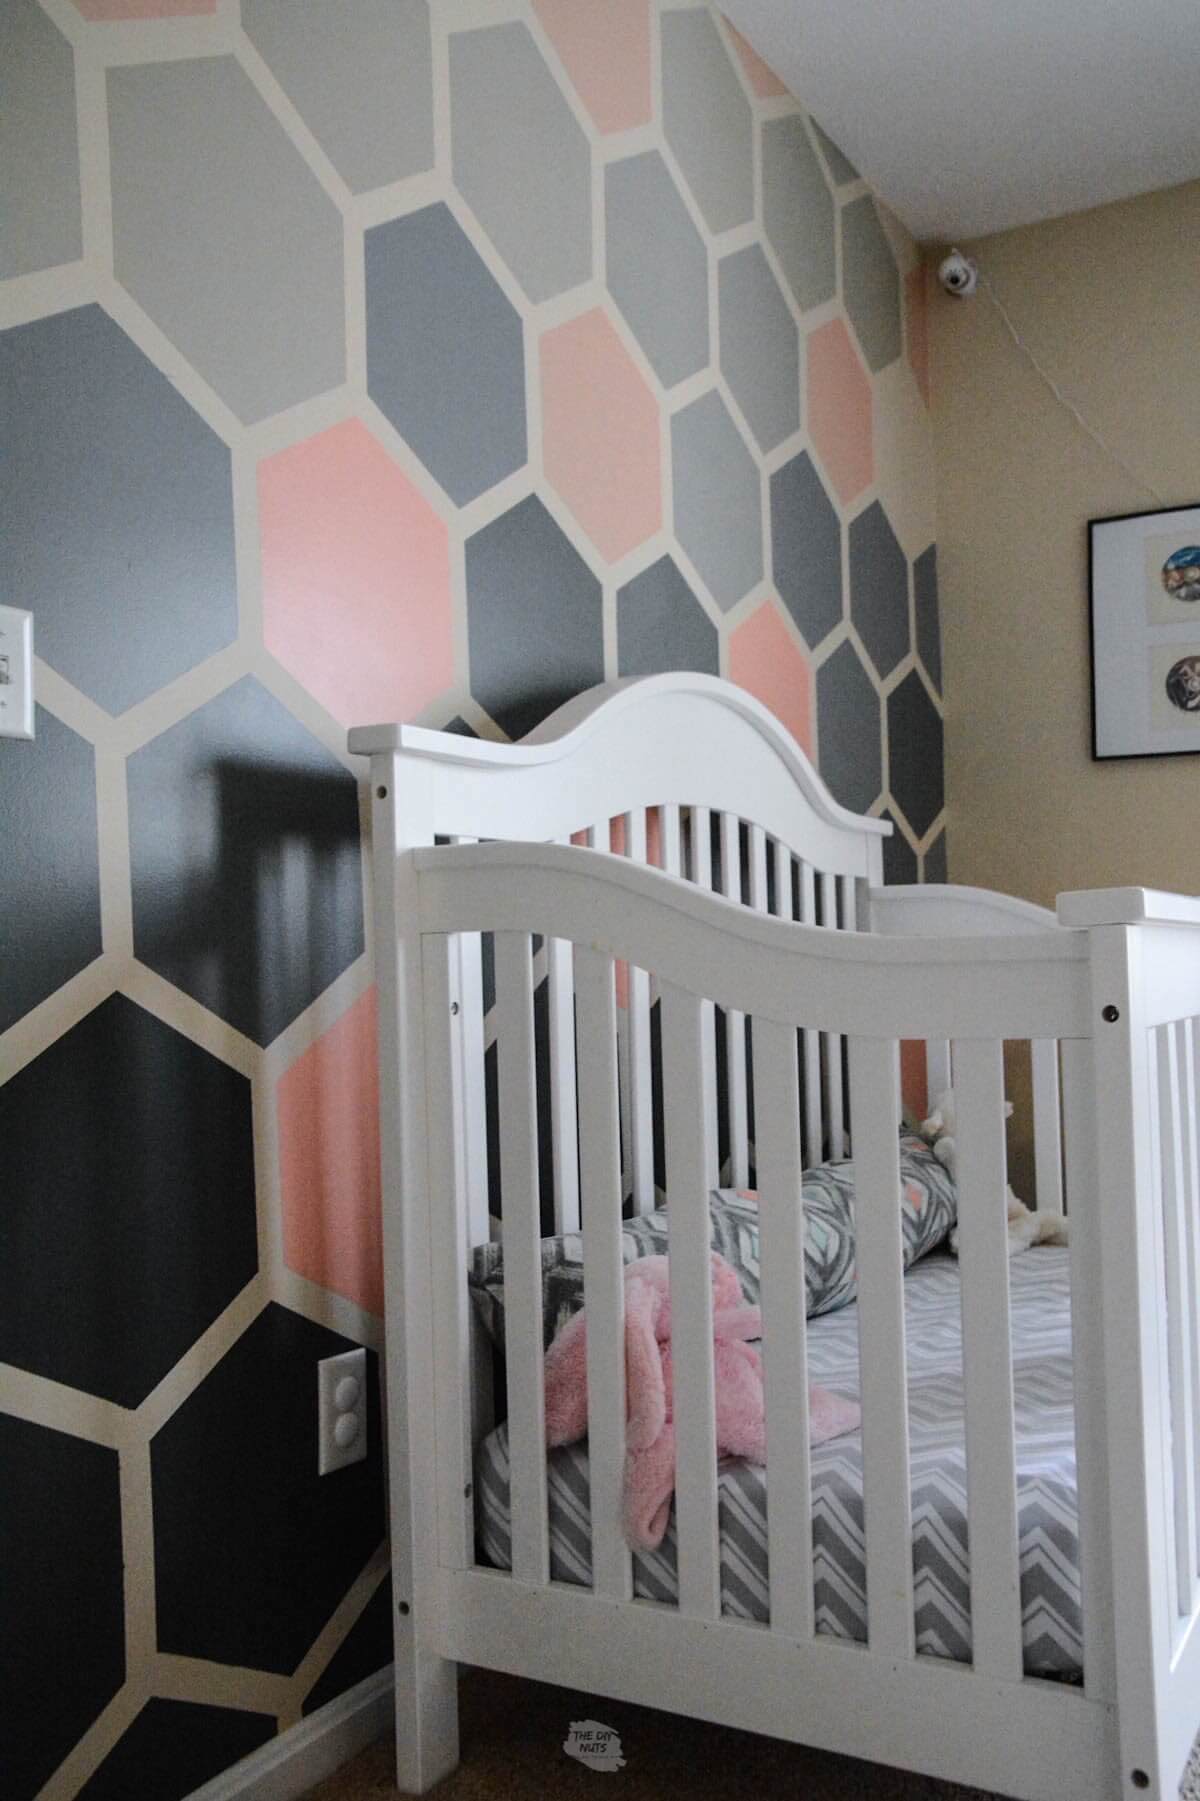
Clean-up! Enjoy your new DIY ombre hexagon wall (or any of these DIY accent wall ideas) and start decorating your new space.
Cue the music, all doubts were left at the door! With patience and hard work, this DIY paint project turned out better than I had expected.
Extra Resource
If you want another perspective on how to create this ombre hexagon wall, feel free to visit Thistlewood Farm post here. They do a great job explaining some of the math behind trying to make your hexagon template.
Other Painted Wall Designs
It is amazing how just some simple taping and painting can really enhance and change a nursery or bedroom to become a special place for your children. You may also want to consider these other accent wall designs.
- Handpaint Brushstrokes
- Stamping
- Stenciling
- Herringbone or Chevron Wall With Painter’s Tape
- Handdrawn Designs Using Paint Markers
- Ombre Wall With Blending Colors
- Neutral Rainbow Design
Also, if you like this accent wall idea here are a few other painted wall designs from some of our DIY friends. Did you know you could paint a shiplap wall?
Geometric Wall Tutorial FAQs
Paint samples are a great way to get a variety of colors while staying on a budget! I even ended up mixing some of the beige base wall colors with some of the paints to get a variety at the top of my design.
By getting different shades from the same paint swatch, you are helping ensure that your ombre wall will look cohesive. I used this same idea to create my chalk paint samples to give a dresser an ombre look.
Both designs use hexagons, however, a honeycomb design normally has a flat side on the bottom and top. You can see in our hexagon wall that the hexagons are turned so that a point is on the bottom.
Either design can be created following our basic steps. You just have to make the decision when you place your first hexagon on the wall.
No, you can choose to design your painted wall however you want. We chose to leave a few empty spaces for a creative look. The design would still work if you had more or less negative space.
We do not recommend using masking tape to create DIY painted accent walls. Using high-quality painter’s tape meant for multi-surfaces is your best option to get clean lines and shapes.
My daughter LOVED her painted accent wall and I hope it inspires you to do a DIY painting project for someone you love!
If you like this tutorial, please give it 5 stars below 🤩🤩🤩🤩🤩. Your support helps us continue to provide unique and budget-friendly DIYs.
Hexagon Wall Painting (Ombré Accent Wall)
Equipment
- Pair of scissors
- Utility Knife
- Drop cloth
Supplies
- Paint samples in variety of colors
- 1″ Painter’s tape
- Paper or Cardboard
Instructions
- Find the middle of your wall.
- Create a hexagon template out of paper or cardboard. See image for the dimensions of our hexagon.

- Tape hexagon template int he middle of wall and trace the outside with 1" painter's tape.

- Use your fingernail, small clean foam roller or old credit card to help push the tape completely on the wall.
- When taping the next hexagon carefully line up the hexagon right on the edge of the other one. Your middle line should be equally coming out of the tip of the hexagon below

- Continue lining up hexagon template and taping around unitl your wall is complete.
- Use a small foam roller to start with darkest color in some hexagons at the bottom.
- Repeat paitning hexagons in the pattern of your choice. Each hexagon will need at least 2 coats of paint.
- Let paint dry.
- Carefully take off painters tape.Use an utilty knife near molding and pull tape straight out.
- Touch any areas that had bleeds.

Notes
- Use your fingernail, old credit card, or foam roller without paint to really press the tape in before you start painting.
- Use a small foam roller to roll on the paint. You can also use small paint tray liners. This will make this DIY project easier.
- Paint samples will help you get a cohesive look. We used 5 gray samples and 2 coral pink colors from the same swatches.
- Make sure you take your time and take breaks as needed.
So clever and beautiful. I am amazed you taped and painted the wall with ombre hexagons.
Happy DIY’ing, Kippi #kippiathome found your post in the group this morning!
Thanks for visiting my site. The project just took patience, but was totally worth it!
I love it! It definitely gives the room personality. I also appreciate how you provide detailed, step-by-step instructions with accompanying photos for each step.
Thank you for visiting my site. I am glad you liked the tutorial on how you could make a DIY Ombre Hexagon Wall.
Love this wall! Great tutorial!
Thanks and thanks for visiting my site! We will continue to learn together!
This is such a neat project, Erin! It turned out beautifully!! Also, the tutorial was really straightforward and super helpful! x
Thank you for visiting The DIY Nuts site! I am glad you liked the project and found the tutorial helpful.
This wall is AMAZING, and I love the direct instructions and steps you laid out in this post. Definitely adding this design in my home as soon as possible – thanks for posting!
Hi Christine! I love how a geometric shape repeating can really change a space. Good luck with your DIY painted accent wall!
This is such a wonderful tutorial! Beautiful wall!
Thank you for visiting our site and for the kind words.
Wow what a tedious job but it turned out beautiful! It’s such a unique idea…perfect for that space! I really enjoy your color choices as well!
-Madi xo | http://www.everydaywithmadirae.com
OMG when I saw hexago wall I thought little tiles!! ?? I was like she must have the patience of a saint!! Lol. But I love this! How cute for an accent wall.
This wall is BEAUTIFUL! I can’t believe it was a DIY!
Amanda, Thank you for the kind words!
I love this! It looks fantastic. You are very talented.
Thank you for visiting The DIY Nuts site and your kind words!
This accent wall is amazing! I don’t know if I would have the patience myself, but I will look at yours with envy <3
Thank you for visiting The Diy Nuts site! I am glad you like the look of ours!
Stunning! And totally love the color pallette!
This is so beautiful! I love that it brings so much personality to your wall!
This is gorgeous! Love it 🙂 Such a different, funky look for a nursery.
Very pretty and creative! Looks like an exotic honeycomb. ?Thanks for sharing this awesome project! ?
Hi! Thanks for the kind words! I love the description of an EXOTIC HONEYCOMB!
This diy hexagon wall looks beautiful! I love the color scheme.
Thanks for the kind words. I love when others love my DIY projects!
I absolutely love this! I have a study/guest room that we are looking to attack soon and this could be perfect for one of the walls! Thank you so much for the inspiration!
Thanks Rachael! This is the perfect accent wall for a guest room or study. You can pick any colors you want!
What a beautiful wall! I wonder if it would work for a staircase wall….. Probably more trouble than it’s worth, but it’s got my gears turning!
I think you could do it as an accent wall over a staircase. You would just have to find the middle spot and put a full hexagon there. Good luck with your painted accent wall!
This is so cute! I love gaining new and creative ideas for my home!
Hi! I am glad we are inspiring your creative side! DIY home projects are a great way to add creativity to your life and home.
So fun! Great, detailed tutorial!
Karen, Thanks for visiting our site. I am glad you like the detailed tutorial on how to create a DIY painted accent wall!
Wow! That is amazing! It turned out beautiful! Love all of your projects ?
Hi Myrtle! Thanks for the kind words. It is so nice to have DIY friends who love projects as much as I do!
Came across this when looking for something to do for my first baby girls nursery room. I love this idea – I wanted to do wall paper but I’m learning that even for a single wall it gets expensive (at least the ones I like were). I have a couple questions though before doing everything.
1.How did you decide on the color pattern for everything?
2. If I have light grey walls would suggest painting white beforehand?
3. if #2 is no, would you suggest changing out the grey sections for a different color?
Hi Sam. Yes, certain types of wallpaper can be pretty pricey for an accent wall. I honestly found a color swatch that I liked for the pink hexagons. I knew I wanted a more coral pink than pure “princess” pink. I then just bought a few samples from that swatch.
I would think you still could get away with using a light gray background. In all honesty, I was too lazy to paint over my beige that was there. Your wall will not have as much contrast, but if the gray is light enough and you pick some darker grays for the hexagons I would think it will still work. You can use your light gray base color to mix into the other paints to tie it all together. I mixed my beige color to lighten some of the pink hexagons at the top.
As far as how to plan on the wall, once it is taped, you could paint a little of each color or mark each one for planning purposes. I just did not do this scientifically and just tried to create balance as I was going up the wall without just paint straight across. Some people might need more planning, but I was able to eyeball what I thought would work.
Good luck with your accent wall and congrats!