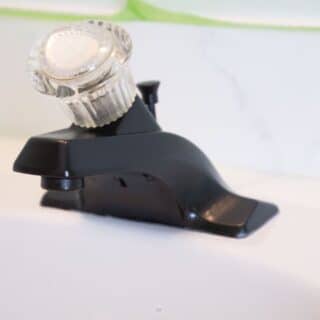
Can You Spray Paint A Bathroom Faucet?
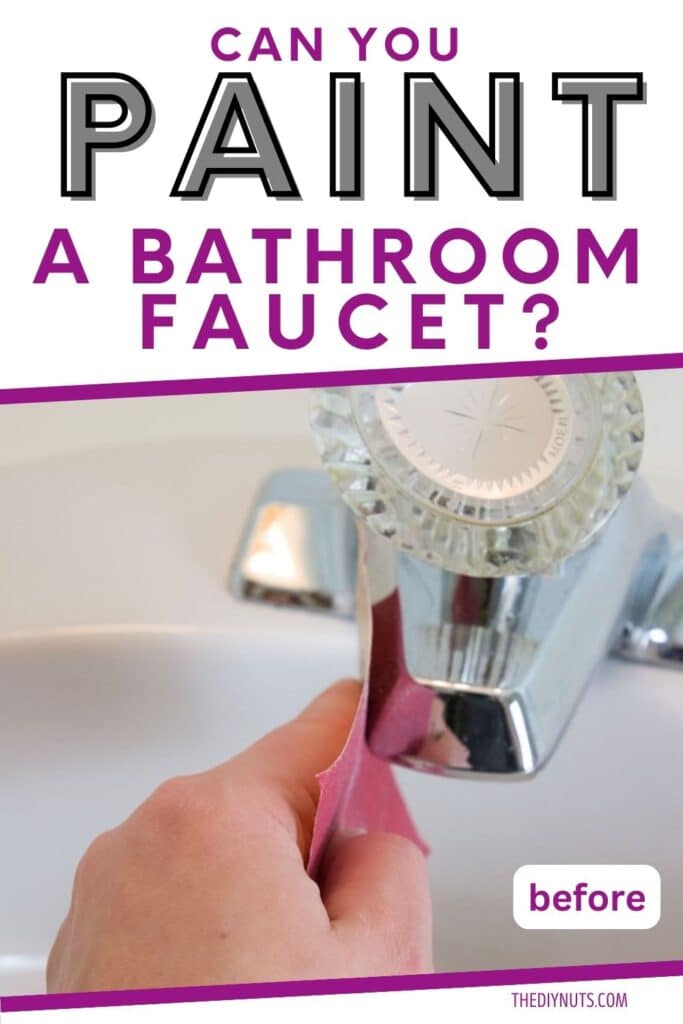
Do you hate the color of your faucet but don’t want the hassle of replacing it? Save yourself the hassle and some money by spray painting your bathroom fixtures to fit our current style.
*Disclosure: I only recommend products I would use myself and all opinions expressed here are our own. This post may contain affiliate links that at no additional cost to you, I may earn a small commission. Read our full privacy policy.
Here is our detailed real-life tutorial to help you save money by painting your bathroom fixtures and other accessories. Learn how we saved over $100 by painting our silver faucet matte black to match our bathroom decor.
Our DIY Bathroom Makeover Ideas
We had all the plans in the world to buy a new black faucet and replace it in our cheap basement bathroom makeover. But after having such success with painting a laminate countertop and DIY painted bathroom cabinets, we knew we had to try to spray paint the faucet, too.
Should you paint your bathroom fixtures?
This bathroom faucet isn’t used terribly much. Therefore, painting it was a great solution. Anytime you paint something that isn’t always meant to be painted (like glass tile), you should assume that you will have to replace it sometime in the future.
But hopefully, you can get a few good years out of your paint project before that time comes. You can see all of the easy bathroom remodel projects we did in this space.
📌 Featured Comment
“This tutorial is exactly what I was looking for. I can’t wait to try it!!”
Carol
Recommended Supplies
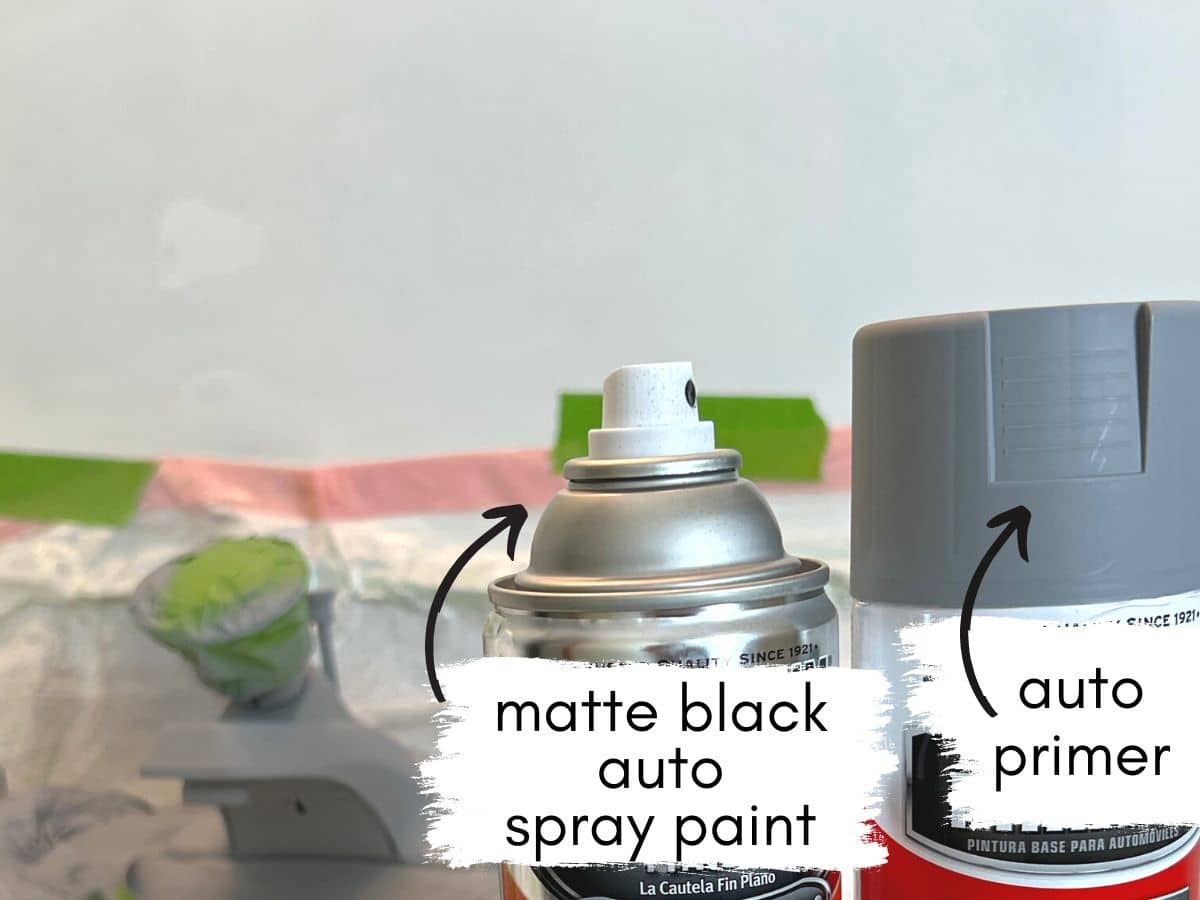
- Automotive Primer: our local hardware had the one with filler but normal automotive primer will work just fine.
- Matte Black Automotive Paint or Universal Black Paint in Satin
- Deglosser
- 220 Sandpaper
- Plastic Sheeting or Plastic Garbage Bags
- Painter’s Tape: We have had great success with multi-surface tape for things like painted accent wall designs.
- Protective Gear: gloves, goggles or masks
Related DIY>>>You can use similar materials to spray paint your cabinet hardware to match.
How To Spray Paint Bathroom Faucets
Before You Begin
Make sure to take proper safety precautions and plan to spray paint when you can get out of your house for a little. It will be smelly.
Step 1: Clean Your Fixtures or Faucet
You need your sink to be as clean as possible, that includes getting rid of any limescale on the faucet spout.
Cleaning Tip: To help get rid of limescale, consider soaking the end of your faucet with a baggie filled with diluted white vinegar. In a few minutes, you will see if loosen the particle. Just be careful not to leave it on too long as it can chip the current finish.
Step 2: Lightly Sand All The Surfaces
Use 220 sandpaper to scuff up the metal surface. This step will help your primer adhere. Wipe away dust with a rag or tack cloth.
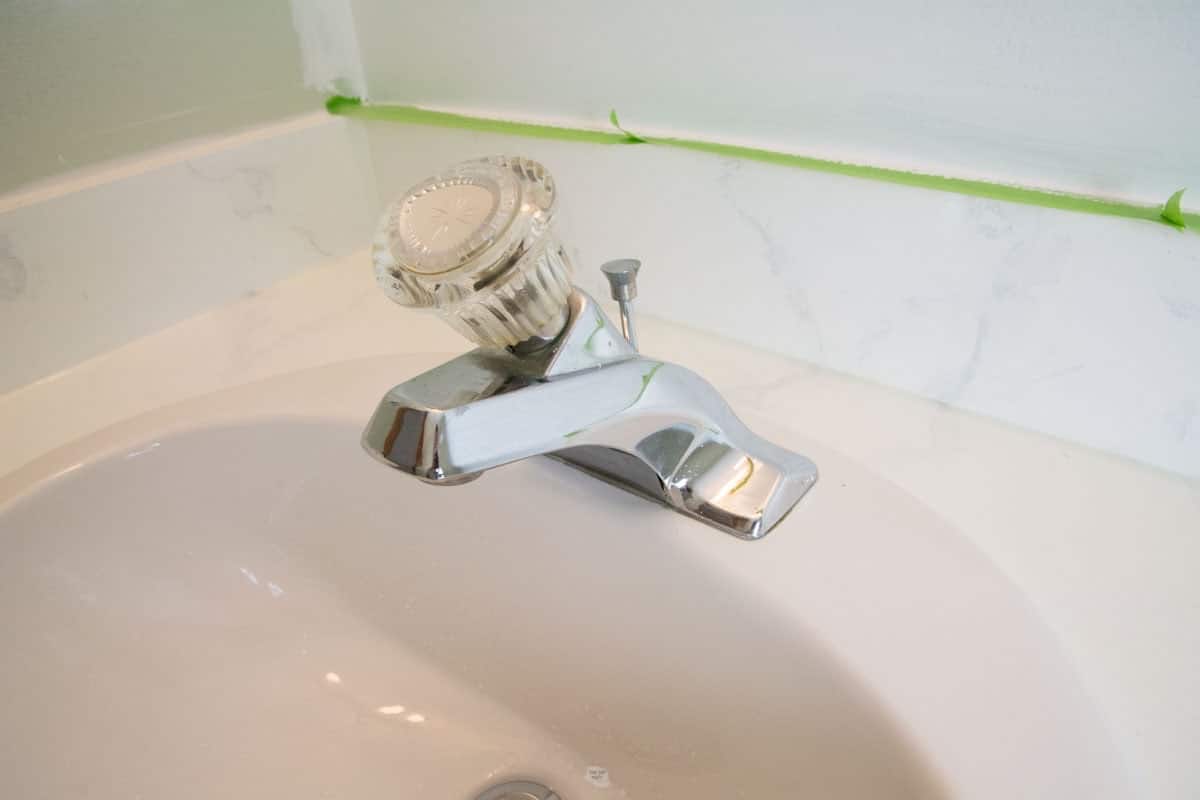
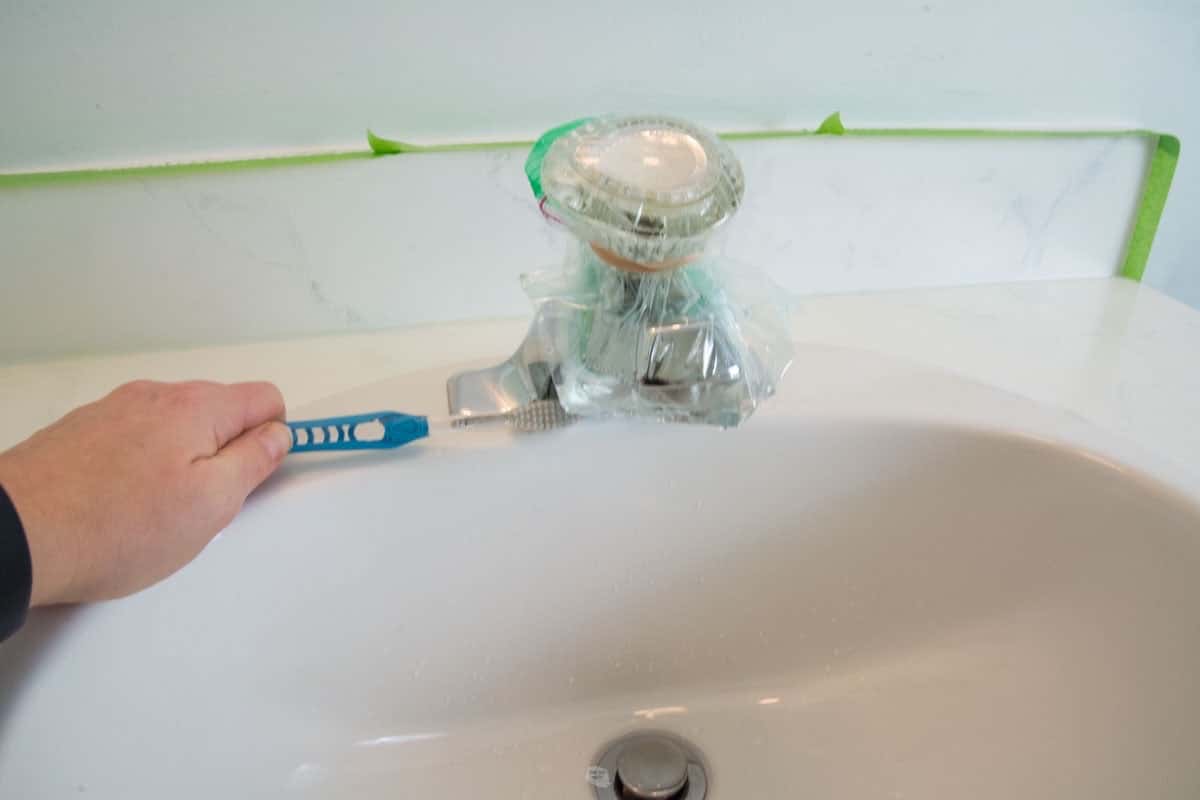
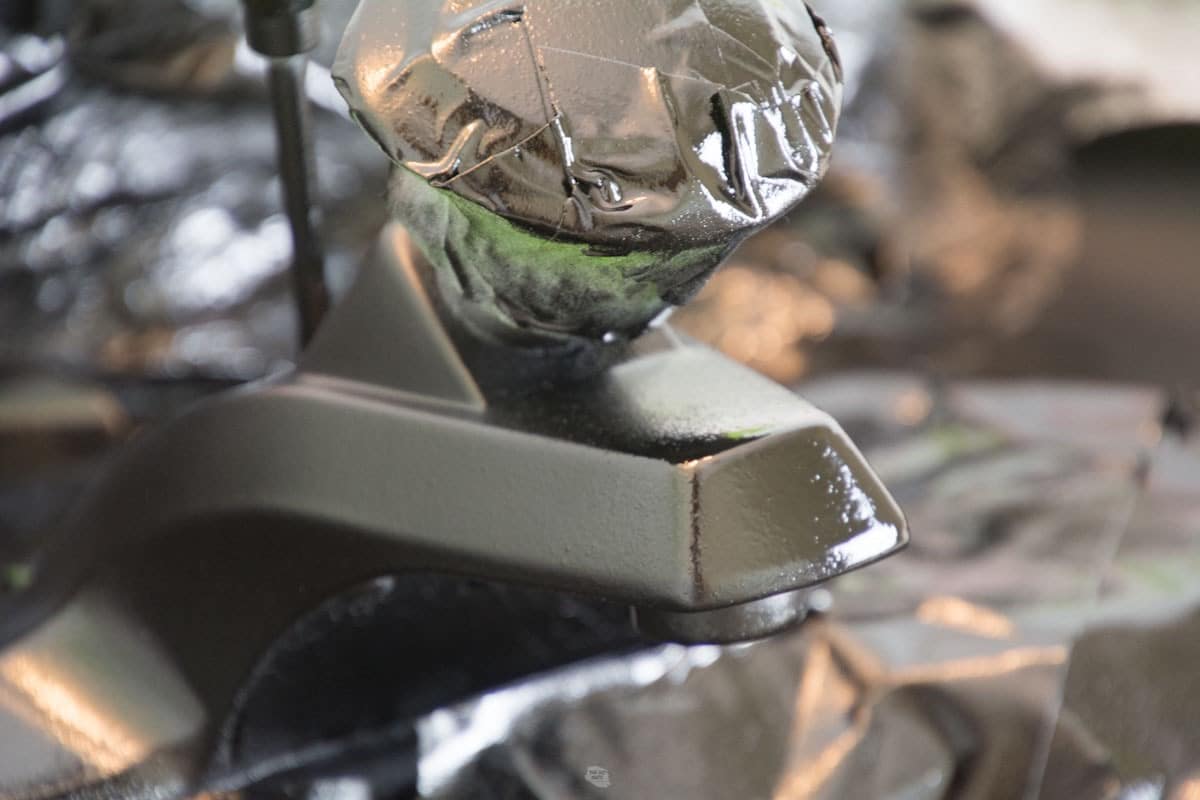
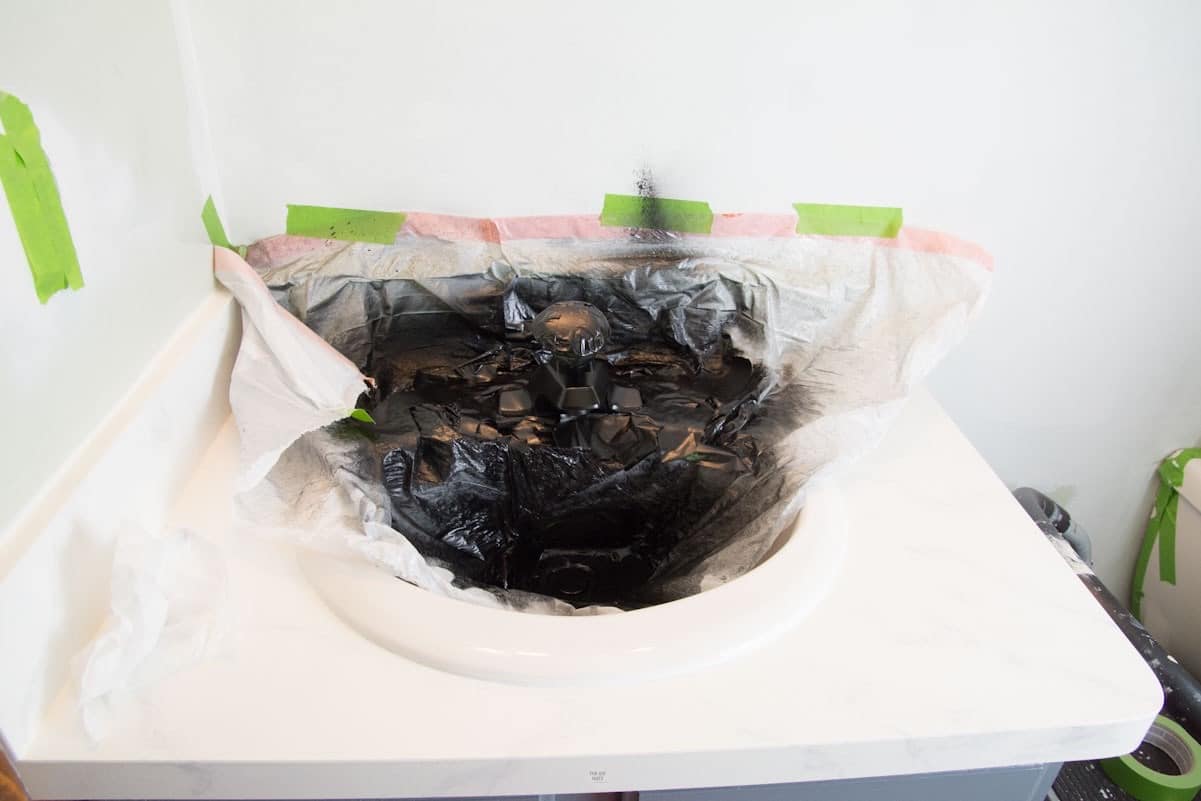
Step 3: Prep Areas You Don’t Want To Be Painted
You could remove the sink faucet to spray paint. However, the hassle of doing that didn’t seem worth it to us. This step is actually the longest.
Tips For Prepping Your Bathroom
- Make sure that the area around your sink is completely dry. Your painter’s tape will not stick if it is not completely dry. You can even use a blow dryer to help dry the spots that still may have moisture.
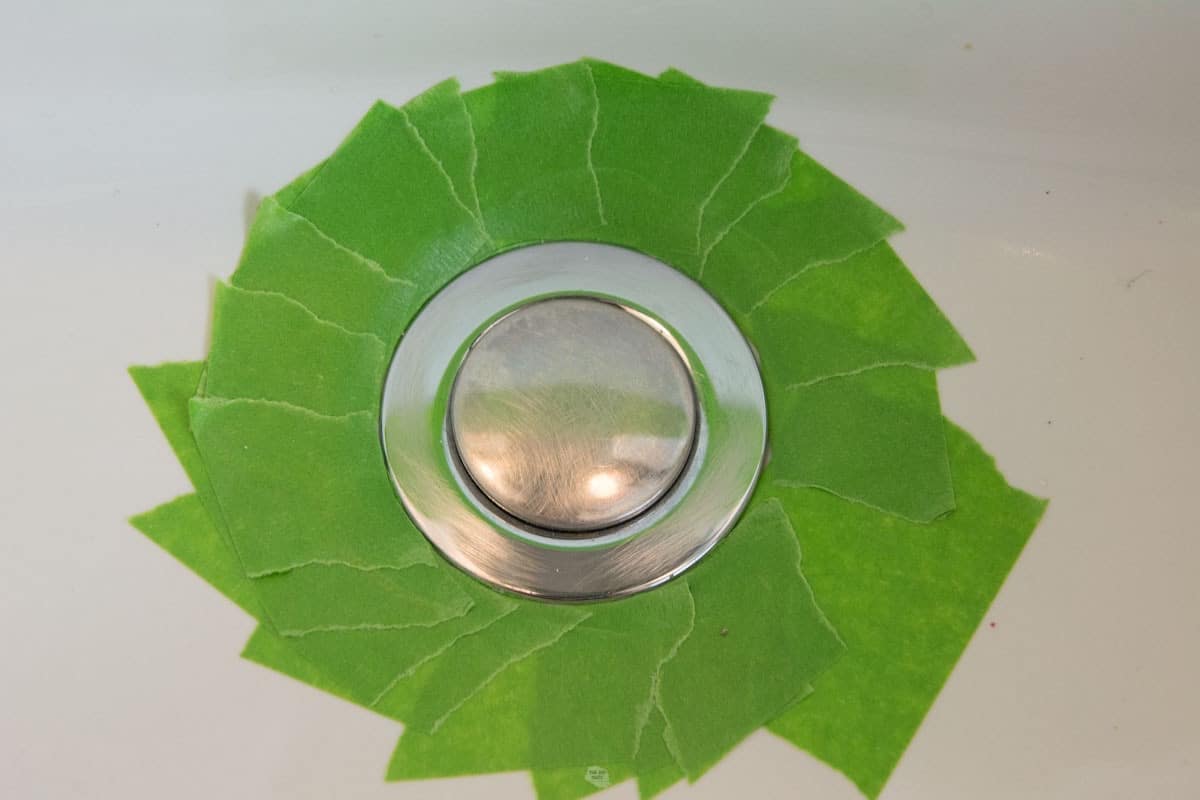
- You need to tape around all the fixtures. Use small pieces of tape for the drain circle. Using your fingernail also to push down the tape in the crevices.
- Add plastic sheeting to cover other areas from overspray. We just used ripped plastic bags as a budget-friendly option.
Why did we not cover more areas with plastic sheeting?
We only need to cover the painted bathroom cabinet and newly painted laminate counters.
Note that we did not cover the walls completely because we would be painting them after this bathroom DIY project. After removing the gross carpet and carpet glue, the bathroom floors were also just concrete. Stay tuned for how we finish this space.

Step 4: Wipe Down With A Deglosser
No matter what we are painting we always wipe down with a deglosser like Krud Kutter. Make sure to wear gloves for this step.

Step 4: Use Light Coats Of Automotive Primer
Read the can directions for the specific paints you are thinking of using. We chose to do two light layers of the primer to ensure we cover all angles.
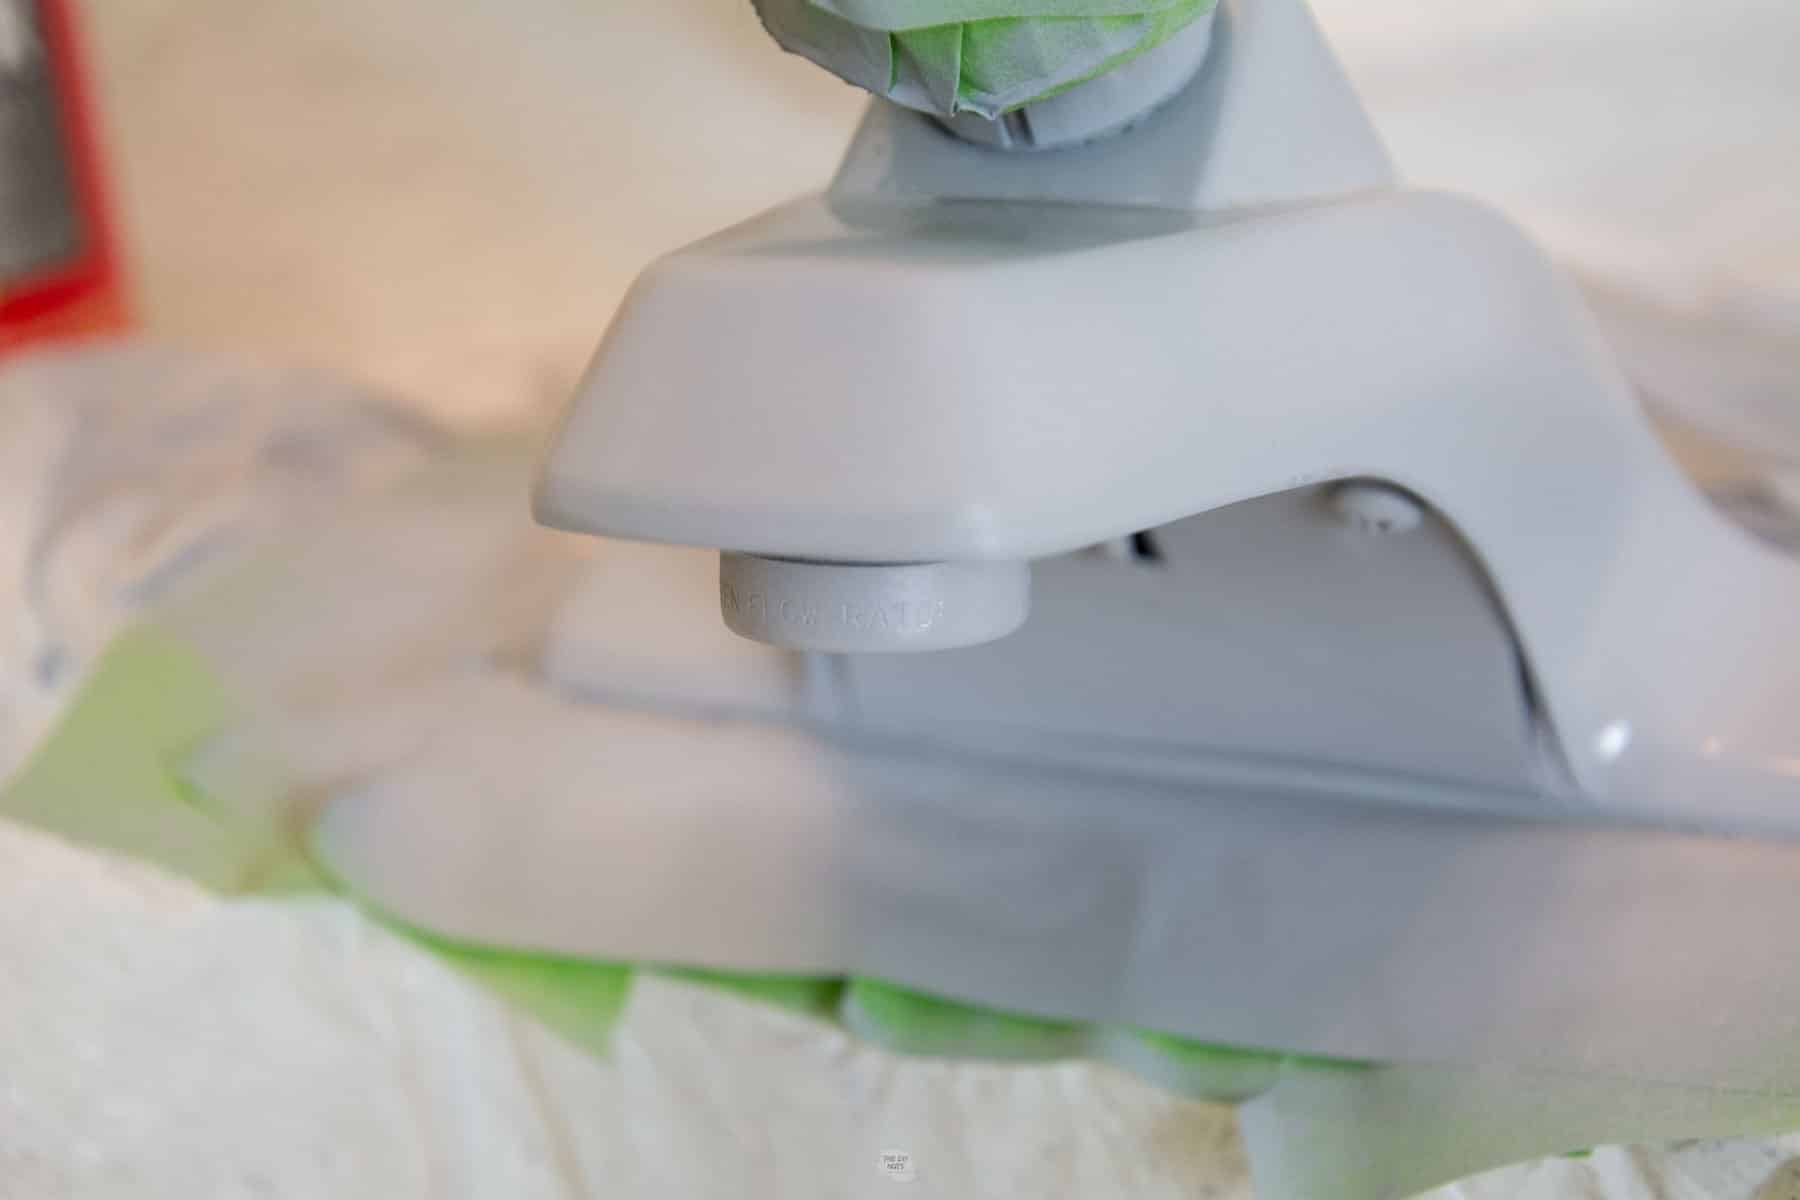
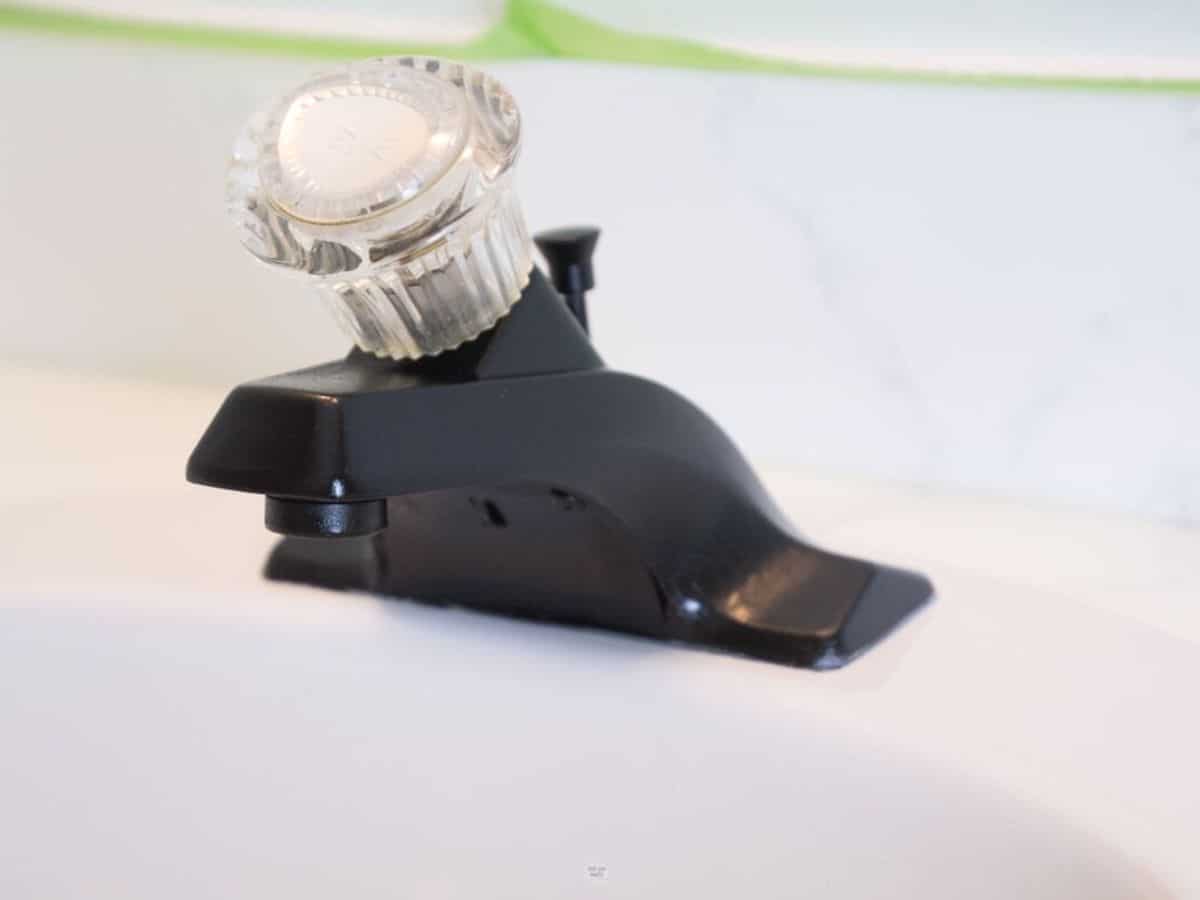
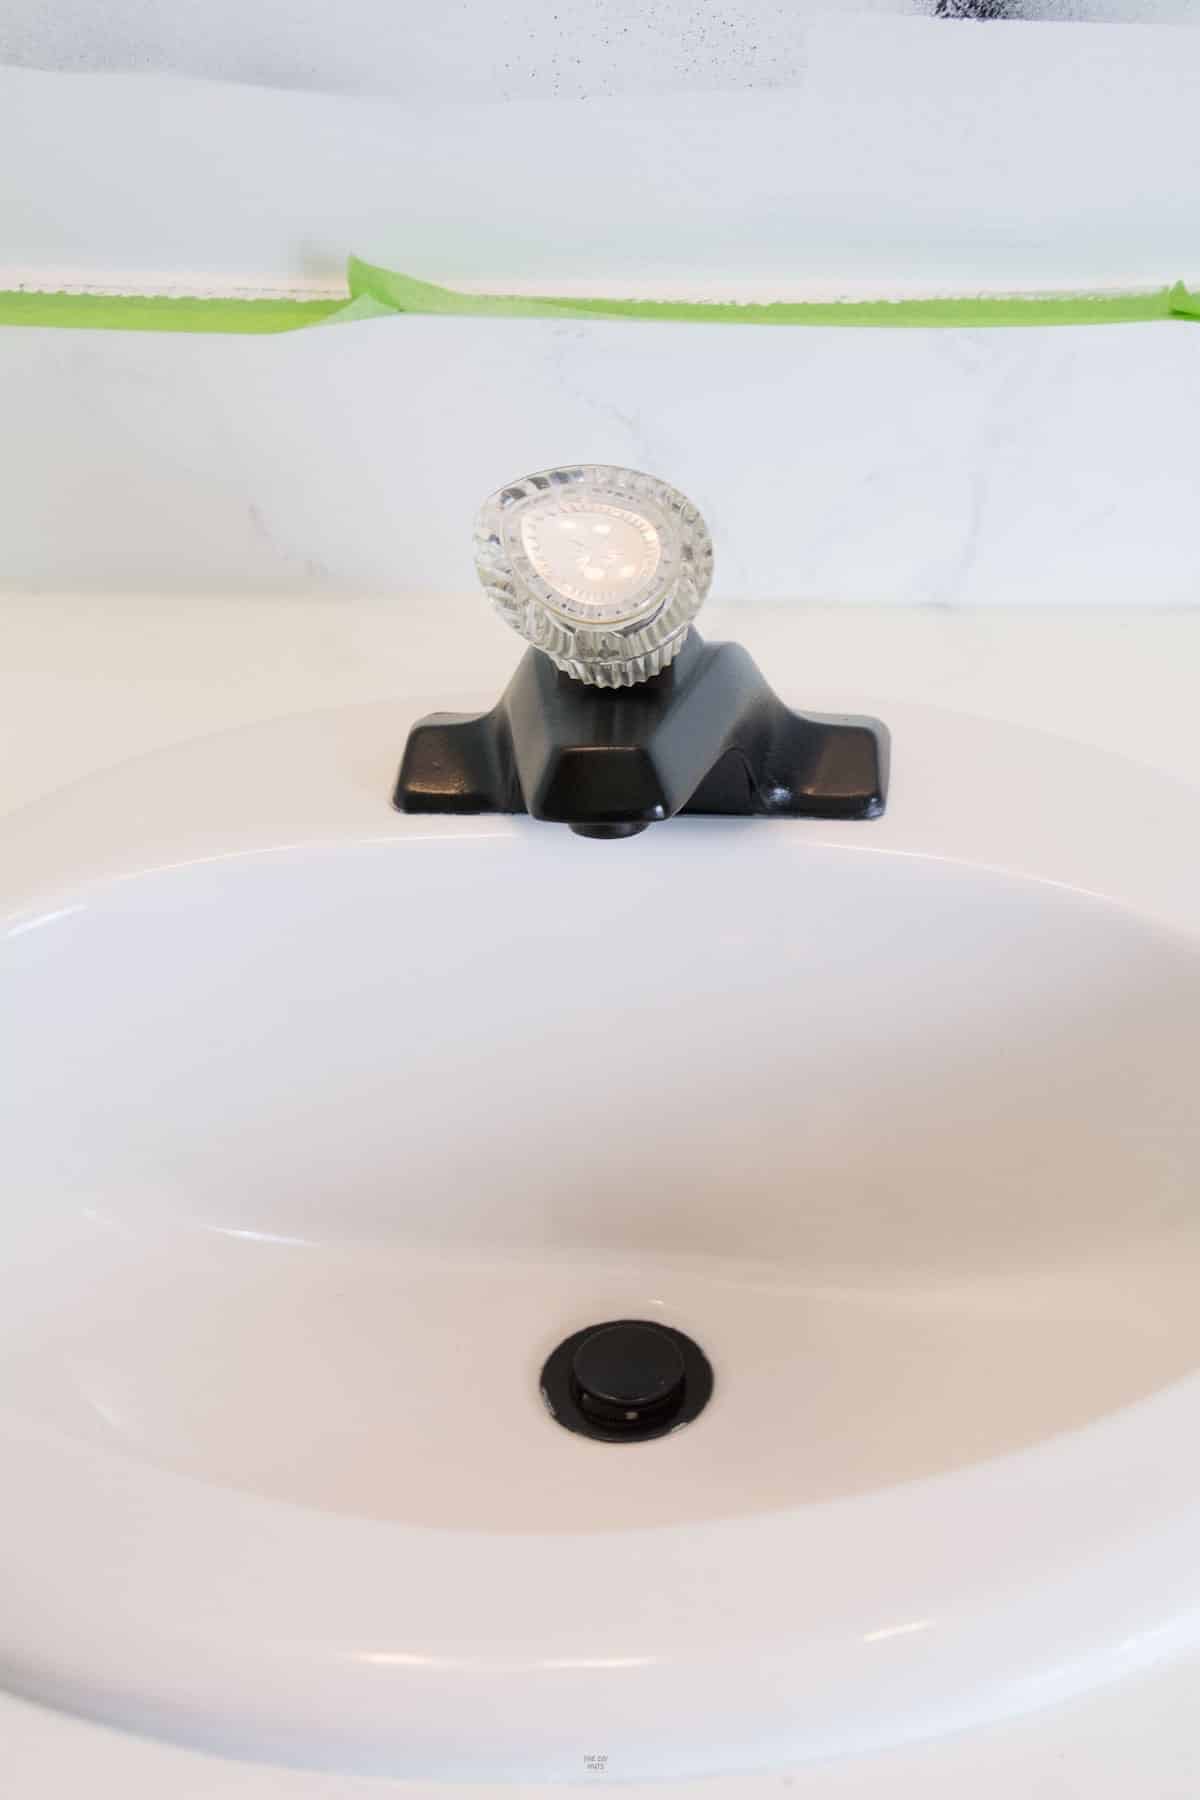
Step 5: Spray 3 Light Coats Of Black Spray Paint
If you want a completely matte finish, then the automotive black paint should work for you. The reason some people suggest this paint is that it is water-resistant and that makes sense for a faucet.
However, satin oil-based spray paint like Rustoluem should also work. We were not liking the complete finish of the black auto paint, so I ended up adding an extra coat of satin on top.
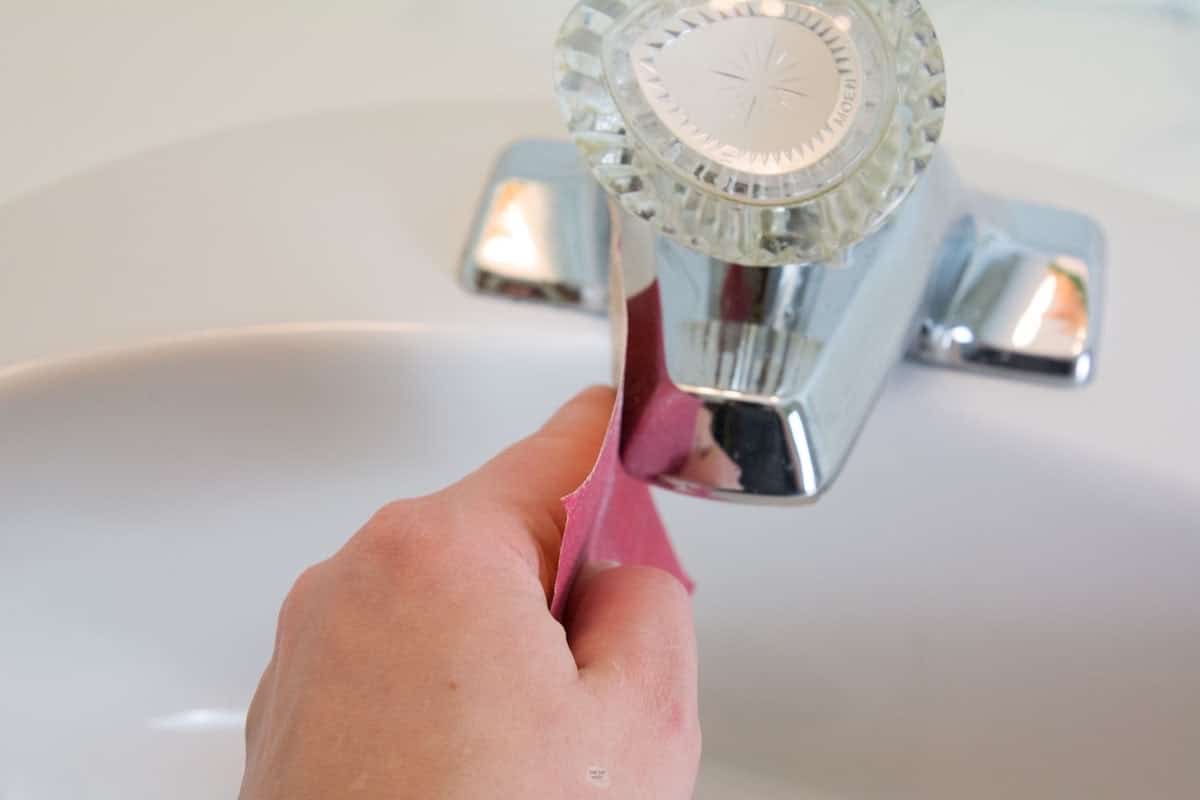
Step 6: Remove All Tape Carefully
After about 30 minutes of your last coat, remove your sheeting and cut the edges of the paint with a sharp razor blade before removing the painter’s tape. By carefully checking the areas before the paint fully cures you can clean up bleeds or any overspray.
Step 7: Let Paint Cure
Wait as long as possible before using your painted sink faucet. You can look up the specific cure times for the spray paint you chose to use.
Optional: Fix Any Spots
The sink drain was the hardest area to get clean lines and I accidentally scraped it with a razor blade when trying to remove the paint. To fix this, I sprayed some black paint in a cup and used a paintbrush to touch up that area.
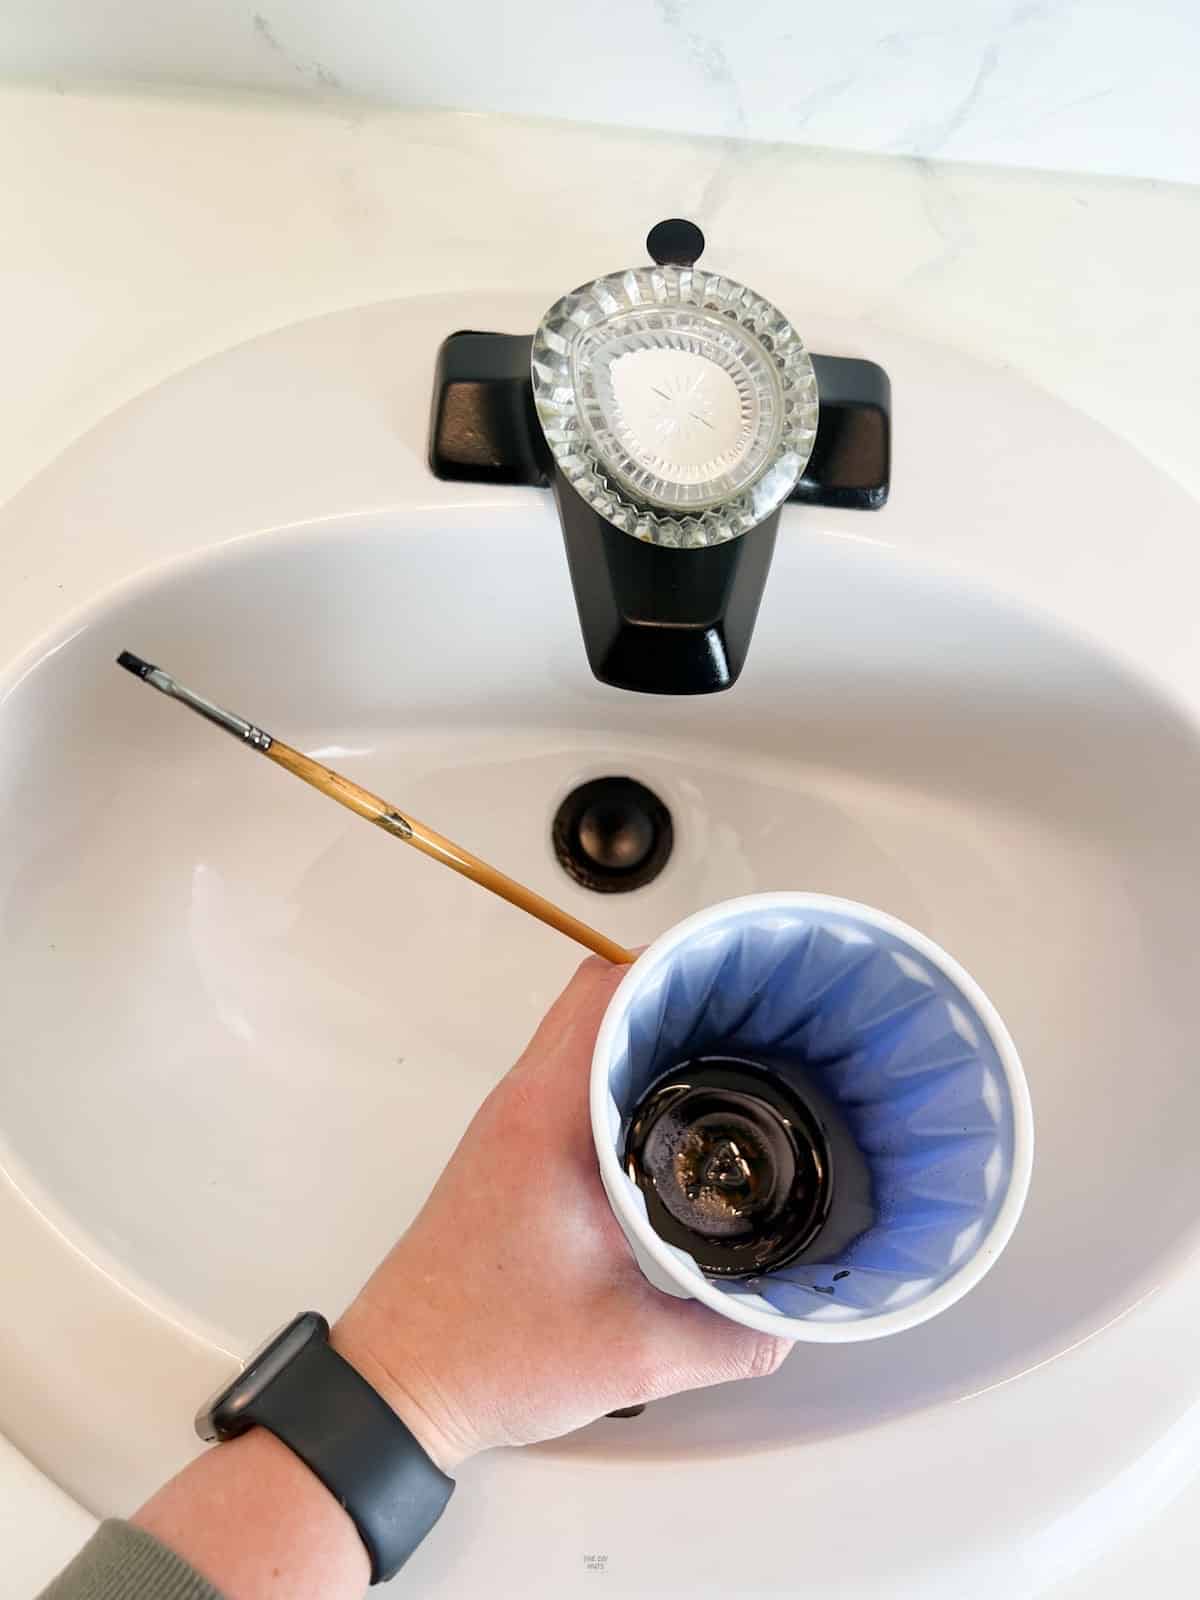
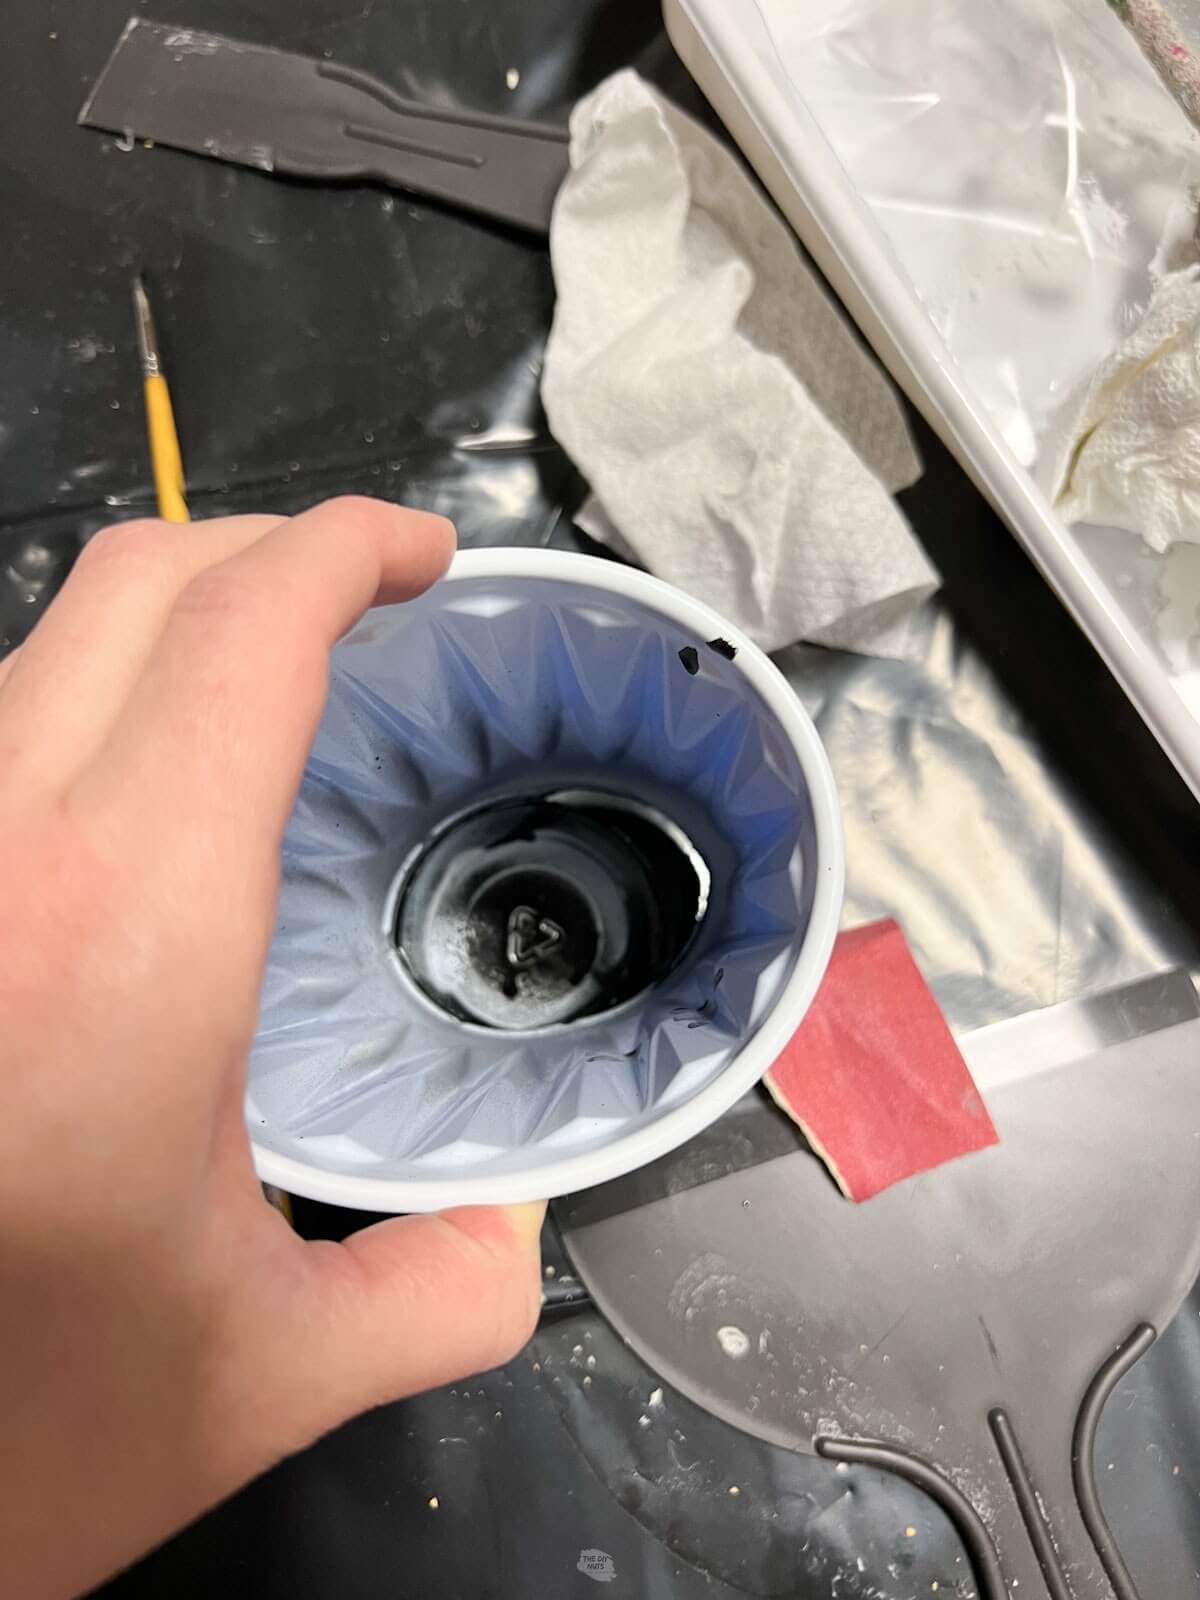
Just note that should learn from our mistake and use a glass or even paper plate. Our spray paint ate away at the plastic cup. We avoided the leaky disaster though.
How To Clean Painted Fixtures
Your bathroom fixtures will last longer if you are careful when cleaning them. Try to limit the use of harsh chemicals on your painted faucets. We simply wipe ours down and only use cleaner when absolutely necessary.
Expert Tips
- If doing other DIY painting projects, spray paint the faucet first.
- Make sure your sink and faucet are completely dry before beginning. Any moisture will cause the spray paint to crackle or bubble.
- Follow the manufacturer’s instructions for the spray paint and primer you chose to use.
- Automotive spray primer is a must to help prep the faucet.
- Use your fingernail to help scrape and clean up any paint bleeds. The porcelain sink surface will allow you to clean any paint if you catch it early enough.
- Just like for any spray painting project, make sure to use spray paint in light coats and take your time.
- Try to ventilate the area the best you can. For our bathroom basement that meant using a fan outside with the window open to help circulate fresh air.
What would I have done differently?
I ended up not liking the look of the black matte automotive paint. It just was too matte, so I added satin on top.
I should have just used the automotive primer than satin black paint. However, I feel like by adding the automotive paint I was able to extra waterproof the project.
We also had some spots that had bubbled up on the old finish. These were difficult to get completely smooth. Before painting bathroom faucets, you should double-check the current surface. We should have tried to make ours even smoother by sanding a little more.

Now we continue working on this small bathroom remodel. You can see how we used large peel-and-stick paint samples to help with our next painting step and what our finished black painted vanity looks like.
Tutorial FAQs
When applied to a clean and scuffed-up surface the primer will adhere better to the metal surface. Because bathroom fixtures are touched a lot, you want an extra layer of adhesion even if your spray paint says it has a primer built-in.
The most important part when spray painting metal is to use a bonding primer meant for metal. We chose to use automotive primer for extra durability. You can then use automotive spray paint or regular oil-based spray paint in the finish and color of your choice.
No, you can use any metallic spray paint like oil-rubbed bronze or even rose gold after you use the primer. Don’t skimp on proper prep and priming though no matter what color choice you go with.
Yes, using an automotive primer and spray paint on properly cleaned metal fixtures should work well.
We used a similar method to spray paint the toilet paper roll holder as well for this space.
Follow us on Pinterest, YouTube or Facebook for more DIY inspiration!
Related DIY Projects
- How To Paint Cabinet Hardware
- Spray Paint Marbling Tutorial: Fun DIY Flower Pots
- How To Chose The Best Bathroom Cabinet Paint
- Trendy Black Cabinet Hardware Ideas That Won’t Break The Bank
If you like this tutorial, please give it 5 stars below 🤩🤩🤩🤩🤩. Your support helps us continue to provide unique and budget-friendly DIYs.
How To Spray Paint A Bathroom Faucet
Equipment
- Plastic Bags Or Sheeting
- Rag
- 220 Sandpaper
- Protective Gear safety glasses, gloves or masks
Supplies
- Spray Paint Automotive Matte Black Or Universal Satin
- Automotive Primer Spray Paint
- Deglosser
- Painter's Tape
Instructions
Before You Begin
- Make sure to take proper safety precautions and plan to spray paint when you can get out of your house for a little. It will be smelly.
Spray Painting Faucet
- Clean your faucet. That includes getting rid of any limescale on the faucet spout.
- Use 220 sandpaper to scuff up the metal surface. This step will help your primer adhere. Wipe away dust with a rag or tack cloth.
- Prep areas you do not want to be painted. Cover the counters, cabinets and walls with plastic. Use painter's tape around the edges of the faucet and drain.
- Wipe down with a deglosser on a rag.
- Set up a spray painting station. Just make sure you are able to fully spray all surfaces of the hardware.
- Cover all surfaces of your faucet with the bonding primer. Let dry. Add a second coat if necessary.
- Use spray paint in large sweeping motions. Let first coat fully dry.
- Repeat for 2 more coats making sure you fully are covering the faucet. Follow the spray paint recommendations on the can for dry time.
- After about 30 minutes of your last coat, remove your sheeting and cut the edges of the paint with a sharp razor blade before removing the painter’s tape
- Let your painted faucet and drain cure as long as possible before using.
Notes
- Make sure that the area around your sink is completely dry. Your painter’s tape will not stick if it is not completely dry. You can even use a blow dryer to help dry the spots that still may have moisture.
- Use your fingernail also to push down the tape in the crevices.
- Automotive matte black has a little texture when sprayed and is very matte. Universal satin will have a little shine to it, but not too much.
- To fix any blemishes, spray some black paint in a cup or paper plate and use a paintbrush to touch up that area.
This tutorial is exactly what I was looking for. I can’t wait to try it!!
Hi Carol. Good luck with your faucet painting. Make sure to take proper safety precautions. Let us know how it goes!
Loving your website and can’t wait to spray paint my faucet as well. Do you think the automotive primer is necessary? Since the Rusteoleum says primer and paint in one. Thanks!!
For this particular project, yes I would say that you want to use the automotive primer to really ensure proper adhesion. My guess is that it will probably look okay if you don’t, but won’t last nearly as long without the primer. Good luck with your DIY faucet project!
Good info
Easy to follow!
Thanks for the post👍
I was looking for a process to again spray paint 2 gold soap holders in my powder room. I had done this in previous remodel but did not last. This process with the automotive primer is EXACTLY what I was looking for, THANKS for the inspiration. I was going to replace but the newer ones are so cheaply made and mine are original to the house.
Hi Debi! Yes the automotive primer makes the paint job last. Good luck with your DIY projects.